Showing posts with label leather/suede. Show all posts

Thursday, 24 April 2014

An introduction to whipped and threaded bead stitches on stitched leather cord


As I promised, here's a closer look on the stitches I used for the 'candy berry' bracelet in yesterday's post. (Candy berry is short for opaque berry pearl matte beads on nappa in the colour candy.) This isn't a "real" tutorial, but I still hope it will be a useful introduction for beaders, jewellery makers and needleworkers, including those that aren't familiar with whipped and threaded stitches.

The illustrations are just simple sketches, but as the stitches are simple too, I hope the close-up photos together with the illustrations will still make the patterns clear and easy to understand. Please feel free to ask if you have any questions (in the comment section or privately via e-mail).


Choosing supplies

First, let's say a few words about supplies. For this bracelet I used a flat nappa cord, which is softer than many other leathers. You want a softer material in order to be able to get a needle between the stitches and the leather. Also, the seam shouldn't be too tight for the same reason, but it should be made with a tough thread that won't break when you press a needle under it.

I found my czech 11/0 seed beads to be the perfect size for this, not least since they're about the size of each stitch in the seams, but you might also want to try smaller beads for a more delicate look.

As for beading threads, I'm using my favourite (K. O.), but feel free to substitute with your own favourite. It's a good idea to match the colour of the seam so the thread blends into it, but as you can see I didn't follow my own advice, using a dark purple thread, and as long as it is more or less in tone with the colour of the seam and/or leather it will be rather invisible.

The needle I use is a size 10 ballpointed bead embroidery needle, which have a blunt point. Sharp beading needles are more likely to damage the seam and leather. If you still find that you push the needle into the soft leather, be sure to alter the angle of the needle so it is parallel with the surface of the leather. If that doesn't work, turn the needle so you push it under the seam eye first.


Simple whip stitch

The bracelet above is made using a basic whipe stitch, adding one bead per stitch. The difference between a whip stitch and a threaded stitch is that a whip stitch is worked in the same direction every time (so it goes over and under a seam) while a threaded stitch is sewn back and forth under a seam.


Most of the stitches discussed here only uses one bead per stitch, but do feel free fo add more than one bead if the spacing and bead size allows for it. You can create whole new styles that way.


Filling it up

If you don't like the "zipper look", you can fill in the bead rows afterwards by going through the beads, picking up one bead after each bead you pass through. Remember that the flat cord will curve once used so even if it might look a bit cramped when the leather is lying flat on the beading table, it will look ok once worn as a bracelet.


I haven't tried making more than one whip stitch per stitch in the seam, but that could also work. If adding more than one bead, be sure to adjust the stitch as the beads will be likely to arch or turn the hole up.


Basic threaded stitch

You can also make threaded designs. I don't have a photo of the basic threaded stitch so I'm afraid you'll just have to make due with one of my sketched illustrations. Here, you see the difference between whipped and threaded stitches.


Double threaded stitch

If you want more beads than in the example above, you can make a double threaded stitch by mirroring the first row of stitches. Start as above and then follow the grey thread path below.


Design tip: No one says you need to use the same colour/size/number of beads for every stitch.


Wide threaded stitches

I tried two variations of threaded stitches for parallel seams when making my candy berry bracelet: one filling the space between the seams and one creating a zig-zag pattern.


These are just two examples: by changning the number of beads, the direction of the threads (straight or zig sag), where you add the beads (in the middle and/or on the edge) and/or doubling the threaded stitches, you can create a plethora of bead patterns. Don't be afraid of experimenting!


Finishing

Almost forgot this part. I secure the thread the way I would in an ordinary embroidery, by whipping or threading it on the flipside. The easiest way is to finish of the bracelet with glue-on end caps. Just secure the threads at the end of the leather strap so they too will be glued together when attaching the end cap.

I don't start nor end with a knot, but feel free to make a small, inconspicuous knot if you find that pulling the stitches tight pulls out the thread end. Do it near the end so it's covered by the end cap or in an inconspicuous place where the knot or secured thread won't show.


That's all, folks!

I hope you enjoyed my little introduction to beading on stitched leather cords. It's a great idea for anyone considering to bead on leather, but don't want to or don't have the tools to punch holes in it. Here you can undo your stitches without being left with a permanent hole. And that's just one of the things I love about these stitches and working on this kind of flat leather cord. Hopefully, you will like it just as much as I do!


Footnote: For a very good book with several examples of whipped and threaded stitches with beads, see Jane Davis' Bead Embroidery The Complete Guide: Bring New Dimension to Classic Needlework. If buying or borrowing the book isn't an option for you right now, you can read parts of it at Google Books. Threaded back stitch is found on pages 90-91. She doesn't show whipped back stitch (which is what's used in the bracelet), but you can find a variation of it in the whipped chain stitch on page 99.

The scrapped design


I mentioned in yesterday's post that I scrapped my first version of the berry metallic bracelet, which used 11/0 seeds. At the time I forgot that I snapped a couple of shots of the WIP before ripping it up, but now I found them while uploading photos to the computer and so why not show them?

Why didn't I go with them? Well, in the photos it doesn't look horrible, but IRL the colours of the beads didn't really match the leather and the size of the beads made the bead stitches stand out too far. I didn't like how chunky it felt, it was more like arches of beads rising over the flat cord than a rope of beads laying against the leather as in the finished bracelet.

I just felt the easiest fix was to find a better colour match and that automatically also meant using smaller beads -- and vice versa. I could perhaps have saved it by using few beads per stitch and making new holes so that the stitches don't end and begin in the same holes, leaving a gap in between for the beads so the first/last beads don't push up the arch of beads. But I don't regret switching to a different set of beads.


A pic of the finished bracelet for comparison if you haven't read the post showing the finished bracelet (or have read, but forgotten what it looked like in detail):


Wednesday, 23 April 2014

Three leather bracelets


Today I've got three new bracelets to show. I got three different flat leather cords from Endless Leather and challenged myself with trying something new with them. The first piece was also a colour challenge as I opted for colours matching Pantone's Color of the Year, Radiant Orchid.


Let's start with the Radiant Orchid bracelet. For this one I used a soft, stitched nappa cord in the colour Candy and czech 11/0 seeds in the colour Opaque Berry Pearl Matte. The idea was to use one of my favourite stitches, whipping, to attach beads to the leather cord, utilizing the existing seams on each side of the flat cord. By using the seam, you don't need to make any holes in the cord so it's great for those who don't have hole punches, awls or similar tools for making holes in leather.

Below, you can see the cord partially beaded, showing the double seams it had from the beginning. You can also see a pic of the unbeaded cord at Endless Leather's website if you need a better idea of what it looked like before beading it (never thought of doing "before" photos).


I did try a few variations, as you can see above, but settled for a simple whipped stitch for this first bracelet. And while it's simple, I am quite pleased with it as my idea panned out really well. While waiting for the cord to arrive, I worried that the seam might be too tight or the nappa too hard, making it impossible to push the needle and thread under the stitches -- but this cord turned out to be perfect for this technique! If I hadn't run out of cord, I would probably have many many more bracelets just because they're so fun and easy to make.

(If you like the technique, stay tuned: I'll be doing a post showing more in detail how the embroidery is made.)


For my second bracelet, using a flat metallic leather cord, I wanted to use another one of my favourite stitches (in both "thread embroidery" and bead embroidery): the stem stitch.


First I tried it with 11/0s in one colour, but it felt too chunky so instead I went with size 15/0 black seeds and 13/0 copper charlottes. The change of sizes is the reason for the long stitches: the holes in the leather were spaced for the bigger seeds. It's also the reason why I don't have double rows of stem stitch, an idea I thought about for a bracelet I wanted to embroider with vaxed linen cord. On the other hand, making two (mirrored) rows, would've obscured the pretty metallic colour of the cord too much. So I'll save that idea for another bracelet.


Be sure to notice that big magnetic heart clasp. Normally I prefer smaller clasps, but this chubby copper heart was hard to resist.


That leads us to the third and last bracelet, which unlike the others doesn't feature seed beads. For a while the idea was just to use seed beads, but I wasn't happy with the ideas I came up with. So as a last minute resort, I picked up an antiqued silver-plate tea rose, put a matching lavender bead in the centre of it and wrapped it onto the bracelet. (You can see some of the cord on the rose here, but after taking the photos I pushed it down between the petals to make it more invisible.)

I might redo this one -- feel like making a feather stitch bracelet and this could be a good base... With or without the rose, come to think of it: the feather stitch could be used to make leaves each side of the tea rose. Or maybe make beaded daisy stitch leaves? Hrmm... I need to think this over for a while...


Anytway, that's it, my latest three bracelets. Hope you liked them!


Friday, 11 April 2014

What I'm working on


I'm playing with leather cords again. Hopefully I'll be showing some pics of the finished bracelets by the end of next week. The first one's ready, but I'm saving them for one post of all three pieces.


Sunday, 2 June 2013

Endless Leather designs -- part 1


Remember when I showed this pic above as a little tease (or just as a way of saying I haven't totally dropped on the planet, just not blogging much)? Well, finally I'm going to do some show and tell! But first the background:

Some time ago, I was made aware of the shop Endless Leather. After having looked around the shop, I was hooked: I love leather and their range was really inspiring, covering everything from basic leather cords to all sorts of flat braids and unique leather cords such as salmon fish leather. Who can resist that?

The next week I got these gorgeous salmon leather cords and a cool stingray print leather cord plus so stainless steel findings to play with. Due to many things the reveal got delayed several times, but today I'm finally ready to show you the result.

Because I'm redoing a design and searching for the perfect components, I've split the reveal into two posts, the other one to be posted on a not yet defined future date. Perhaps in a few days, perhaps in a week or two depending on the workload next week.


First design is the cat wrap bracelet I made with violet salmon leather cord, stainless steel end caps and d:o clasp. To add a little fun detail while still keeping the design simple and sleek, I slid a cat button unto the clasp's loop before attaching it to the end cap. An easy way to make a quick and simple design a bit more personal.


There's actually a "secret" to this clasp: it was created as a necklace/bracelet. Originally I planned on making it a triple bracelet, which would be a good size for it to be able to be used as a necklace too, but it felt a tad too chunky on my dainty wrist so instead it's just a doubled bracelet. In order to be convertible it need a little something I haven't made yet as I don't have the right purple beads. Yes, it's one of my favourite colour in the leather cord and, yes, I don't have the purple beads to match it! So that'll have to wait until part 2.


The second piece is a necklace made from turquoise 6 mm stingray print leather, stainless steel end caps and d:o clasp with a beaded bezel focal. The focal is attached to the end cap loops using jump rings. It would be possible to stitch the end caps directly onto the bezel, but I chose not to as by using jump rings, it is easy to remove the focal e.g. for repairs or to substitute it with something else. Like a chunky, irregularly facetted focal bead as was my original idea before settling for this beaded component instead.


The focal is made of a crackled mosaic stone with the usual white ceramic back, which I covered with a coin in order to add weight (to counterbalance the clasp) and a more attractive finish to the flipside. Of all the coins in my small collection, only two had the right size and of those two, this one had the most suitable design. I put the change from a Copenhagen visit in the supply box just because of the designs on a couple of the coins. And now it came into use.


The last piece of the day doesn't have a clasp, hence the oddly cropped photo. This is more of a fun thing I whipped together last night. I love the brown salmon cord as it looks like bark (though much, much softer!), very earthy and so totally my thing. Of cause nothing works better with bark than flowers and leaves. In this case a small bouquet of paper roses on wire. I simply wrapped the wires onto the cord for a quick, whimsical piece of jewellery celebrating the summer season.


More to come: a metal free necklace, a necklace made from the cat button bracelet -- and who knows what else as I do have more leather cord left. So stay tuned for part 2!

Monday, 13 May 2013

Sneakpeek


What I'm working on right now.

Saturday, 27 April 2013

Bead Soup Blog Party 3rd Reveal


And so it's finally here, the third BSBP reveal. I signed up for BSBP again, not having joined for for a couple of rounds. Of cause that had made me very keen to participate again and I signed up -- completely forgetting that the dates could be in the middle of spring farming season. Oops! Of cause I couldn't know that the spring farming would start unusually late this year, but as luck would have it (for me), the reveal was postponed a couple of weeks so here I am, free from the potatoes and ready to show what I made with the lovely soup I got from my BSBP partner Noemi.

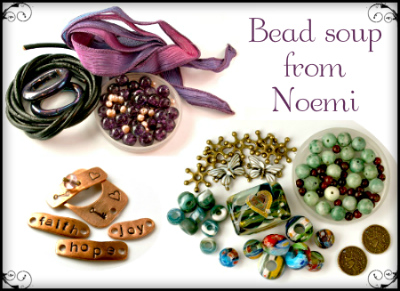
First, let's take a look on that spanish soup Noemi cooked up for me to work with.


You can read more about all the different ingredients here. It was a fab soup, but due to work, a workroom I couldn't work in (= no metalwork or techniques requiring a torch this time) and everything else that came in between, I still had my struggles with it. Mostly with getting ready in time with something I wouldn't be embarrassed to show anyone and that would make Noemi's soup justice. In the end, I ended up with four piece to show you today. Haven't yet used all the beads from the soup so there might be some "leftover posts" later.


First a quick (and hopefully enticing) sampler of what's to come below.


First up is the necklace made for the lampwork focal. I had matching fire-polished rondelles, but they were pretty tiny (as are most my beads, being used to working with dainty jewellery and seed beads) and there were only 30 of them. After going back and forth many times, I finally decided on just stringing them with dark green silk cord (in lieu of anything matching the chain) on a gunmetal chain.


Looking back at it, I should've added something to the last portion of the chain. Ran out of rondelles, but adding, say, some gunmetal beads would've looked better than just leaving it bare in the neck. Well, something to remember for next time, then.
 
And look at that wire wrapping -- you can tell I've almost only been seedbeading and embroidering these last couple or years!


For the next piece, I wanted to do something with the sweet little copper connectors and clasp, which are made by Noemi herself. Wanted to keep it simple in order not to overpower the connectors and this is what was finally settled on. Not the best chain to use -- if you want to try something similar, I'd suggest a small rolo/belcher or cable chain -- but the only one I had that matched the copper. As it was slightly boring with just the chain, I wrapped some dusky dark purple anchor embroidery floss around the links. Don't know if it made it better or worse! *lol* I do enjoy embroidery so threads and floss is something I like to add to my jewellery nowadays.

The chain was so uncooperative I almost gave up, thinking of turning the connectors into little charms with a bead dangle in one end (it would've included a maneki neko charm, sorry all catlovers who didn't get any cat jewellery here). But I persevered.


Third piece is a silk wrap bracelet. First I thought of altering the ribbon in some way, either embroidering it, smocking it or adding a beaded edge, but in the end it all came down to my wanting to try an idea. Now, I'll say right away that it's an idea that maybe looks nice, but wasn't as practical as intended.


The idea was to lose the clasp and use the rubber o-rings to tighten the ribbon ends, then tucking them under the ribbon as with other wrap bracelets. But the wrap part made it more cumbersome than practical -- next time I'll try it with a simple bracelet that doesn't wrap around the wrist several times. (Also, the focal was supposed to be black to match the o-rings, but I hadn't time to blacken it. Some of you might prefer the antique bronze colour it has now, though.)


And so, the fourth and last piece. I wanted to use those vibrantly coloured crackle beads, but couldn't think of anything fun to do with them last minute (made it yesterday). Ideally I wanted to keep them mixed with the fw pearls in the colour combo Noemi created, but some of my teal supplies kept trying to get my attention, wanting to play with the purple beads. Finally, I caved and created this simple leather necklace with beads dangling from waxed linen cord attached to the leather using lark's head knots.


That's all, folks! My creations for this year's edition of BSBP. Now be sure to visit my BSBP partner Noemi, who had this eclectic (and somewhat boringly coloured) soup to work with:


And of cause a huge thank you to Lori for hosting this great (in fabulousness and size) event once again! You're fab!

*

For a complete list of all participants in the 3rd reveal of the Bead Soup Blog Party, please visit Lori's blog here. As Lori makes her way through the blogs, she will replace the links with direct links to the reveal posts, making it easier for us who will take a long time going through all 200+ blogs in this reveal. 

You will also be able to find many of the creations from all three of the reveal on the official 7th BSBP pinboard at Pinterest.


Saturday, 3 March 2012

The reveal!


Yes, welcome to this latest edition of the Bead Soup Blog Party! I hope you will enjoy seeing what I've cooked up for you all today.

Penny, my bead soup partner, sent me a delicious soup in spring colours. I ended up using the beads and other supplies in multiple pieces, adding some of my own materials to the soup. In some cases this meant finally using beads and things I've had lying around for ages as I couldn't think of something good to do with them. Yay!


Here's a pic of the soup. If you want to read about my reaction when I got you can find a post on that here. Now to see what I did with my soup. As usual you can click on the photos for close-ups (that especially goes for the first pic below).


This is not the first piece I did, but since it uses the focal and clasp (as was mandatory) it will be presented first. And considering the time it took me to make it deserves the most of the limelight. Cutting a long story short, I had several ideas but annoyingly most of them where random and didn't really work as a whole. As you saw here, I just recently had to scrap half a dozen beaded beads because, while the colours matched the focal so well and I wanted to include some seedbeading, there just wasn't any good way I could think of to use them i a necklace design using the other ingredients.
 
The key to solving the puzzle came when I selected my flower focal. I wanted to layer the ceramic focal and also use it as part of a toggle clasp (yes, I've only used half the mandatory clasp, namely the key-shaped toggle bar). After having tried and scrapped several ideas, I looked through a container of fabric flowers and found a beige leather flower bought ages ago. It looked good in the pic, but the one I got was poorly cut and some of the smooth surface was sliced off. Disappointed I put it away, almost forgetting it. But now it looked like a good candidate and to make it more attractive -- and to add some colour to the earthy focal -- I painted it with three shades of ink: ash rose, purple and raisin (wine coloured).


After that the rest of the beads were adding as I chose anything that matched the focal or flower. More or less: the pink/rose/crystal fire-polished nuggets could've been redder (looked like they had more red flecks and no purple tones when first selecting them) and the mustard-orange-salmon in the half picasso rondelles adds a colour not intended from the beginning. But you've got to use what you have. I also added the filigree beads from the soup for more earthy browns.


Final design decision was which side to use as the front as the ceramic focal had different textures on each side. In the end I went with the texture you can see above instead of the side you see in the secon pic above.

The colour of the matte seed beads was so pretty and in one of my boxes of forgotten beads, I found a bag of matte 4 mm shell pearls. A perfect match! Quite soon I came up with the idea to use this technique/design. Originally to make a wrap bracelet, but then -- while getting ready to start -- I remembered an idea I'd thought about ages ago: what would happen if you add a second row to the "berries and vines"? Just had to try. And this is the result.

The reason it ends with two loops is not because I wanted to make a laced ribbon closure (which would work, have tried it), but that I wasn't sure the idea would work so I made sure to make the bracelet in such a way that it would be easy to remove the second row and still have a good, finished bracelet if it didn't work. But, at least in my eyes, it worked.


This necklace was actually the first thing I did. I really liked the colours in the Beady Monkey wooden bead and the soft spring green in the silk cord. They were perfect for a piece of light -- in weight and colour -- jewellery and so I made a very simple design, stringing large beige lustre seed beads on the cord and adding the bead as a small pendant. The necklace i adjustable as it's finished by threading both cord ends through one of the large-hole seeds.


Fourth piece -- yeah, I know, lots of pieces this time around --  is this bracelet, which isn't really finished. I made it by threading the ribbon through the shank of a matching glass button and then knotting the ends to create a loop for the closure. On one side, I began embroidering using a dark brown thread. Feather stitches with a whipped "stem" (if you follow my blog and have seen what I've done in the Take a Stitch Tuesday embroiery challenge you know I like whipped stitches).

My idea was to add some (dark) bronze beads too, but before I had the decided on a design the clock reminded me it was time to take some photos and compose this blog post. So I'm afraid you can't see the finished result. Hope you like what you see so far, though.


If the bracelet is a WIP this is probably no more than a hands-on sketch. My idea -- that I never got the time to realise -- was to wrap the metallic green seed beads around the oval links of the chain after having removed the "antique gold" links it was orinally equipped with (meant to use them in the necklace, didn't happen). For the wrapping I'm using a thin light green coloured copper wire. For now you'll just have to imagine the finished result...


And that was the last of it.

Thank you so much for giving me this delicious, inspirational and challenging soup, Penny! And thank you so much, Lori, for making this party happen again! And, last but not least, thank you, who are reading this, for stopping by!

Now it's turn to go and see what my bead soup partner Penny at the Copper Penny Designs blog and all the rest have made. Below is a peak of the soup I sent Penny. I bet you're interested to see what she made with them -- I know I am!


Bead Soup Blog Party participants list

(A full list of participants can be found on Lori's blog Pretty Things.)


Related Posts Plugin for WordPress, Blogger...