Showing posts with label buttons. Show all posts
Wednesday, 9 April 2014
A puff stitch flower
I've tried a new crochet stitch again. This time it was one of those puff stitches that look so pretty you just have to give it a go. I followed a video tutorial, which in my case means watching it three times or so, then go find some yarn, sit down in bed and try to remember how to do it. Now, I had some written instructions for a similar flower by my side so I could consult that as the basic idea is the same. Considering my method of learning, I think it looks rather nice. Have problem making the loops a consistent size, but it doesn't look too lopsided, does it? At least not for a first try. Next time I'll use fewer chain stitches to move them more to the back where they're hidden
My original idea was to make brooches, but they were kind of addictive so now I'm thinking of making something bigger, stitching them together. Making a cushion, bag or something. Like this gorgeous bag.
After finishing it, I thought a mushroom button drop might be just the right bead to put in the centre. It was. And now I have a reason to buy mushrooms. You see, I've seen some pretty colours of button drops, but always thought it wasn't worth buying as I don't really use them. Well, now I do -- and having an excuse to "have" to buy a certain bead always feels good.
(If you want a reason to buy mushroom drops, you should check out this necklace and this bracelet, by the way. There are many other designs using them too, some probably more impressing that these, but these two are ones I spotted the other day and which whispered "you should get some mushroom drops to play with".)
PS! Looking for tutorials? I've got a handful of puff flower patterns pinner on this pinboard. When writing this, the pins are close to the top of the board so they should be easy to find. Some of them are also on my DIY flower board. (Or... I might just repin them all there too so they're easy to find. Just noticed I had some crochet flower there that are pobably buried far down on my crochet/knit board.)
Tuesday, 6 August 2013
Silk ribbon bracelet tutorial
It feels like summer is soon over so maybe I should translate my silk ribbon bracelet tutorial while there's still warm and sunny days left? This is a very simple little summer project, perfect for vacations and summer breaks as it suits all ages and skills -- and you don't (depending on the choice of button) need any tools at all to make it.
For these bracelet I've used silk ribbons with overlocked edges (= doesn't fray easily), which are sold i somewhat varying lengths. These two ribbons were about 91-94 cm. Some ribbons are shorter, maybe around 80 cm, which can be too short for a wrap bracelet. If you only find really short ribbons, you can make a normal bracelet instead.
For choice of button, se the tips at the end of the tutorial.
*
Supplies:
1 silk ribbon with sewn edges (at least 90 cm long)
1 two-hole or shank button
optional: buttonhole thread, embroidery floss or similar
Tool (optional): sharp embroidery needle
1. For a shank button bracelet, start by pushing the ribbon end through the shank of the button. Slide it carefully to the middle of the ribbon.
2. Fold the ribbon double and tie an overhand knot. Push the knot towards the button shank while tightening it. It is important to push the knot where you want it before starting to tighten it.
3. Mark where on the ribbon you will place the next knot, which will create a loop for the button. I did this my simply wrapping the ribbon around the wrist and drawing a dot with a pencil at the edge of the button. If you find it hard to do it this way, you can instead use a tape measure wrapped around the wrist -- not too tight -- to note the desired length and then use it to mark the ribbon.
4. Knot the ribbon, making sure it ends up more or less at the place of the mark. Make this knot as pretty as you can -- prettier than in my photo -- as this knot will be visible.
5. Measure how big a loop you need to be able to thread the button through it and mark the length on the ribbon end. Make a knot.
6. Finish by trimming any loose thread end on the ribbon edges.
*
Variation 1: 2-hole button bracelet
Many jewellery projects using buttons demand shank buttons, but for this bracelet, a two-hole button works just as well.
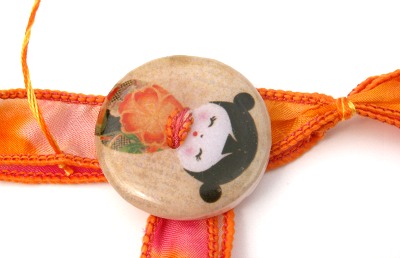
1. The easiest way to use two-hole buttons is to choose a button with big holes so you can just thread the ribbon ends through it like in the photo above.
2. Pull the ribbon tight and keep it from twisting while you do it as a twisted ribbon will look heavy and clumsy.
Are the holes too small? The easiest solution is to simple stitch the button to the ribbon. Knot the thread and start by sewing from the front of the ribbon so the knot will be hidden between the ribbon and button. Finish the same way to avoid visible knots. Tip: For the last stitch, add beads to the thread if it fits the button motif (here, it would give the kokeshi doll a bead necklace).
Variation 2: Instead of knots
If the ribbon is just barely too short for knotting or you don't want to knot the ribbon, one option is to stitch and wrap the ribbon together instead.
1. Mark where you want to place the wrap. Choose a heavy, strong thread in a colour matching the ribbon. Thread your needle and knot the thread. Start by stitching from the edge -- from the wrong side in order to sandwich the knot between the ribbons.
2. Make small running stitches through both ribbon ends from one side to the other.
3. Gather the ribbon by pulling the thread while holding onto the ribbon.
4. Wrap the thread around the ribbon three times. Keep the wraps as tight as you can. Push the needle through the wrapped section and pull very tight.
5. Finish by fastening the thread between the ribbons by making a knot as close to the wrap as possible...
6. ...and make a couple of invisible tacking stitches in an inconspicious location and cut the thread.
7. Measure where to place the next wrap and repeat the above steps.
*
Tips
- The choice of button is important: a heavy button will make a loose-fitting bracelet turn so the button sits on the inside of the wrist. A light-weight button and/or a tight-fitting bracelet will keep the button on the top of the bracelet where it will be more visible.
- A large button demands a larger ribbon loop, which will give the bracelet a loose fit. Remember that when choosing buttons.
- If you just wrap the bracelet around your wrist like in step 3 above, you will only see one half of the ribbon. If you want a somewhat wider bracelet or want to show you the whole ribbon , you can instead wrap the ribbon as in the photo below: when you've completed one wrap, split the ribbons so the will sit on either side of the button for the second wrap.This will also place the button in the middle of the bracelet.
- If the ribbon is somewhat too long for your desired length it's easier to just let the ribbon ends be instead of trimming them down as they will fray. Let them hang free or tuck them under the ribbon when you've clasped it around your wrist (compare top photo with the one below). Works best with tight bracelets.
Friday, 12 July 2013
Silk ribbon bracelet tutorial
Due to circumstances (which include being bitten by a tick, which have made me slightly hypochondriac, and having had a jaw ache that's made me cranky), I haven't been able to blog much lately. However, I did get around to publishing my first summer project on my other blog: Manekis sidenarmband.
It's just a very simple bracelet project for all ages and skills. Planning on making an english version to publish on this blog too, but for the moment I'll be referring you to my other blog for instructions. There are many pics and the project is so simple that it shouldn't be hard to just follow the pictures. And then use Google Translate to try and make out the tips. Key tip, which I didn't even write: pick out the loveliest ribbon and button you cand find as it'll make all the difference!
I'm hoping my second blogiversary project will be more about bead-weaving. Or perhaps I'll do something embroidered... Well, we'll just have to see what happens.
Hope you enjoy it!
Sunday, 30 June 2013
The seaside pendant -- an acrylic doodle
It's ages ago since I participated in a monthly challenge it feels like. This month I really wanted to get started on something and gathered info on challenges. One challenge that I instantly felt a connection to was the Art Bead Scene Blog challenge, featuring a painting by Franklin Carmichael called Jackknife Village. Living on a peninsula, always close to the sea, I really liked the landscape he conjured up on his canvas. While it doesn't really look like that around here, the image reminded me of the childhood vacations I spent in Bohuslän (google it and you'll get photos illustrating my point). It's pretty similar to the Bohus coastline. In other words, it was an image that wouldn't leave me.
Some weeks ago I felt compelled to paint a pendant with these images -- of the artwork and the childhood vacations -- in mind. I got out a 34 mm arte metal (i.e. blackened steel) pendant and started painting using white gesso that I tinted with acrylic paint. Now, the only small brushes I have are watercolour brushes as that's always been my favourite media when it comes to painting (ironically, Carmichaels painting is watercolour and I still didn't choose that myself for this project). No way I was going to ruin them with acrylic paint -- and besides, the brushes are made for heavy paints like oil and acrylics anyway. So I had to make due with some bigger craft quality brushes instead, which partially determined what style to paint in: it wasn't possible to paint any fine details so instead I opted for an impressionist style. The kind that just look like smudges of paint close up, but forms a dreamy landscape when you take a step or more back and admire it from some distance. I always did like impressionism as a teen.
It's really just a doodle, but a doodle I had a lot of fun working with. It might not be perfect, but I'm still pleased with it. While it might be hard to understand from seeing these photos, I must say it looks quite pretty in real life -- though of cause I see it through my own rose-tinted glasses right now.
So the challenge really inspired me, but unfortunately I also wanted to participate in it for real (and get a chance to win as they always have such lovely art bead prizes) and the pendant just didn't want to turn into a piece of finished jewellery (a bead strung on cord or chain doesn't qualify). So frustrating! The days went passed and I couldn't find anything useful in my stash. No blues or if I found any they were the wrong blues (pendant have a slightly lavender blue, most my blues are turquoise). Or the wrong finish: the pendant is so matte that any shiny bead detracts from the focal. The last day today and anything I did try failed. Everything conspired against me!
Wanting to at least do something with the pendant, I made this necklace which I doubt will be approved by the ABS team. But at least I did finish a project so I should feel good about myself anyway, even if I can't officially be part of the challenge this month.
The cord, by the way, is one that I've tea dyed myself. Tea dyeing might not be the best method of dyeing textiles as the tannins can weaken the fibres over the years, but it's easy and fun -- and you can experiment to get just the right hue. Like in this case: I let some cords steep longer than others which gave me range of hues to choose from when wanting to find a good match for the pendant. It looks a bit dark in the first two pics, but it really does match the cliffs in the pendant.
The necklace cord is simply made by doubling the cord, knotting a loop in one end and tying the loose ends to a metal button. Nice and simple. You just need a cord long enough, which was really just barely the case here.
Sunday, 2 June 2013
Endless Leather designs -- part 1
Remember when I showed this pic above as a little tease (or just as a way of saying I haven't totally dropped on the planet, just not blogging much)? Well, finally I'm going to do some show and tell! But first the background:
Some time ago, I was made aware of the shop Endless Leather. After having looked around the shop, I was hooked: I love leather and their range was really inspiring, covering everything from basic leather cords to all sorts of flat braids and unique leather cords such as salmon fish leather. Who can resist that?
The next week I got these gorgeous salmon leather cords and a cool stingray print leather cord plus so stainless steel findings to play with. Due to many things the reveal got delayed several times, but today I'm finally ready to show you the result.
Because I'm redoing a design and searching for the perfect components, I've split the reveal into two posts, the other one to be posted on a not yet defined future date. Perhaps in a few days, perhaps in a week or two depending on the workload next week.
First design is the cat wrap bracelet I made with violet salmon leather cord, stainless steel end caps and d:o clasp. To add a little fun detail while still keeping the design simple and sleek, I slid a cat button unto the clasp's loop before attaching it to the end cap. An easy way to make a quick and simple design a bit more personal.
There's actually a "secret" to this clasp: it was created as a necklace/bracelet. Originally I planned on making it a triple bracelet, which would be a good size for it to be able to be used as a necklace too, but it felt a tad too chunky on my dainty wrist so instead it's just a doubled bracelet. In order to be convertible it need a little something I haven't made yet as I don't have the right purple beads. Yes, it's one of my favourite colour in the leather cord and, yes, I don't have the purple beads to match it! So that'll have to wait until part 2.
The second piece is a necklace made from turquoise 6 mm stingray print leather, stainless steel end caps and d:o clasp with a beaded bezel focal. The focal is attached to the end cap loops using jump rings. It would be possible to stitch the end caps directly onto the bezel, but I chose not to as by using jump rings, it is easy to remove the focal e.g. for repairs or to substitute it with something else. Like a chunky, irregularly facetted focal bead as was my original idea before settling for this beaded component instead.
The focal is made of a crackled mosaic stone with the usual white ceramic back, which I covered with a coin in order to add weight (to counterbalance the clasp) and a more attractive finish to the flipside. Of all the coins in my small collection, only two had the right size and of those two, this one had the most suitable design. I put the change from a Copenhagen visit in the supply box just because of the designs on a couple of the coins. And now it came into use.
The last piece of the day doesn't have a clasp, hence the oddly cropped photo. This is more of a fun thing I whipped together last night. I love the brown salmon cord as it looks like bark (though much, much softer!), very earthy and so totally my thing. Of cause nothing works better with bark than flowers and leaves. In this case a small bouquet of paper roses on wire. I simply wrapped the wires onto the cord for a quick, whimsical piece of jewellery celebrating the summer season.
More to come: a metal free necklace, a necklace made from the cat button bracelet -- and who knows what else as I do have more leather cord left. So stay tuned for part 2!
Etiketter:
bead-weaving,
bezels,
bracelets,
buttons,
cats,
coins,
Endless Leather,
JEWELLERY,
leather/suede,
necklaces,
paper,
roses,
tips
Saturday, 3 March 2012
The reveal!
Yes, welcome to this latest edition of the Bead Soup Blog Party! I hope you will enjoy seeing what I've cooked up for you all today.
Penny, my bead soup partner, sent me a delicious soup in spring colours. I ended up using the beads and other supplies in multiple pieces, adding some of my own materials to the soup. In some cases this meant finally using beads and things I've had lying around for ages as I couldn't think of something good to do with them. Yay!
Here's a pic of the soup. If you want to read about my reaction when I got you can find a post on that here. Now to see what I did with my soup. As usual you can click on the photos for close-ups (that especially goes for the first pic below).
This is not the first piece I did, but since it uses the focal and clasp (as was mandatory) it will be presented first. And considering the time it took me to make it deserves the most of the limelight. Cutting a long story short, I had several ideas but annoyingly most of them where random and didn't really work as a whole. As you saw here, I just recently had to scrap half a dozen beaded beads because, while the colours matched the focal so well and I wanted to include some seedbeading, there just wasn't any good way I could think of to use them i a necklace design using the other ingredients.
The key to solving the puzzle came when I selected my flower focal. I wanted to layer the ceramic focal and also use it as part of a toggle clasp (yes, I've only used half the mandatory clasp, namely the key-shaped toggle bar). After having tried and scrapped several ideas, I looked through a container of fabric flowers and found a beige leather flower bought ages ago. It looked good in the pic, but the one I got was poorly cut and some of the smooth surface was sliced off. Disappointed I put it away, almost forgetting it. But now it looked like a good candidate and to make it more attractive -- and to add some colour to the earthy focal -- I painted it with three shades of ink: ash rose, purple and raisin (wine coloured).
After that the rest of the beads were adding as I chose anything that matched the focal or flower. More or less: the pink/rose/crystal fire-polished nuggets could've been redder (looked like they had more red flecks and no purple tones when first selecting them) and the mustard-orange-salmon in the half picasso rondelles adds a colour not intended from the beginning. But you've got to use what you have. I also added the filigree beads from the soup for more earthy browns.
Final design decision was which side to use as the front as the ceramic focal had different textures on each side. In the end I went with the texture you can see above instead of the side you see in the secon pic above.
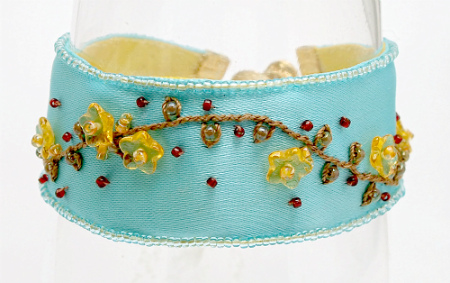
The colour of the matte seed beads was so pretty and in one of my boxes of forgotten beads, I found a bag of matte 4 mm shell pearls. A perfect match! Quite soon I came up with the idea to use this technique/design. Originally to make a wrap bracelet, but then -- while getting ready to start -- I remembered an idea I'd thought about ages ago: what would happen if you add a second row to the "berries and vines"? Just had to try. And this is the result.
The reason it ends with two loops is not because I wanted to make a laced ribbon closure (which would work, have tried it), but that I wasn't sure the idea would work so I made sure to make the bracelet in such a way that it would be easy to remove the second row and still have a good, finished bracelet if it didn't work. But, at least in my eyes, it worked.
This necklace was actually the first thing I did. I really liked the colours in the Beady Monkey wooden bead and the soft spring green in the silk cord. They were perfect for a piece of light -- in weight and colour -- jewellery and so I made a very simple design, stringing large beige lustre seed beads on the cord and adding the bead as a small pendant. The necklace i adjustable as it's finished by threading both cord ends through one of the large-hole seeds.
Fourth piece -- yeah, I know, lots of pieces this time around -- is this bracelet, which isn't really finished. I made it by threading the ribbon through the shank of a matching glass button and then knotting the ends to create a loop for the closure. On one side, I began embroidering using a dark brown thread. Feather stitches with a whipped "stem" (if you follow my blog and have seen what I've done in the Take a Stitch Tuesday embroiery challenge you know I like whipped stitches).
My idea was to add some (dark) bronze beads too, but before I had the decided on a design the clock reminded me it was time to take some photos and compose this blog post. So I'm afraid you can't see the finished result. Hope you like what you see so far, though.
If the bracelet is a WIP this is probably no more than a hands-on sketch. My idea -- that I never got the time to realise -- was to wrap the metallic green seed beads around the oval links of the chain after having removed the "antique gold" links it was orinally equipped with (meant to use them in the necklace, didn't happen). For the wrapping I'm using a thin light green coloured copper wire. For now you'll just have to imagine the finished result...
And that was the last of it.
Thank you so much for giving me this delicious, inspirational and challenging soup, Penny! And thank you so much, Lori, for making this party happen again! And, last but not least, thank you, who are reading this, for stopping by!
Now it's turn to go and see what my bead soup partner Penny at the Copper Penny Designs blog and all the rest have made. Below is a peak of the soup I sent Penny. I bet you're interested to see what she made with them -- I know I am!
Bead Soup Blog Party participants list
(A full list of participants can be found on Lori's blog Pretty Things.)
Etiketter:
bead-weaving,
blog hops,
bracelets,
BSBP,
buttons,
ceramics,
challenge and contest entries,
czech,
hand embroidery,
JEWELLERY,
leather/suede,
necklaces,
silk
Wednesday, 29 February 2012
Challenge of Music
Thank you for stopping by!
Today is the day, time to reveal what we've made for Erin's Challenge of Music. I can't begin to tell you the problems I've had getting this done these last few days (on top of having been in a bit of a rut lately, creatively and otherwise), but at last I've got something to show.
It took a long time to choose which song to work with. Should I go with the 80's music I grew up with on the radio? The early 90's music I've partially forgotten until they pop up on VH1? The songs from school that I've sung hundreds of times and mark the excitement of summer break or longing for christmas break? Or some of the bands and singers I listen to now, perhaps choosing someone I don't think that many (at least outside Scandinavia) knows of?
In the end, I settled for another type of nostalgia as my sis and I one evening (once more) searched YouTube for intros to all the tv shows we remembered from childhood. After looking trough a dozen or so videos we stumbled upon the serene intro and outro to Skymningssagor, "Twilight fairy tales". Skymningssagor was a children's television series that aired October 1988 through March 1990.
Intro
Outro
I wanted to capture the atmosphere; the simple melody, the lightness, the colours of dusk, the serenity. At first I was working on a totally different idea, but it had to be scrapped yesterday when I couldn't find a good way to finish the design. Frustration. What to do? So little time, so little materials that seemed to work with the images that popped into my mind. Went through half my stash and in the end settled for some thin (7 mm wide) silk ribbons in periwinkle blue and a variegated rose-purple. But what more? Some ideas had to be scrapped due to the fast approaching deadline. After a while I instead started to focus on a focal.
I found a matte transparent violet plastic flower button (38 mm) and looking for something to layer it with found a pink MOP flower button that I had sprayed with a matte lacquer. Finally something that could work as an eye-catcher! I like how the mother-of-pearl gives a subtle glow to the plastic (a bit like the Polaris Polsweet beads I showed a week or two ago). A brooch back was attached to the layered flower so it can be used as both a pendant and a brooch.
For this image I added the silk ribbons to turn the brooch into a necklace. Don't know how the pic looks -- it was tricky trying to get the right colours in both the flower and silk in the photo... Not too happy with the look right now so it'll have to be altered a bit later.I'm also thinking of adding some seed beads to the centre of the flower, a nice detail that I totally forgot in my haste to finish in time. Hopefully it doesn't look too bad though.
And so... That's it, my contribution to the Challenge of Music and my -- somewhat sidetracked -- interpretation of a song that brings back memories of childhood, children's books and beadtime stories to me. I hope you like it and be sure to visit all the other participants too -- of cause including the fab hostess, Erin of TresoriTrovati.
Today is the day, time to reveal what we've made for Erin's Challenge of Music. I can't begin to tell you the problems I've had getting this done these last few days (on top of having been in a bit of a rut lately, creatively and otherwise), but at last I've got something to show.
It took a long time to choose which song to work with. Should I go with the 80's music I grew up with on the radio? The early 90's music I've partially forgotten until they pop up on VH1? The songs from school that I've sung hundreds of times and mark the excitement of summer break or longing for christmas break? Or some of the bands and singers I listen to now, perhaps choosing someone I don't think that many (at least outside Scandinavia) knows of?
In the end, I settled for another type of nostalgia as my sis and I one evening (once more) searched YouTube for intros to all the tv shows we remembered from childhood. After looking trough a dozen or so videos we stumbled upon the serene intro and outro to Skymningssagor, "Twilight fairy tales". Skymningssagor was a children's television series that aired October 1988 through March 1990.
Intro
Outro
I wanted to capture the atmosphere; the simple melody, the lightness, the colours of dusk, the serenity. At first I was working on a totally different idea, but it had to be scrapped yesterday when I couldn't find a good way to finish the design. Frustration. What to do? So little time, so little materials that seemed to work with the images that popped into my mind. Went through half my stash and in the end settled for some thin (7 mm wide) silk ribbons in periwinkle blue and a variegated rose-purple. But what more? Some ideas had to be scrapped due to the fast approaching deadline. After a while I instead started to focus on a focal.
I found a matte transparent violet plastic flower button (38 mm) and looking for something to layer it with found a pink MOP flower button that I had sprayed with a matte lacquer. Finally something that could work as an eye-catcher! I like how the mother-of-pearl gives a subtle glow to the plastic (a bit like the Polaris Polsweet beads I showed a week or two ago). A brooch back was attached to the layered flower so it can be used as both a pendant and a brooch.
For this image I added the silk ribbons to turn the brooch into a necklace. Don't know how the pic looks -- it was tricky trying to get the right colours in both the flower and silk in the photo... Not too happy with the look right now so it'll have to be altered a bit later.I'm also thinking of adding some seed beads to the centre of the flower, a nice detail that I totally forgot in my haste to finish in time. Hopefully it doesn't look too bad though.
And so... That's it, my contribution to the Challenge of Music and my -- somewhat sidetracked -- interpretation of a song that brings back memories of childhood, children's books and beadtime stories to me. I hope you like it and be sure to visit all the other participants too -- of cause including the fab hostess, Erin of TresoriTrovati.
- Erin Prais-Hintz (hostess)
- Marcie Abney
- Christine Altmiller
- Elisabeth Auld
- LJ B
- Lori Bowring Michaud
- Shannon Chomanczuk
- Cece Cormier
- Jenny Davies-Reazor
- Malin de Koning
- Beth Emery
- Michelle Escano-Caballero
- Erin Fickert-Rowland
- Therese Frank
- Amy Freeland
- Tanya Goodwin
- Stephani Gorman
- Amy Grass
- Beth Hemmila
- Kristina Johansson (YOU ARE HERE)
- Jennifer Justman
- Tari Kahrs
- Susan Kennedy
- Ema Kilroy
- Kathleen Lange Klik
- Kirsi Luostarinen
- Paige Maxim
- Beth McCord
- Natalie McKenna
- Alice Peterson
- Cat Pruitt
- Bobbie Rafferty
- Johanna Rhodes
- Cynthia Riggs
- Sally Russick
- Sarah Sequins
- Amy Severino
- Staci Smith
- Kristen Stevens
- Lola Surwillo
- Stefanie Teufel
- Sandi Volpe
- Holly Westfall
- Shaiha Williams
~*~
Etiketter:
blog hops,
buttons,
challenge and contest entries,
music
Sunday, 26 February 2012
TAST week 7: Detached chain stitch
English name: detached chain stitch, lazy daisy, daisy stitch
Swedish name: öglestygn, enstaka kedjestygn, bellisstygn
Today there'll be double TAST posts as I didn't post in week 7.
Chain stitch, detached and "regular", is a stitch I've tried before and which I'm not all that fond of. I do like it, it's really not that I hate it or anything, but it comes with a big but. I really like the look of detached chain stitch and admire lots of embroideries made by others using this stitch. But I don't use it that often myself and the main reason probably is that I keep pulling the stitches too hard, making them lose that pretty petal-shaped curve. It's the same reason I only crochet once in a while and don't like writing too much by hand. I pull, push and press too hard. Maybe I'll learn some day.
For the "doodle page" above I did a few rather basic variations. My aim was to make something other than flowers, which the stitch so often is used for. There's a butterfly and a dragonfly for instance. But in the end I had to do a few flowers too. It really is hard to tell, but the long-stemmed tulip have anundsjö stitch leaves. Wanted to try that stitch and doubt it will appear in the TAST challenge.
I also incorporated some buttons -- and learned that it's easier to add chain stitches if you stitch the button to the foundation first (like in the white button) rather than try to do nice, even and "open" stitches with the button moving around like the red one did. I also stitched one button with "reverse engineered" fly stitches (grey, left corner).
This is the result of my Aurica sampler. I've tried different lengths etc for different effects. Just playing with the yarn, seeing what I could come up with. I am planning on taking what I learn from these doodles and make e.g. a flower, dragonfly or something. I was focusing on making petals here, but when I showed the pic on Flickr (and later here on the blog in the Aurica sampler part 1 post) I got comments from people seeing all sorts of things in my embroidery doodles. Fun!
Here are a few detached chain stitches with beads that I stitched on the bracelet made for Erin's Challenge of Color. I stitched the beads first and then added the daisy stitches around them.
---
What is TAST?
Take a Stitch Tuesday is a weekly embroidery challenge throughout the year by Sharon of Pin Tangle. You can read more about it here (or by clicking the TAST badge to the right).
To see what others have done in this stitch, check out the comments in this post on Pin Tangle. Be sure not to miss Sharon's lovely stitch variations in the actual post.
Wednesday, 5 January 2011
Tila trials
Well, seeing how my bead block kind of faded away this last week or two (read more about that here), I finally got around actually finish a couple of tila projects. While I've made a few swatches just to test how I could stitch with them, it wasn't until now that I actually made a whole project.First out was the rivoli above. It's by now means a perfect project, but I really enjoyed creating this slightly unusual beaded bezel. The flipside looks exactly the same as the front, but the tila beads are a bit crowded: next time I'll only use seed beads for the back. As for colours, I just had to work with what I had eventhough the colour combo isn't my best one. Matte black tilas and seeds and a 18 mm custom coated Swarovski rivoli in peridot glacier blue.
I was planning on making a bracelet as well, but not this one. What happened was that I stumbled over Jennifer VanBenschoten's article Diagonal Stitch for Tila Beads and her Elegant Tila Bead Bracelet project. The stitch looked fun and interesting so I put my original idea aside in order to give this a try.
I didn't mean to embellish it with these seed beads. I tried a few different ideas, but in the end it was my choice of clasp -- a black and gold glass button given to me -- that made me go with the Permanent Finish golden 11/0. Ideally I wanted to use 15/0 matte beads in the tips, but I couldn't find them so I had to settle with larger 11/0 Czech seeds.For the loop, I stitched a row of herringbone. Again, nothing I originally planned (thought I'd do a simple three rows of peyote instead of just stringing the beads). But when I began fastening the first beads agains the tilas, it came natural to do it in herringbone stitch instead.
And now I have to get more tila beads! Love playing with them and the new possibilites as well as challenges these two-hole beads offer. I've got so many more ideas to try, but -- alas -- I just have barely a dozen beads left right now...
Etiketter:
2-hole beads,
bead-weaving,
bracelets,
buttons,
JEWELLERY,
Miyuki,
pendants,
rivoli
Subscribe to:
Posts (Atom)