Showing posts with label filigree. Show all posts
Wednesday, 3 July 2013
Black gesso filigree
I'm waiting for the rain (ok, it's really just a light drizzle today) to clear so I can get back out and take some more photos. While waiting I thought I might as well show you this. A little something I made just to try my new black gesso.
It's a relatively large silverplated filigree piece that I coated with black gesso and then dusted with purple chalk, which gave the matte surface a slightly smoky feel. As you can see, I wasn't very thorough with the paint job so the plating peaks through here and there, but on the other hand it was just a test. Next time I'll prepare the surface better -- and wait with the second coat and chalk until the first coat is fully dried.
Hrmm... I should've taken a photo of the filigree before painting it so you could see the difference. I do have a second, unused and unaltered, one so I'll see if I can add a pic of it here later.
...and now it's added.
It's very pretty as it is too. But it's fun to do something different sometimes, create a new look for filigree you've had laying around for ages.
Thursday, 21 June 2012
Upphlutur
I mentioned in the Helsingborg post that I had a find to share. Nothing big and not a thing. It's a magazine article find.
It all started because few stores in Helsingborg are open on a Sunday so we went to Pressbyrån to look for a copy of the new rose-themed issue of Hemslöjd. I told my sis to keep an eye out for it while looking through all the magazine shelves, commenting and looking for something of interest. My sis found it first, but what she picked up and showed me was the mag next to it, norwegian Bunad (issue 2-2012). I'm not sure why she picked it up to show. Maybe she wanted to say "look, a norwegian hemslöjd magazine" or "look at those girls on the cover" (in colourful and patterned folk costumes) or "look at that price". Either way, I took the copy, flipped through it -- and there it was! An upphlutur.
I've never seen icelandic folk costumes (Þjóðbúningurinn) before and this particular one is very different from the scanian and swedish folkdräkter and bygdedräkter I've seen. (Not just because the other scandinavian/nordic costumes are regional while the icelandic ones are national.) I really liked the simplicity of the black-and-white upphlutur. And above all I loved the embellishments. At first I thought it was like goldwork, metallic threads embroidered onto the cloth. It didn't look like plain embroidery floss so my guess was goldwork with silver threads. Then I looked closer and saw that it was in fact silver filigree (real, handmade silver filigree) stitched to the bodice. Two of my favourite things in one: metalwork and embroidery!
Look at that!
The mother inherited her dress, which has vermeil filigree instead of just silver, from her grandmother, who in turn was given it in the 1920's (so it's really old). At that time this type of upphlutur was relatively new. It was designed by Gudmundura Thoroddsen in the early 20th century. The upphlutur itself was originally part -- or more precisely the "undergarment" -- of another folk costume, the faldbúningur (see this photo). When it was warm the faldbúningur could be worn without the jacket and from that the upphlutur was developed as a folk costume in its own right. The colours can vary. The bodice is often black but can also be e.g. blue or red. As you can see, different types of aprons are also used and the embellishments varies. The cap that goes with the dress is called skotthúfa or, in english, icelandic tail cap.
Of cause I can't show you the whole article (already this much is probably a stretch). There's more pics and information in the magazine and while it doesn't go in to any depth, if you want to see better pics -- and, if you understand norwegian, want to read the whole article -- you might want to try and get a copy. It costs 89 SEK or NOK, though.
You can read more about the icelandic folk costumes at e.g. The Icelandic National Costume Board and Wikipedia. More pics of upphluturs can be found on the Icelandic National Costume Board website, Flickr and by image googling.
Myself, I'm starting to think about embroidering filigree and wirework on cloth now.
Etiketter:
books/magazines,
filigree,
hand embroidery,
history and culture,
inspiration
Wednesday, 4 January 2012
Embroidery on filigree -- an update
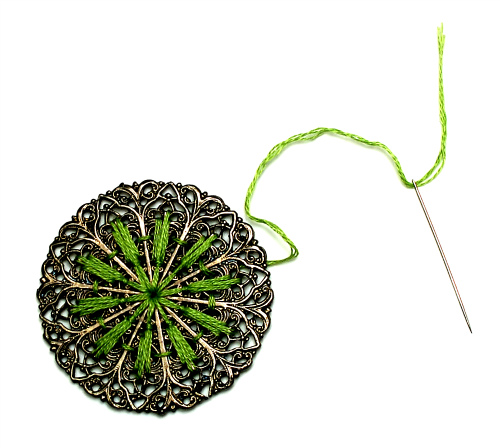
I wrote about embroidering on filigree a few days ago and promised to show some more of it when it was finished. And here it is, my embroidered gunmetal filigree.
I'm thinking of adding a backing of leather, faux skin or somesuch to protect the threads on the back and add findings. Because of that I haven't fastened the floss used to whip the edges as I'll have to redo it, whipping the backing to the filigree. It'll either be a pendant or a brooch. Brooch was my first thought, but I fear the cast filigree might be a bit too heavy for that so a pendant is more likely now.
I also made a second pendant, stitching on a thin stamped brass filigree. It's a very simple "design" that I made while pondering what to stitch on the gunmetal filigree.
The brass filigree had larger open spaces which made it harder to stitch on, both in terms of creating designs and stitches and in terms of hiding the threads on the back (e.i. you can't travel with the thread as much as in the gunmetal filigree).
Friday, 30 December 2011
WIP: embroidery on filigree
Here's another current WIP (work in progess) I've been playing around with. My idea was to embroider with cotton floss on a piece of cast filigree sort of in the same way you can use jewellery components like these for embroidered jewellery. (That type of components can also be used for beading and just plain odd things.)
This filigree is cast and has less sharp edges than several of my thin stamped filigrees so I hope it's easier on the soft thread -- my biggest worry, embroidering on metal, is that the hard edges will wear down the embroidery threads.
This is a WIP rather than a finished piece by now mainly because I've got no idea what to embroider: what colours to use, what pattern to create, what other stitches (if any) to use. It's just a doodle and I haven't got an inkling how I want to finish it. Guess it could be left as it is, but I want something more -- though without totally obscuring the pretty pattern in the filigree. And preferrably it shouldn't have any beads as it's not meant to be a bead embroidery.
Well, well... no idea when it'll be finished, but hopefully soon. And perhaps I'll get some ideas from the Take a Stitch Tuesday challenge, which begins already next week (yes, it's almost 2012 already!).
*
If you're interest in seeing what the filigree looked like before being embroidered (not that it's covered up that much -- yet), here's a pic from the shop I got if from, Perles & Co. (You can click on the pic to go directly to the product page for a bigger photo.)
Etiketter:
design woes,
fibre/textile,
filigree,
hand embroidery,
WIP
Monday, 16 August 2010
Shaping a filigree flower
I haven't been feeling very creative lately and energy's been low. For obvious reasons, really. But I thought I'd sit down and do something. Anything. Just to keep some spark alive. And that something was these filigree flowers. For these I've used white (painted) filigrees from a pair of earrings I bought at a sale for the sole purpose of butchering them.
Uhm, yes, sorry for the bad photos by the way. Must invest in some better coloured papers to use as background when I want to get pics of white things. Hope the orange/peach paper isn't too ugly to look at...
But let's return to the flowers. For my first flower I just wired five of the filigrees together. Looks like an old crocheted doily in the colour doesn't it? I wasn't that pleased with the result as it doesn't really look like a flower, which I was aiming for. Maybe it will look better when I bead it, but for now it just look like a doily.
While I still think the shape of the filigrees aren't perfect for petals, I think this second version looks much better: the shape itself makes the design more "flowery" in appearance. Plus, making it more dimensional adds interest to the design.
As for the final design, well, I'm thinking of using light blue beads to the centre. Not so much for the sentiment "something borrowed, something blue" eventhough I envision this as a bridal project, but because the white is of a slightly cold hue. And the colours can look sweet together -- I've seen some very nice white and blue wedding gowns by a finnish designer.
Wednesday, 28 April 2010
Beads, bead caps or flowers?
When I first saw these filigrees, described as "cube drawn bead" and bead caps by the shop, I just had to buy them. Not because I had an inkling of what to do with them -- I was just attracted to the unusual shape.
The seller made an association to 19th century drawstring bags, myself I just keep seeing them as flowers. Despite being square while most flowers have round bells, I just keep thinking of "puffy" flowers like those you can find in water aven flowers, japanese lantern husks, turk's cap lily (martagon), lily-of-the-vally and many more.
Not yet sure how I will use them, but I just had to show them. Will publish some picks of the finished jewellery once I get the inspiration to use these.
PS! If I don't get any jewellery ideas, I bet they could be used as ornate miniture tables or flower pots, depending on which end you place down.
Wednesday, 10 March 2010
Apples in a bowl

A couple of days I go I made a comment on the Vintaj blog about beading on filigree. Which made me think of this little objet d'art I made back in October 2008. The bowl is a piece of dapped brass filigree ("Garden Trellis" from Vintaj), 40x40 mm, and the apples are made using 6 mm round soo cho jade beads with Toho 11/0 seeds in matte opaque chocolate. The beads are simply stitched to the filigree base using brown K.O. Beading Thread. I just use it as a small decorative item, but others have suggested it'd also make a nice brooch.
I thought the "jade" was just the right autumn colours for apples, eventhough the seed bead "calyx" make them look a tad like ripening currants in the end. Well, at least now I know how to make bead currants.
Thursday, 11 February 2010
Rose in filigree

I'm having a bit of a Vintaj theme this week, I feel. Here is another pendant I've made using my last natural brass filigree piece I have in my stash.
Here is yet another way for me to use my blanks from the giveaway. I selected a large round pendant and decoupaged a cutout from one of my favourite scrapbook papers, Paul (SCRB 256) from Calambour onto it. I pierced a hole in the paper so I could still use the hole in the blank.
When dry I put some 0,5 mm Vintage Bronze wire through the hole and pushed the wire ends through a hole in the filigree piece. I then wrapped the filigree "petals" around the blank. Because of the wire, the filigree is a tad off-centre, but not so much it's annoying. The filigree not just added a frame to the floral motif, but added interest to the back of the pendant.
Ideally I would have wanted to use a different style of filigree, but I had to use what was in my stash. I'm still pleased with the results though.
Monday, 1 February 2010
Viola odorata -- Sweet violet locket
I've already shown some jewellery I've made with readymade ribbon flowers here.
This is another example of a locket I made using a tiny ready-made violet ribbon flower. On its own it felt a bit too boring so I made two violet buds and a round leaf from hand-dyed silk ribbon and added it to the flower. It's a bit fiddly working with the narrow ribbons used here, but I think it was worth it. I stitched the flowers to the filigree front of my brass locket and added a few light bronze fp for a subtle sparkle, which is more visible IRL. I also added a few fp to the 60 cm long antiqued brass chain. I like to think of it as dewdrops.
The locket I've used is deeper than a usual photo locket as it is intended to be filled with solid perfume, as you can see in the pic below. Of cause sweet violet perfume in this case.
Friday, 15 January 2010
A touch of India
I haven't made much jewellery lately so I keep showing some "old favourites". This is a necklace I was very pleased with after finishing. And very tired: it is made up of rather small hand-wrapped wire shapes, made only using a pair of round-nose pliers and cutters. Using a jig was out of question, not only since I don't get along very well with jigs, but also because I wanted smaller components than a jig can make.My starting point was this lovely open filigree pendant with cloisonné details. I chose to pick up two colours from the enamel: amethyst and tuquoise. Fist, I made links using bugle beads in both these colours (silver-lined), golden charlottes and golden craft wire (non-tarnish brass). Note how I deliberately bent the loops too the sides so that they would not hang straight, but in a slight zig-zag pattern, when worn.
Then I made basic "3-loop connectors" using the same wire and adding a amethyst s/l seed bead in the middle. I made one without the seed, the centre connector/link I added the pendant to. I liked these two shapes together with 2 mm jump rings I made from wire (not fun, making all those tiny rings). The clasp is also handmade by me.
I'm so glad the necklace turned out well and I got some lovely comments on it -- eventhough it's a bit hard to see how delicate and pretty it is in my photo. I'd be horrible if I had wasted all that time and patience it took to make.
The cloisonné pendant is Chinese, but the finished necklace made me think of India, hence the name. I've also made another piece of jewellery using Chinese cloisonné, but ending up with an Indian name: the simple bracelet below from 2006 is called Indian Spice. (I was real pleased to find that my silverfoiled beads matched the cloisonné beads bought on a seperat occasion: both have metallic lustre that shines through and hold the piece together.)
Thursday, 14 January 2010
2-hole beads and filigree

I don't use 2-hole beads or slider beads very often. Probably as I think just making multistrand stringed pieces aren't fun -- I didn't use to have that many other ideas involving these beads.
That is, until I found a bunch of purple 2-hole beads with flower motifs. Very pretty with kind of a vintage style. For months they were just hidden away until I bought half a dozen silverplated filigree connectors from the US. I soon got the idea to link the connectors with the beads and that is how Victorian Amethyst was born (below).
I was afraid of bending the stiff filigrees -- thought I might damage the plating -- so it feels a bit "angular", but still nice enough to wear as a choker, using a ribbon as closure. As you can see, I ran out of filigrees and and to finish the choker using "3-to-1" necklace ends attached to drops in the same style as the filigrees.I liked the style, but felt the choker had a few minor design flaws so later I made my "Victorian Amethyst v 2.0", or Herrgårdshöst as I named it. It had an English title too, which was longer, as it was my entry to one of the monthly challenges at Vintaj blog, Golden Harvest in November 2008. This time I used brass filigree that I felt more comfortable bending and some new beads as the once I used in my first version was no longer to be found in the shop anymore. Instead, after much research I found similar matte beads in the US (of cause, now this shop no longer carries any floral 1-hole beads...).
I will probably make more jewellery in this style, if only I could find shops selling the right beads. The other 2-hole beads I own are eiter the wrong shape or have holes too close to one another to fit the connectors. Or, in rarer occasions, the beads are vintage or vintage-style, meaning the prices are too high for me...
Saturday, 9 January 2010
Baking brass in my oven
I stumbled over this tips on how to give brass that nice antique patina at B'Sue Boutiques. So I ordered some cider vinegar and soaked a couple of test pieces in a mix of salt and vinegar.
I don't know if it was the vinegar or the fact that the oven got a bit warmer than it said in the instructions, but after my first baking, the brass seemed to have turned more copper coloured than antiqued. Kind of the copper tone brass can be, if not yellow but red brass. It said to repeat the result if the brass wasn't dark enough so I did this -- soaked the pieces again and lowered the temperature. This time they lost a bit of the pinkish copper tone and turned more brownish, they way I wanted.
It's a tad hard to tell from the photo alone, but above you can see an untreated floral drop to the left, the coppery drop baked once and the slightly more golden brown drop to the right.
Even if it was boring to wait, especially when soaking the brass a second time, I did enjoy this experiment and will probably use the method again. And I will try to lower the temperature from the beginning to see if that will keep the brass from turning too coppery.
Thursday, 31 December 2009
Ogalala butterfly stitch

When it comes to off-loom bead weaving there are two things I'm especially drawn towards: lacy stitches and ruffles. Ogalala butterfly stitch combine them both: netting with a drastic increase of beads for every row creates flowing ruffles.
In the bracelet above, called Sjögräs (Seaweed), I have used chunky 8/0 japanese seed beads in peridot together with drops in sparkling aqua green-lined aqua. Not a colour combo I use very often, but I liked the feel of it, real bright summer shades. The clasp is a cobalt blue MOP charm.
When the bracelet was finished, I played around with it, rolling it together. Which turned out to be a good thing to do: when rolled together, the ogalala strip turned into a flower. Some time later a new contest was opened at Pärlplatsen, Regntunga skyar (Skies heavy with rain). The theme being to create beadwork in a greyscale. I sighed -- had been working a lot with boring colours lately -- but gathered all my grey beads and findings. That included a UFO, consisting of grey vintage drops, filigree connectors and pewter-grey chain. It had lead a quiet life in the UFO collections since I hit a dead end with the design. Now I stripped away some of the drops and flowers and instead I got the idea to stitch ogalala flowers to the filigrees.
The result was Under en silvermåne, Under a silver moon.

I actually did not get the idea of rolling my netted ruffles into flowers just out of the blue. A couple of years prior, I had made a rose in peyote ruffles for another contest. That contest was dedicated to peyote stitch only so while I didn't like the stitch much, I did enter with my very first finished peyote beadwork. The instructions for making ruffles had I found much earlier at Beadwork.about.com. That time I had soon realised that ruffles made great roses, the same way you roll a ribbon or paper rose. The rose was then stitched to a filigree box clasp. Ideally I wanted to use a sieve clasp, but at the time I couldn't find one so the filigree clasp had to make due.
Gammeldags ros means Old-fashioned rose.
Subscribe to:
Posts (Atom)