Showing posts with label stamps. Show all posts

Wednesday, 8 January 2014

Carved doodles


We once learned how to make carvings in linoleum blocks for printing in art class at school. I doubt I was really good at it, but it was fun. Didn't cut my fingers off, at least. It is, however, nothing I've dabbled in since. But then, some time last year I bought a set of knives (for carving in linoleum and soft wood) and a square of linoleum substitute.

This time I wasn't looking to carve printing blocks, but rather texture plates and stamps. I started out making raised motifs as that's easier: you just carve the parts that will be raised unlike when making stamps and you have to carve around every little dot and hair-thin line. I'm also thinking of trying to carve wood, but it'll have to wait. Focus right now is textures and motifs for imprinting clay. There's some forgotten poly clay that needs to be used soon.


At first I didn't want to start carving as I was afraid of ruining the square. It's not big so there aren't much room for carving and so I didn't want to mess up and have to buy a new one. Then I got an urge to just carve something. Didn't have a pen that worked on the greasy, plastic surface so instead I doodled and worked on freehand. As long as I stuck to simple flowers and leaves/grass straws it wouldn't be too hard to succeed with. They might not be amazingly good, but they are decent -- especially considering I haven't carved anything in the last 18 years and when I did carve in school it was just a couple of printing plates before we moved on to the next technique.

This is one of my more expensive types of doodling as you can't reuse the linoleum once it's cut. With photo editing, I don't run out of material. With drawn doodles, it takes a long time to run out of pen/pencil and paper. And in both cases you can -- in some amount -- erase mistakes in a way you can't do when carving. So I won't carve that much, it'll be too expensive to keep buying something to carve in. But it's fun so this won't be my last carvings.


The carvings look pretty boring photographed as there's no colours and no sense of scale so first I'll be showing a few pics taken in "artistic" angles.


 Very simple and not exactly meticulous carvings, but I hope that with some colour and a nice shape of the bead or pendant, they'll look nice. Some carvings are a tad shallow, but I'm hoping it'll be enough.


 Apart from the flower meadow, I made a few small motifs and a hideous texture that I can just hope will turn out ok once printed in clay and painted.


I also wondered what it'd be like to carve a word or two. Started by writing Ullegull's name and soon realised this would look very... special. Even if I had written out the name to follow, it turned out I had written it slightly too small and too condensed.

Then, thinking about my recent rune doodles, I thought runic script would be better for this than the latin alphabet. After all, runes were designed to be easy to carve into wood. And the result? Well, I still have to practice. Most of all, I learned how important it is to plan the cuts. When you write, you usually draw the main stave first and then the shorter lines and there's no problem, but when carving it turned out to be troublesome to cut the diagonal staves on the N and A runes as I got stuck in the groove of the already cut stave. Next time I'll try cutting the shorter lines first and see if that helps.


 And here's what it looks like printed in Tack-It. Not as horrible as it might look judging from the photo above, but still a lot of room for improvement.


I'll fill the square with some more carved doodles, but then I should try and make an effort to get out the clay and use the texture plate for something more than just Tack-It. Clay isn't my best medium, but some day I hope to master it a bit better -- though I would like to work with epoxy clays rather than polymer in the future as there's no hassle with oven baking. Anyway, fingers crossed I'll be able to show a finished piece soon so you can see the result of these doodling sessions of mine.

Monday, 21 November 2011

Ick -- first try at polymer clay

polyclay inside-out beads

First, I should add that these aren't new. The pictures are new, though, and I don't think I've shown my polyclay beads and pendants to anyone before. Why that is, is pretty obvious: I do have a hate-love relationship with all sorts of clay, which I've written about before, and this was my first time working with polymer clay. The only clays I've worked with before have been saltdough and modelling clay as a kid and then dabbling with ceramic clay in art class in school as pre-teen and teenager a couple of times.


 I'm no natural clayer. More a painter than a sculptor when it comes to creating. I like to work on a canvas, be it painting on an actual canvas, embroidering on cloth or weaving beads on a thread. While it most certainly can be dimensional, not least my beadweaving, it's not about moulding a material or chiselling away bits and pieces of it. I draw with threads and beads or piece beads together like it was Lego, I shape but I don't mould and manipulate like you do with clay. But sometimes I'm inspired to work with it nonetheless. It has its uses and there are many interesting techniques to try.

The beads above are made after instructions by Irene Semanchuk-Dean in the book Making Beautiful Beads. She calls the Inside-out beads if I'm not mistaken, which explains pretty well how they're made. It's a rather fun and very simple technique, perfect for clay newbies and kids. Like children's inkblot paintings, but in 3D.

As you can see, I haven't mastered the technique for smoothing out the edges and seams where the different clay pieces meet. One thing I did learn, on the other hand, is not to use white clay unless you're 100 % sure the work surface is clean. If there is just one pin-size speck of darker clay or one tiny glitter particle it will end up on the white clay... D'oh!

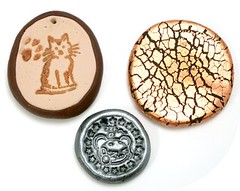
polyclay pendants


 I also used ultrafine glitters, metallic powder, liquid Fimo and copper foil on some of the pieces. You can only see the foil and silver powder here as I wasn't pleased with the other pieces. Too fugly to show...

The cat pendant and silver charm have stamped images. There was probably a good reason for adding the pawprint to the kitty image, but I wish I hadn't. Other than that, I'm pleased with the colour I mixed for it (using chocolate brown, white and a smidge of yellow, I think) and the chocolate brown frame. I also like the finish I got using Fimo silver powder.

The copper crackle cabochon is one of the pieces I was pleased with. Sure, it's a bit uneven, but I really like crackle effects -- and this one was so easy to do. Normally, instructions call for a pasta machine, but I just used an acrylic roller.


I will add another, bigger pic of the cab later. That photo shows off the copper foil better, but I couldn't add it now as the photo is on another computer. *photo added*

So there you have it, my first venture into the world of polyclay. I haven't touched it since -- and that was perhaps two year ago I made those. Clay probably isn't my thing. And now other clays have become more interesting in my eyes. Clays that don't require oven baking and clays that also work as adhesives. So why even bring all this up then? Well, I guess it's because of this. Pehaps I should give pc another chance? (Though I confess that a resin clay challenge or hop would've been much more exciting and inspiring for me personally.)

Wednesday, 30 June 2010

Stamping on leather


I've never stamped on leather before, but now that I got a nice, tough piece of vegetable tanned leather I thought I had to give it a go. This is my first test where I wanted to see how much I had to soak the leather before stamping and to see how hard I must hit the stamps (as you can see, hitting them hard makes the stamp cut through the coloured surface, totally damaging it). The stamps I used are just some common letter and number stamps for metal. Not even mine, my sis bought these at Jula or Clas Ohlson or some such.

I'm a novice when it comes to this type of leatherwork so I really don't know what I'm doing, but that much I have picked up from info online that I have to soak or dampen the leather first (in cold water -- warm/hot water is used to harden leather) and that it shouldn't be chrome tanned. There are special leather stamps/punches, but as mentioned above I used metal stamps, also something I read online, that some stamps made for metal works well on leather too. The biggest problem with stamping leather is that the imprint can rise and thus fade away. You can also use a knitting needle or other "dull point" to trace a pattern on the leather. And, yes, I will be needing to colour those imprints so they show up better.

There are other ways of working with leather too, such as cutting and pauting, but I'm not looking to do anything more elaborate that I can make using just metal stamps. I have used another method of leatherworks in school as a kid: in woodshop class we got to try pyrography on wood as well as leather. It stinks, but it was a not-too-difficult way of decorating leather. I do have a Dremel Versatip that can be used for pyrography, but I haven't yet tried it on my leather.


PS! For another example of my "leatherwork", see my shaped leather flower. Also an amateur experiment.

*Edited to add: Since writing I read about and clicked my way to Tandy Leather Factory. Not only do they share info on leather working, but they have so many stamp that I just must have. And embossing rolls. I've never been that fond of metal stamping, but now I feel like leather stamping might be something for me!*
Related Posts Plugin for WordPress, Blogger...