Showing posts with label patina. Show all posts

Thursday, 20 June 2013

Solder and tin paste experiments


So step one was to clear space at the worktable. Last night and today I got some time to play a little at that very table. Got to make use of the workspace now that I have it, right? Keeping it simple, I just picked up a few things to dabble with: little copper pendants, solder, flux and tin paste. Things that require that special workspace as it meant lighting that micro torch for the first time in ages.

Now, I should say that I've never soldered anything (if you don't count that copper spiral I added some solder to just to test if I'd be able to do some sort of solder joint). Have pretty much just melted solder from time to time, wondering when I'd make a project requiring this particular skill. And I don't have any good instructions for using tin paste so it was basically about playing around and see what happens. Of cause using due precautions as I'm using stuff that comes with warning labels.


These were my first two experiments. On the one of the left I used some plumber's silver solder I got from my dad. Don't really use it much since it didn't say what's in it and I do prefer to know that. It took time to melt, that much I know at least -- which is why I accidentally created the big dollops of unmelted solder. Drops that turned out to add a nice texture so it was a pretty good mishap.

The one on the right is tin solder (tin/copper/silver). The idea was to try this technique -- also see this link -- but I don't have the right stamps (clear stamps is a bad idea, don't ask me why I say that!). So instead I just melted solder and then hammered it a bit. All copper pendants are heated and hammered prior to solder application, by the way.

Both pendants were then oxidized using a tiny bottle of stink -- AKA liver of sulphur -- that I've had for ages, but actually use sometimes. Just a few drops are needed so the little bottle last a long time.


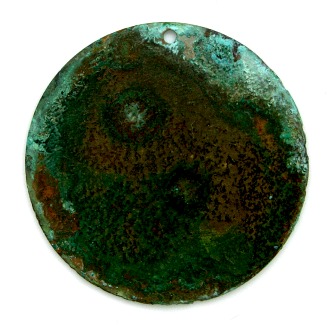
Then of cause I had to test my tinning paste (99,9 % tin). In theory I know how to use it, but I've never read any clear, detailed instructions. I didn't want to just tin the surface, but create a water drop effect described by Fleur Grenier in her book Pewter: Designs and Techniques. Unfortunately her instructions are really scarce, the only time she mentions tin paste and it's when describing how she made a project of hers, not one of the step-by-step projects in the book. It pretty much assumes you know your way around tin paste weirdly enough for a beginner's level book, which it is. Anyway, these were my first two tries at the water droplet tinning techniques. Far, far from perfect (I want the copper surface to show through between drops as in the book), but at least it's droplets. Not bull's-eye, but at least somewhere on the target.

The right one is oxidized.


Then just a few hours ago, I made these two samples. Same as above, just less paste and more dotted onto the surface than above. Both pieces where then oxidized soot black.

A fun time playing, even if not all samples are what I was striving for. But, hey, I am a newbie at solder and tin paste so what else is to be expected? I need to learn and practice -- and, besides, some of the pieces are cool and I do really like them. Below are my top 3.


Those results are really worth working more with, see where it will take me and what potentials there are in the techniques. Just need to polish my technique and read up on some basics while I'm at it.

What do you think?


~*~


Just a little footnote, which is pretty OT: Have you seen that I've added a new pinboard on my Pinterest page? It's called Colour it! and is all about painting, dyeing, drawing and in other ways adding colour to materials such as fabric, paper, metal, wood, glass etc. Not including patina, faux finishes and crackle as there's already a board for that. (It's amazing how fast you get up to over fifty boards -- Colour it! is board no. 63. I'm conservative when it comes to adding more boards and now there's over sixty anyway.)

Tuesday, 5 March 2013

The old hen house


Well, what can I say? I hope you like these photos because I hurt myself taking them. Or to be more precise, I hurt myself as I got the idea to go back and fetch my camera so I could take a few pics. On my way back to the hen house, I slipped on a patch of ice and sleet in the grass. I ended up wet and with a small bruise o the hip that I landed on. The camera landed in the snow, which isn't a good thing, but it also cushioned the blow so the camera's fine. It could've been this all over again, but it wasn't. And no real damage on me either, just a little soreness here and there, mainly in the left arm.

The big irony is that when going down to the hen house the first time -- before getting the idea of opening the door -- I told Uggi to go slow as I had to be careful, what with having the wrong shoes on (the ones that are useless on ice as they just slip) and it still being icy and very wet on the north side where the barn keeps the ground from heating up. Guess I should be listening more to my own advice...


Every now and then I've shown pics of the old hen house -- from one angle or another -- but this is the first time the door's opened. Don't think anyone's been in there for ages, but Uggi was curious so I opened for him. As the name implies, it used to be a roost, but after giving up farming, the hens moved from here to the by then empty barn. So as long as I can remember this has just been an old building (or two, as you can see, half the house is a latter attachment with more modern steel roofing) used for storage.

And this is what it looks like inside:


Anyone want to clean those windows? That's decades of grime and spiderwebs.


 This is not the only broken old spade in there.


 If you wonder why there's a window inside the house, it's because we're in the extension: this used to be the outer wall. I didn't go into the older part of the building as there's not much light and it's mostly full of barbed wire. This part of the hen house is spacious in comparison.


 I think I can get some nice texture images from that wall.


 Doodles? Zentangles? No, an old mattress. As you can see below.


I also found the old sewing machine. The one you power with a foot pedal. There's a table for it too, but it's stored in the hayloft. I think I'll show some close-ups of the embellishments in another post.


Uhm, no, I have no idea why we have a plastic sign that says Malmö...

And that's it, the secret of the hen house. I left out the worst mess as I don't think anyone needs to see more clutter than they can find in their own cellars and attics. The thing with a farm that isn't used for farming is that you have a lot more places to stuff all your old, broken, unused and found things into. Fascinating places for kids, but of cause not always places we were allowed. Not that we always listened. Nowadays, though, I'm a grown up and can go where ever I want. And sometimes I do, even though it's not as exciting as it was in a child's eyes. It's more a hunt for useful things and good photo opportunities, not a treasure hunt, an adventure into the unknown, as it used to be. But it can still be fun.

And who knows -- one day one will find something that one need in there -- and feel good about saving it. Why throw away something -- on day it could come in handy!

Tuesday, 29 January 2013

Hockeypulver patina experiment


I should be answering e-mails right now, but can't help procrastinating. So instead I'm writing this short post before forcing myself back to the mail.

This is another one of my little patina experiments. Remember how the only ammonia I could find was baker's ammonia (hjorthornssalt)? Well, some time after that I bought some hockeypulver -- mostly out of nostalgia but also because I had a craving for salty liquorice -- which made me start thinking: salmiak liquorice is made from salmiak and salmiak is ammonia based (I do remember some things from chemistry class!). So does that mean you can use salmiak liquorice powder like hockeypulver to create fumed or buried ammonia patinas?


My first attempt at finding out failed as I ate all of it before finding any metal to test it on... Not sure the second attempt was any better. One of the main reasons are that I wanted to try a fumed patina first and thought it'd work by just wetting the powder (after having eaten most of it), put a bronze tag in the box, close the lid and wait. Unfortunately as the powder melted, the tag sank into the liquid and it was more guck than patina that covered it once I opened the lid again. So I put the tag on a little scrap of paper on the liquid and sealed it up again. And this is the result after the guck was rinsed off. The glimmering is sugar crystals that I haven't scrubbed off: looks like the patina would disappear before the rock hard crystals if I tried and I haven't tried to immerse it in water to let the sugar dissolve.

So it is worth trying again? I don't know, but if it's the only thing you have, it can be used to create some sort of patina. And with better execution, the result would've been better than in my first hockeypulver experiment.

Monday, 17 September 2012

More inked verdigris


Sorting through my photos, I found another recent patina test. As in an earlier post, Tinted patina, it's alcohol ink (stream I believe the name of the colour is) over a so-so verdigris patina in an attempt to boost the colour and cover up ugly spots. Very successful as far as I'm concerned: the ink deepens the colour without hiding the mottled surface or covering the crusty patina. An easy way to save a less than impressive verdigris surface.

Below are the first to tests with a few drops splashed over the patina. For the beetle above, I more or less drenched the stamping in ink to get as intense a colour as possible.


So far I've only tried to add another colour than blue-green to the turquoise patina once. It'd be interesting to test more colours too, but I've just got a few ink bottles so there's not much to choose between.

Wednesday, 12 September 2012

The bearded lady


As I've said before, patina experiments don't always turn out the way you want them to. When using vinegar, the acid will eat into the metal if left long enough -- and it doesn't etch evenly as an etching fluid would, but createds a pitted surface, which can be great (see e.g. this post). But sometimes it goes plain wrong.

In this case I sacrificed a plated stamping. I'd bought it ages ago, but never really liked it once I got it. Didn't like how she puts her chin out, which made it feel like she had the mumps or something. So I wasn't worried about putting it in the baker's ammonia and vinegar sawdust: a good patina would just improve it, a failed patina wouldn't damage a piece of any particular value to me. So in the jar it went. I waited. And waited. Even forgot it for some time. And very little happened. Often, the vinegar will eat through sealants and even plating, but not this time. In the end, I put it in another jar with just salt and vinegar to see if that would speed up any patina. Eventually, this is what I ended up with.

More rust than verdigris and the edges had corroded badly. That distressed, rustic surface might be a great loook on many stampings, but perhaps not one with a human face because that protruding chin had become more etched and pitted than any other area.

I had ended up with a one-eyed bearded lady!


Wednesday, 5 September 2012

Tinted patina


Double post today. Just a quick snapshot of a couple of ammonia patina'd bronze tags. Like most of my tags, the most intense blues faded from the crusty patina surface. Having seen metal colouring techniques and patinas that were made on a base of a "primer" patina, I thought why not dye the verdigris crust with some alcohol ink. To boost the colour in the first case (left) and add another colour in the second (right).

You could probably do something more interesting with this that just add a few drops in the middle of the tag like here. This was just a first try to see how the ink reacted with the patina, how it'd spread and how well it'd stick.

Adding the pic, I was reminded of an old photo of a rose I made using layers of alcohol inks in a two or three different shades on a brass ox flower. Add a really matte spray lacquer and you get a nice velvet-like feel. (That white smudge is made by the nick in the lens on my old camera -- will not be missing that about it!)


Tuesday, 31 July 2012

Better or worse?


Remember the iris heart from this post? This is yet another example of a piece that first ended up with a meh patina (or at least a patina that looked more good than great) and therefore got another patina on top of it. Experimenting is fun and it's hard to resist the urge to do something more, think "what if..." and act on that curious thought.

This time I let the the dusty turquoise silver-plated stamping bathe in some old LOS solution I found. Didn't know what the result would be as I had no idea how it'd react nor with the flaking plating (which could still have som lacquer left on it too), neither with the previous patina. My thought was that it would darken the metal so this wasn't the result I was aiming for...

The effect is cool in one way, though, as it makes the metal look very old and dirty. Like it's been picked up from the mud. It really does look like dry mud, nothing like the oxidised black or brown LOS normally creates on metal. Some would probably call it ruined, but I like distressed and old-looking surfaces. "Real old", the authentic, is of cause the best, but simulated old like this can be gorgeous too (if it isn't overdone or made all cutesy or obviously fake, like some do with shabby chic).

Below you can see what it looked like before. In a way it looks ok in picture and it almost makes me regret the second patina, but the contrast was low IRL, making it hard to see the iris motif and the colour was fading. But was it a good call, adding liver of sulphur? I really can't decide.


So what do you think: did the second patina make it better or worse? Or just different?


(Size note: Including the loop, the heart is 54 mm high. It's a big pendant, not a small charm.)

Saturday, 28 July 2012

So-so patina results


Not all patinas turn out the way you like it. Some will turn out different, but good, or perhaps even different and great. Others will turn out different and disappointing.

The heart above is a plated stamping, silver ox or something like that. Those stampings are usually lacquered to protect the antiquing and keep the plating from tarnishing. I don't always bother with such details as seeing if there is lacquer and if so remove it before trying to patinate a piece. That was the case with this iris heart. I just chucked it into the baker's ammonia and spirit vinegar (ättika 24 %) sawdust and checked in on the progress from day to day.

This piece have been removed from the sawdust and rinsed in water several times, which is one of the reasons it doesn't have a crusty or cobalt patina. Today when I took it out and let it dry, I also brushed it vigourously with an old tooth brush, removing some of the blue dust of the patina. The result almost looks like an old/antique, not very wellmade, paintjob.

Not sure what I'll do with it. Keep it like this or try to enhance the motif a bit in one way or another (adding LOS? polish the relief? gesso in recesses?). I'll have to think about it for a while longer.


This is a Vintaj brass tag I put in the vinegar-and-tea leaves jar. Originally I had attached an image transfer to the surface (Nunn Design image transfer sheets), but forgot to check that the lacquer was compatible with the plastic film. It wasn't -- I watched in horror as the beautiful butterfly image dissolved in front of me! So it's just been laying around, looking like a ruined mess. Adding some verdigris couldn't make it worse so that's what I did.

Above is a pic of the back (also lacquered) and below is the front with the ruined image transfer.


Finally, another piece I put in the ammonia jar:


Not exactly sure what the material is. It looks very much like pewter, probably lacquered but it doesn't really look plated as it was darker than most silver and white plates. At first it looked like the patina hadn't had the slightest effect on the charm, but once I took it out, I saw that the patina solution had darkened the metal significantly. (The reason one edge is lighter is that it protuded out of the sawdust so it wasn't fully buried as the rest of it.)

This is the back of the charm. The front is so fugly it doesn't feel work showing. In fact it was the "fugliness" of it that made me sacrifice it for the patina experiment in the first place.


~*~

Do all these patinas last? No, unfortunately not. Even if lacquered, some of my samples in this blog have altered in appearance already after a few weeks. Maybe they needed heavier layers of the sealant, maybe I needed a better sealant, maybe the pieces should've been rinsed and/or neutralised better before sealing. The patina tutorials and recipes don't always discuss such details.

You need to make sure you stop the process you started as best you can or at least slow it down as much as possible. But it just isn't always enough to completely stop it -- and sealants often alter the patinas one way or another (a common problem is that matte sealants dull heat patina colours or alter the hue). I've also had problems with some lacquers that have seemed to "boost" the patinas before drying. It's all about experimentation at this stage.

Wednesday, 18 July 2012

The butterfly: patina on silverplate


This silver-plated butterfly component was buried in the same baker's ammonia-and-sawdust mixture as the bronze tags. Like the tag in the bottom right corner, it got a cobalt blue patina. Fearing it'd bleed just like the first tags, I let it dry on the window sill.

Turns out that dark blue doesn't only wash out if the patina is still moist (but not if dry it seems): it dissappears in sunlight too (or air, but the blue tag is still blue and I didn't seal it until today), turning into turquoise blue. You can still see some patches of darker blue, but it's now mainly a dusty turquoise. I also brushed it a bit with a tooth brush to see how durable the crusty patina was. There was dust and some of the plate shows through, but most of it still stuck to the metal.

I  tried to use the vinegar patina on plated components but it didn't take, at least not as fast as the ammonia mixture. Maybe the pieces where made using different plating metals or sealants, maybe the ammonia just works better on plating. Now the pieces from the vinegar jar are in the ammonia jar so we'll see if that works on them. (And the butterfly is in the vinegar and sawdust just because I want to and I already have ammonia turquoise tags so why a butterfly too in a colour I just like sometimes?)


Footnote: I say silverplated and believe it was describes as that, but it could also be white plate or rhodium plate. I'm not sure. Same goes for the two pieces I tested the vinegar-soaked sawdust on.

Tuesday, 17 July 2012

Blue, bluer, bluest


As promised, here are some pics of my first baker's ammonia buried patinas. The top row is vinegar/ättika patina as a comparions while all the bronze tags in the bottom row are coloured using a mixture of baker's ammonia (half a sachet), sawdust and spirit vinegar (ättika 24 %) to moisten it.

The two first tags were rinsed in water almost immediately after being "excavated", which pretty much washed out all the cobalt blue, leaving a turquoise blue, crusty patina. The last tag has had another day in the sawdust and then been allowed to dry before being carefully brushed and rinsed.

Blue isn't normally my favourite colour, but I must say it was cool to open the jar and find an intense cobalt blue patina -- created from nothing more than two common household products. (Well, at least baker's ammonia is sort of common in Scandinavia: don't know if it's often used in baking in other countries.)

This patina became awfully "crusty" compared to just vinegar or vinegar and salt. Now that I know baker's ammonia works so well, I'm also going to try a fumed patina. That is, after I get some more of it -- and some more metal blanks...

And just to round it off: one more vinegar patina tag. Before burying it, I hammered it a bit, causing it to dome slightly, the idea being that the patina would be more protected inside the cupped tag. (Colours are a bit off in these pics, I'm afraid...)


Sunday, 15 July 2012

Resist patina


I've been playing with my patinas today too and thought I'd just show a somewhat more successful example of resist patina (as mentioned in yesterday's post One more patina'd bronze tag). This time I used some sort of LOS (liver of sulfur) mixture I bought ages ago and had forgotten about. Because the sticker was left on for a much shorter period of time it was easy to peel off and there were no glue residues to remove, risking to harm the patina in the process. The surface of the tag was also sanded to get more of a tooth so the patina would stick better.

As with e.g. etching, though, you should avoid stickers with narrow lines. In this case I really just had to go with whatever sticker fit the small size of the bronze tag. Next time I'll get some bigger metal blanks to work with so I can be more picky in my choice of sticker and so I can create bigger images. (But it looks slightly better IRL than in these huge close-ups I show you.)


I also dug up this from the vinegar-soaked sawdust. It's a tag I'd partially dipped in copper brown embossing powder one day because I was bored (heated it with my butane torch and dipped it straight into the jar of powder, which -- being a plastic powder -- melted almost before the metal touched it). Notice how the verdigris can the seen under the embossing powder. Embossing powder normally isn't matte: this tag has been sprayed with a matte lacquer.


PS! Using baker's ammonia for patina (in lieu of other types of ammonia I'm guessing most people use) as I mentioned in this post seem to be working a charm. Might have some pics for you tomorrow.

Saturday, 14 July 2012

One more patina'd bronze tag


Lots of patina posts lately. The reason this sample wasn't in the previous post published a few hours ago is that I wrote that post yesterday (right now there's so much I want to post about that I could write three or four posts aday, but I'm trying to pace myself). This post is just being written as I fished this particular tag from the tea leaves around the same time that previous post was being published.

I'm not going to call this one a patina mishap because eventhough it didn't end up looking like I wanted, it wasn't a mishap. It was part of the experimentation, of the learning process. This was my first try at using stickers with a buried patina and of cause it doesn't always go as planned the first time.

Part of the learning process was also the realisation that adding another patina on the first one works wonders sometimes (see this post), but it doesn't really work that well all the time. Sometimes it can make things worse -- if you're unlucky -- or just turn it into another kind of meh.


It's not the first time I use stickers for something like this, though. I've used it before for a "reversed resist patina" when I stuck a few peel-off stickers (all stickers peel off, I have no idea why these silhouette stickers are called that) on a couple of Vintaj brass tags. Those tags come with a nice antiqued patina, which I removed using a commercial copper cleaning product. When removing the stickers, I got a simple "patina pattern" as you can see below.


(You can read more about the inspiration behind these tags and what I did to the right one here.)


The main issue here was probably that stickers work better with quick patinas like a dip in LOS or when stripping a patina like above. Spending a couple of days in vinegar-soaked tea leaves the sticker glue really stuck -- the same reason why you should never leave masking tape on a wall or object while the paint dries unless you use masking tape specially made for that sort of use. And trying to remove the residue (which you can see in the first pic), I removed part of the patina. (And to tell the whole truth, I never cleaned this tag before patinating it. It was probably both greasy and had lots of lacquer residue, which might have affected the outcome...)

So my conclusion is: either I need to use this method for another patina (on that either is fast enough for the sticker glue not to begin to harden or tough enough to withstand the removal of said glue) or I need a less rough glue-removal method. I know oil dissolves glues -- an oil mishap in one of my boxes of this and than made that all to clear, lots of detached labels -- and maybe that would be a better solution, one that doesn't harm the patina. The only question then is whether it'll be a problem when sealing the metal...

So what now? 

-I'm going to try the stickers method again, using both using a fumed or buried patina and using LOS. I'm also intent on trying what Charles Lewton-Brain in this article calls "bound materials", which is similar to the sticker method.

-I've just prepared a different buried patina with some ammonia, which is called for in many patina "recipes", but using the only ammonia I have: baker's ammonia, hjorthornssalt. (It does mean I can't bake any drömmar right now, though, as that kind of cookie/biscuit can't be done with more modern leavening agents such as baking soda or baking powder. Sacrificing everything for my patinas here.) Really fun thing is that upon writing this I googled baker's ammonia and patina and got this hit. Which also taught me a new word: metallokromi (= metal colouring).

-Another thing I want to try is recipes no. 12 and 18 at the Science Company. Because I love purple

-This post on Jenni's Beads also made me want some Swellegant Tiffany Green/Rust patina to create a different kind of patterns using iron paint on copper or copper alloys like bronze and brass. But buying Swellegant doesn't fit my budget and I'm running out of metal so sadly it'll have to wait.

-But the main thing is my shortage of metal. I've got a few bronze tags left, but no stampings I want to sacrifice, nor any other metal blanks. I need to buy more... But I also want to buy beads so there's a conflict as I'm not sure I can afford buying both... And I want some different things: brass, copper, stainless steel, pewter, single clad silver-filled/copper blanks (they've got those at Beaducation).

Well, well. It's fun to play with patina so I'm sure I'll come up with a solution.

And to round it off, here's a pic of some of the bronze tags in the patina collection so far:


Patina again


Just one more tag that I buried in vinegar-soaked tea leaves. This one I haven't washed to remove some of the patina, but let the patina form and then dry slightly before removing any stuck leaves and rinsing it. This resulted in a darker and bluer patina than in my previous attempts (check out the patina tag in this blog for pics).


It's just one tag: the first and second pic is of the same side, it's just the light playing tricks with the colour and patterns in the patina. I included both simply because I like the colours. The tag is the same size as always, roughly 16-17 mm, much smaller than they appear in the photos.

Thursday, 12 July 2012

More patina: the back


I took these pics thinking they'd end up in one of the previous patina posts. Just a "by the way, check out the back of that stamping" I just sealed, but it didn't happen so why not show it here?

On the left is the back of the brass stamping I first buried in vinegar-soaked sawdust and then torched (see this post). Classic red heat patina. As you can see, the patina looks very different on the side you torch compared to the back, which is turned away from the heat source. To get a similar patina on both sides, you need to apply the heat on both sides. I prefer the colours/patterns being different so I almost always only apply heat on one side (usually the front).


On the right (in the first pic) is the burnt back of the heat patina and gesso stamping featured here. It's burnt because I originally wanted to use it as a cabochon glued to a bead embroidery foundation and therefore filled it with white/hobby glue. I didn't use it and so when I wanted to play around with patinas I had to get the glue out and the easiest way -- after having tried to pry it out -- was to heat it enough to melt it. Probably not the most healthy way to do it, but I was careful (not recommending this method to others!). The burning happened later when applying the heat patina.


PS! Don't forget to help choose a twin bead design to write a free tute on -- check out this post!

Monday, 9 July 2012

Patinated bronze tags


I'm on a blogging streak right now, posting every day! Showing you my patina mishap yesterday, I thought I'd show something that went more according to plans today. These are the same bronze tags I've used in some of my previous patina posts, including the one on peanut oil patinas.


The first pair of tags (above) were buried in jar of old tea leaves -- from teabags saved from a tea dying session -- soaked in spirit vinegar (ättika 24 %). They were left in there perhaps 48 hours or less. They were covered in verdigris that I washed off to reveal the pattern underneath.

[No pic of it, but I did use the same sealer as in the valkyrie stamping on the back of one of the tags to see if I got the same result: sure enough, this morning the back was  covered in green verdigris. So it's a good sealer if I want to amplify the patina, but not so much if I don't (as with the valkyrie). It doesn't behave like this on heat patina'd stampings, though, so I can keep using it there. One more reason to add a spray sealer to my shopping list.]


For this sample, I mixed some ättika in a heap of salt and placed the tags on top. After 24 hours they started to form verdigris around the edges, but nothing like in the buried patina. I then placed some salt on the top of the tags, which created the patterns by next day. This solution is too wet for verdigris to form if buried: by placing the tags on top I got more of a fumed patina than anything else.


PS! Don't forget to help choose a twin bead design to write a free tute on -- check out this post!

Sunday, 8 July 2012

Patina mishap


You remember my valkyrie from this post? The one that I didn't know if I wanted to do something more to or keep as it was as the patina was rather nice. Well, as mentioned in the comments I decided to keep it as it was. All I had to do was seal it. It took a few days to decide so in the meantime the stamping sat on the worktable. When a few new spots of verdigris appeared I decided it was time to brush it off and seal the stamping before it got another, less wanted patina.

So I did it. Using a sealer for patinas. But...


This is what I found when the sealer had dried. It looks like bark covered in bright lichen. Or a loaf of bread suddenly "attacked" by mold... A nice effect in a way, but I didn't want it on this piece! On a piece with an abstract pattern it might look great, but here I feel it obscures the motif too much -- and it doesn't look like an old artifact either so I can't go for the "just excavated and ancient" style either.

I don't know why it happened. Maybe I'd not rinse off the vinegar enough or neutralised it. Maybe there where spots of verdigris that accelerated when mixed with the wet waterbased sealant (one that you brush on, not spray sealer/lacquer). Either way I ruined my patina.

What remains to do now is to choose whether to keep the piece like this or do something about it. It's not like it can get more ruined... (I've thought about adding crackle glaze on patinas, something along the lines of Tammy Tutterows alcohol ink crackled metal pendants pehaps, so maybe I'll do that on this one, but I'm not sure. 

In the meantime I guess I'll have to just enjoy the colours. There's a nice mix of green and turquoise in places and patina at the bottom is pretty too.


Thursday, 5 July 2012

More buried patina


New blog post today again, but like yesterday's I don't really have much to say (other than I'm still here and haven't abandoned my blog?). Just showing a few pics.

These are the rest of the pieces I patinated with the valkyrie stamping shown here. Together with that antiqued brass piece, I also added a few other things. Like the "antique gold" ring above. Not knowing what metal it really was (antique gold being used for brass ox as well as antiqued gold- or yellow-plate over various metals), I had no idea how it'd turn out. It ended up looking pretty rustic. Like it was excavated at some archeological site. Huge pic: IRL it's perhaps 20-25 mm wide. Can you see the faint striped patterns at the upper right and lower left parts? That's because those two sections were wrapped with craft wire -- made for this pic -- when buried and then removed afterwards. The wire acted almost like a resist (I'm planning on trying resist patinas too one of these days). An effect I want to explore more.


The second piece was a stamped silver-plated filigree drop. Here it was partially about testing the plating and partially about using what I could find. The patina is as uneven as it looks. I'm not sure if the rusty bits are patina developed on this piece (which might be a steel-cored brass stamping) or if it's stains from the third piece seen below. Anyway, I like the darken areas, but on the other hand you can get such an effect much easier with e.g. LOS or the egg oxidation method. I think this one will be subject to more patina or faux patina methods. Not sure exactly what -- heat patina? paint? rust paint? LOS? -- but something else will be done to it.


The third piece wasn't any kind of copper alloys, which is what I've used the most for buried patinas, but an iron alloy butterfly (more exactly a Vintaj Arte Metal decorivet). I'd painted it with acrylics and alcohol inks in several layers, but even after adding a protective, shiny lacquer it didn't look that good. So instead of trying to remove all the lacquer and paint, I chucked it in the sawdust, thinking vinegar, with time, effects everything. And it did. The piece didn't come out of the sawdust look like this, but some of the paint and original black patina (cf. small butterfly on the left in picture) had gone and the rest of the paintwork could easily be peeled off.

This too is a piece that will probably get another round of patina or paintwork. It does have an interesting aged or distressed look as is, but the steel colour is a tad boring. I want to keep the uneven surface with dark areas so perhaps a sheer wash of colour, heat patina or perhaps even a bit of rusting if I can make that happen in a controlled way (this might work, I've got some of that as well as the acrylic-based iron paint to go with it).

PS! If you want to see what rusted iron paint looks like I've shown an example here. Read about all the Magic Metallics products here.
Related Posts Plugin for WordPress, Blogger...