Showing posts with label brads. Show all posts

Thursday, 5 July 2012

More buried patina


New blog post today again, but like yesterday's I don't really have much to say (other than I'm still here and haven't abandoned my blog?). Just showing a few pics.

These are the rest of the pieces I patinated with the valkyrie stamping shown here. Together with that antiqued brass piece, I also added a few other things. Like the "antique gold" ring above. Not knowing what metal it really was (antique gold being used for brass ox as well as antiqued gold- or yellow-plate over various metals), I had no idea how it'd turn out. It ended up looking pretty rustic. Like it was excavated at some archeological site. Huge pic: IRL it's perhaps 20-25 mm wide. Can you see the faint striped patterns at the upper right and lower left parts? That's because those two sections were wrapped with craft wire -- made for this pic -- when buried and then removed afterwards. The wire acted almost like a resist (I'm planning on trying resist patinas too one of these days). An effect I want to explore more.


The second piece was a stamped silver-plated filigree drop. Here it was partially about testing the plating and partially about using what I could find. The patina is as uneven as it looks. I'm not sure if the rusty bits are patina developed on this piece (which might be a steel-cored brass stamping) or if it's stains from the third piece seen below. Anyway, I like the darken areas, but on the other hand you can get such an effect much easier with e.g. LOS or the egg oxidation method. I think this one will be subject to more patina or faux patina methods. Not sure exactly what -- heat patina? paint? rust paint? LOS? -- but something else will be done to it.


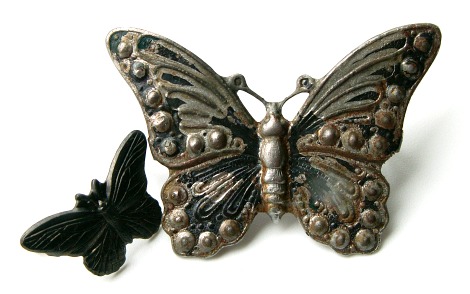
The third piece wasn't any kind of copper alloys, which is what I've used the most for buried patinas, but an iron alloy butterfly (more exactly a Vintaj Arte Metal decorivet). I'd painted it with acrylics and alcohol inks in several layers, but even after adding a protective, shiny lacquer it didn't look that good. So instead of trying to remove all the lacquer and paint, I chucked it in the sawdust, thinking vinegar, with time, effects everything. And it did. The piece didn't come out of the sawdust look like this, but some of the paint and original black patina (cf. small butterfly on the left in picture) had gone and the rest of the paintwork could easily be peeled off.

This too is a piece that will probably get another round of patina or paintwork. It does have an interesting aged or distressed look as is, but the steel colour is a tad boring. I want to keep the uneven surface with dark areas so perhaps a sheer wash of colour, heat patina or perhaps even a bit of rusting if I can make that happen in a controlled way (this might work, I've got some of that as well as the acrylic-based iron paint to go with it).

PS! If you want to see what rusted iron paint looks like I've shown an example here. Read about all the Magic Metallics products here.

Friday, 1 July 2011

Metallic butterfly wings


This little critter is an Arte Metal decorivet by Vintaj that I got as part of the delicious beady mail I got when winning the Rings & Things blog partner drawing this spring. If you want to see what it looked like before I altered it -- forgot to take a pic myself -- you can find a photo here.

Inspired by a keum-boo butterfly, I wanted to add a mottled effect to the wings using leaf metal flake. Leaf metal often comes in sheets, but flakes are -- as the name inplies -- a blend of different types/colours of leaf metal in small flakes. They are sold in different colour combination and here I choose to use one with purple and rose flakes on top of the gold, silver and copper ones. That is gold- and silver-coloured copper, not precious leaf metal.

Compared to working with sheets, it's very easy to "gild" a surface using flakes. For a mottled effect like this one you just simply dip the surface -- painted with size -- into the flakes, let it dry a little and brush of excess metal with a soft brush before letting it set completely. If you don't like the result, add size to points you like to cover with a different colour flakes and either dip again or apply single flakes to the spots using a soft, dampened brush.

The butterfly has tiny specks of leaf metal on the body. That's because I initially wanted to add foil to the bands across it, but didn't like the result so I scraped it off. You can't really see much of it IRL as the butterfly is smaller than in my photo, but I'll try and scrape some more off before sealing the gilding. Because it's copper-based, the leaf metal can easily tarnish unless coated.

Not my best work using leaf metal flakes, but a fun -- if slightly fiddly -- alternative to using paints, alcohol inks, gilder's paste and such.

Tuesday, 26 October 2010

Purple jewellery to show support

On one of the Swedish jewellery-making forums I'm active, Smyckestillverkning iFokus, the founder recently announced a little challenge: make purple jewellery for October 27. The reason? An appeal to wear something purple that day to show HBT youths that you accept them for who they are, that you support them and that it's ok to be gay, bisexual or transsexual. There isn't anything wrong with them, they aren't weird or perverts, as some people seem to think, looking at gay people in distaste. And, perhaps most importantly, it gets better!

The background is of cause the five suicides in the U.S., where the gay boys gave up on life after being harassed just because they weren't "straight". But it isn't just in the U.S. that HBT teenagers, and adults, attempt to comit suicide because of the way certain individuals in society look at them. So on Wednesday we can do this one simple thing to show that we like them for who they are.

For this challenge I've made two pieces. First, a simple flower necklace I put together last night. It features light violet acrylic (lucite) flowers with elongated drop glass beads as "stamen" that I attached to a jump ring, forming a small clustre. I wanted to string the clustre on purple cord or wire, but didn't have anything that matched the purple nuances in the flower. So instead I did something I normally don't like to do: I just strung some Toho 8/0 seed beads on beading wire. (Why I don't like to do that? It looks cheap, like some tat you can buy for pin money. No disrespect to those that do string seeds like this in their jewellery making.) The colour is called sugarplum, a cooler purple that e.g. amethyst.


While shooting the necklace, I felt an urge to do something more. Something to show how easy, how uncomplicated, it is to make a quick piece of jewellery for a special occassion.

The result was a simple brooch, that you can wear on a jumper, coat, hat, scarf or where ever you feel it will be visible. Three paper flowers, sealed for durability, are held together by a flower-shaped brad, which I've attached to a brooch back. The petals of the brad are bent a bit for a better shape and to keep it from pushing on the paper petals as it causes them to curve backwards.


To attach the brad, I simple "wrapped" it over the bar of the narrow brooch back. Squeezed it with my pliers and burnished it slightly. It seems to be sturdy enough. If not, I could always add a drop of glue for added security.


The challenge entries can now be uploaded at a special gallery thread at the forum. It is encouraged to write a short description in both Swedish and English. You can find the thread here: Den lila kampanjen.

Tuesday, 13 April 2010

How to make links and spacer bars from brads


~*~Instruktioner på svenska hittar du här. ~*~


I've already shown you my brads bracelets. Today I thought I would show you how to turn brads into jewellery components, using only a pair of round-nose pliers. In my example I will use clamshell style brads from Vintaj. You can also use studs or Decorivets, provided they have two peripendicular prongs to loop.

Here you will just find instructions for how to make the links -- how you want to use them in jewellery is up to you. Be creative! For a couple of examples, see my brads bracelets in the link above.


Supplies needed: Brads

Tools: round-nose pliers, nylon jaw flat-nose pliers (optional)


1. Start by looking at your brads. Do they look like the one above, with two prongs protruding straight from the sides of the brad: go directly to step 2.

If the brads on the other hand looks like the example below, you need to straighten the prongs first. Begin by bending out the prongs from the centre. Then use your fingers to pull the prongs straight, as in the brad to the right in the pic below. You can also use nylon jaw pliers to straighten the prongs, especially useful if they are hard.


Now it's time to begin making the links. I will show two different variations: one with loops on the back -- suitable for making spacer bars -- and one with loops on the sides, which is a better option if using the link as a connector.


2. Spacer bars: Grab the tip of one prong with the jaws of your round-nose pliers and begin rolling it inwards so it forms a loop. It can be tricky grabbing hold of the outermost tip without the pliers sliding. Don't give up if this happens. You may want to keep the jaws slightly away from the tip for better gripping, but not too far as the loop won't get a nice round shape then.


4. Keep rolling the prong until you reach its base and the loop rests on the back of the brad.


5. Repeat steps 2-4, looping the other prong. Check that the loops are equal size: as when making loops on wire it's important to begin the loops at the same point on the jaws of the pliers for the loops not to end up with different sizes.

6. Your component/spacer bar is now completed.


7. Connector: To make a connector, loop the prongs as in steps 2-4 above, but instead of rolling the prong inwards and under the brad, you will roll the loop outwards (as indicated by the pic above).


8. Keep looping until you reach the base of the prong. In this component, the loop should end up on the middle of the brad, as seen in the pic above. Repeat with the second prong and your connector is finished.

~*~

NB! Brads are not originally made for jewellery making and are not necessarily regulated by the same laws with regards to contents. If you are allergic or will be selling your brads jewellery, it's wise to check them first, not least for traces of nickel (within the EU it's illegal to sell jewellery that isn't nickel safe). Some embellishments on brads are not very durable -- that is also worth keeping in mind.

Friday, 25 December 2009

Brads bracelets


As some of you might already know, I enjoy looking for jewellery supplies in the scrapbooking section in the craft shops. One thing I especially like, apart from the papers, is the decorative brads that come in a wide range of styles. I use both the kind where the motif is made of painted metal and the ones with epoxy stickers on.

Brads are easily made into jewellery links or pendants/charms and they can also be attached to bracelet bases, as I've done in the bracelet above. Round brads with vintage motifs were added to a tough suede bracelet, which came already with holes. A quick project -- what took time was arranging the brads and trimming the legs so they were short enough to more or less "embed" in the suede after attaching them in the holes. (If you are looking for the same type of bracelets, I got it from Perles & Co.)


Making brads into jewellery links was one of those ideas I came up with all on my own -- and was pretty proud of doing it -- just to realise later one, when doing some online research, I'm not the only one having had this idea... See Stampvamps.com for example. In my "Colourful Sakura" bracelet I've used jump rings made of square wire as these matches the rolled up legs of the brads better in style. In the summer bracelet on the right I've instead covered the plain jump rings with Miyuki drops.

I have also found another way of making brads bracelets, unlike the methods I've used, Patty's Stamping Spot. She uses a bracelet chain and "wrap" the brads around the links. I really like this way of making brads bracelets too so I think I must have a go at something similar soon.
Related Posts Plugin for WordPress, Blogger...