Showing posts with label ear cuffs/earrings. Show all posts
Saturday, 22 March 2014
We're All Ears march challenge
So... when I saw the pic Erin chose as the inspiration for this month's challenge, I felt like joining in even though I rarely make earrings. Very rarely. The deadline was yesterday and I had nothing to show. Why? "Det bidde en tummetott", as we say here (at least if you remember the old classics). Of grand ideas came a meager result. I wasn't happy with my embroidery designs, that's way. First time trying to make embroidered earrings and all and I'm simply more used to adapting stitches and motifs to bracelets, not tiny earrings.
But I didn't really give up. No, instead I decided to let the ideas mature a bit and instead make just a fun little design. Or "design", it's more of just putting a piece of tape on an earring. As you can see below.
But let me explain some more. That's a piece of printed textile tape that I pierced with a headpin on the middle and then folded together. After that it was just a matter of creating a wrapped loop and slide it onto the clip-on earrings. Unfortunately, I only had bright silver plated and gold plated ones and this earring dangle is crying out for something a tad more antiqued (tricky to oxidize plate).
Those rectangular tape pieces reminds me of the "wind catchers" on a fūrin. Guess they'll blow in the find just like them too considering how light they are.
As for making the loop you have two options: either make a small loop big enough to fit the ring, but not slide over the balled ends, or make a slightly larger loop that slides over the ball ends so you can make the earrings interchangeable. Personally I prefer the latter, though you have to be aware that it's easier to loose either the dangle or the ring when they aren't permanently attached to each other. (This is what happened with these earrings yesterday...)
That's the back of the earrings in case you wondered why I needed four photos of a simple pair of earrings.
So to conclude, not the earrings I wanted to show you today/yesterday, but still a fun little experiment I'm not too embarrassed to show people.
To see everybody else's challenge entries, please visit the Earrings Everyday reveal post!
Sunday, 2 March 2014
Challenge earrings -- or, seeing an old bead in a new light
I'm still editing my reveal post for the Challenge of Music so I thought I'd take a break from that and show these earrings instead, which is sort of a fusion between yesterday's challenge in FusionBeads' 30 Day Challenge and this week's bead soup challenge in Heather Powers' Jewelry Making Mojo Challenge. It's not much of a bead soup, just four beads, but I'll try to explain why it still sort of is in my mind. But let's start from the beginning.
These four beads come from a bag of mixed leaf beads I've amassed over the years. It contains leftover beads as well as beads I just bought one or two of (often just to see the shape or colour IRL with no project in mind). As there's so few of them, I rarely find a project for them. Especially since I don't actually do earrings (as explain in an earlier post, I don't wear earrings and don't have pierced ears), but lately I was inspired by the blog Earrings Everyday to get my little stash of clip-ons and screwbacks out.
The focal point of this design is the milky red beads. Originally, I bought them for an autumn design with matching flower beads. They're autumnal maple leaves and I never saw them as anything but. Until... Thinking about the bead soup and earring challenges, I picked out the leaf bead bag and started to think. Turning the red leaves around, they do look like some sort of exotic flower or a floral motif from old indian, persian or other asian designs. Suddenly, I had budding flower beads instead of leaf beads in the bead soup ziplock bag!
After that it was only a matter of deciding on the design.
In the end, I when with my first choice as I liked the inverted drop shape.
And that's it, the first pair of earrings I've made in over a year.
Etiketter:
challenge and contest entries,
czech,
design woes,
ear cuffs/earrings,
flora,
JEWELLERY
Friday, 25 January 2013
My Nina Designs creations
I'm a fan of Nina Designs jewellery components so when I read about their new blog partner programme and the chance for jewellery makers to get some goodies from them, I just had to ask if I could participate. And earlier this month I got a late christmas present in the mail. Inside were lovely bronze charms and components, soft deer hide leather cord and sheer silk ribbon.
Today I thought I'd show you what I made with the stuff I got (or at least most of it). I won't complain too much about the quality of my photos as I do that too often, but the light turned out to be more finicky than usual today and I just hope the pics are too bad.
One of the first things I did was to figure out something fun to do with the leaves. Thinking about it back and forth, I settled for two things I like: weaving and embroidery floss. Just like you would use a metal frame to weave and twist wire around in wirework, the 24 mm long skeleton leaf charms acted as a frame for weaving the floss. If the charm hadn't been made in such a pretty metal, I would've wrapped the outer lines with floss too, but this time I decided to keep the metal bare, which also frames the colourful floss.
Originally I wanted to show them on a golden jewellery chain, which is how I intend to wear them, but I couldn't find it. So just try to imagine the leaves dangling on i thin matching chain.
The package also contained two coral branch charms, which I immediately wanted to embellish a bit. It was like they were crying out for some blossoms and leaves. This was my first version with tiny acrylic flowers wire-wrapped onto the branch. Simple, but fun. Not sure what chain or cord I want for this one, but will probably opt for a chain that'll go nicely with the colour and texture of the branch.
I also made a second version today with the same flowers but with added seed bead picot leaves where I strung the pendant on the green deer hide cord and finished by adding the toggle clasp that were also in my package. No pic of that as I'm still not sure whether I like it or not.
UPDATE: I just realised that it would've been a nice touch if I'd oxidized the branch first for a more earthtone colour rather than a shiny bronze.
The sheer silk ribbon (aka fairy ribbon) I got had such a gorgeous dark purple colour I knew this would probably be my favourite piece. But what to add to it when I'm a girl that can wrap a ribbon around my wrist and find that a perfect bracelet in itself? Actually, this piece started out as and idea. It all began with the infinity link and my questioning myself what could be a fun and less usual way of using it. Why not make it into a slider, threading it onto the ribbon and adding a focalpiece to it? Which is exactly what I did by wiring an acrylic violet flower and two dark green acrylic leaves to the middle of the link.
To finish the bracelet, I added two -- for their size rather heavy -- lotus petal charms (such a simple and lovely shape) to each end of the ribbon. The idea is that they will both keep the slider from falling off and add some weight that'll keep the knot in place when wearing the bracelet. I say bracelet, but it could probably also double as a necklace.
The final piece were a couple of earrings. Unfortunately I ran out of roses, but I didn't want to give up my idea so I simply made just one earring. The base for this earring is a three teardrops link that I attached to a bronze hook. I then played around with different ideas, arranging roses in different ways before ending up with this design. To attach the tiny metal roses I used something I rarely use: glue. A cheat and shortcut sometimes, but here pretty m uch my only option due to an unforeseen lack of suitable wire in the right colour.
Of cause, just making a single earring I ended up with a leftover hook and teardrop link. Therefore I made a second design using a single, velvet matte aluminium rose wired onto the bottom link. Very simple and "clean" compared to the first earring. Not sure if it'd look better on an earring with just one teardrop instead of three? But it's definitely something for those that prefer simple jewellery and a single rose to a whole bouquet.
And that's it, my take on Nina Designs bronze jewellery components. I hope you liked them and perhaps were inspired by them.
~*~
Disclaimer: The materials above were provided as part of the Nina Designs blogging program. The author of this blog has not received any payment from above-mentioned company. The post above represents only personal opinion of the blog author.
Etiketter:
bracelets,
bronze,
ear cuffs/earrings,
experiments,
fibre/textile,
flora,
JEWELLERY,
Nina Designs,
pendants,
ribbon,
roses,
silk
Tuesday, 8 January 2013
Having fun with rizo beads
No, I haven't disappeared from the online world, though for some reason I haven't blogged since new year's eve and I've forgotten a Meowy Monday. Partially it's been because I've had fun with a couple of "late christmas gifts" I got offered during boxing week.
During christmas, Karin from swedish bead shop Fru Pärla asked me if I wanted to have some new rizo beads to play with and blog about. Fru Pärla was the first swedish shop to get the new beads that were presented by Sabine Lippert in December. If you're into beadweaving, you've probably heard about these new rice-shaped top-drilled little beads. While they've been developed by and for bead weavers, they do work very well in all sorts of beading/jewellery making, from stringing to chain maille. As I hope to show here.
These are just my first designs: I still have beads left and hope to use them soon.
This isn't the first thing I made, but of the designs here it's the pièce de résistance. My own original design, but most of all a design where everything just fell into place. No frustration at all: no ripping up, no re-thinking the whole thing, no design issues at all (apart from choosing whether or not to add the big daggers). If only it was always like that!
| sideview |
I was really keeping my fingers crossed the colours would work as I picked them out at night in poor light... The preciosa rivoli is crystal honey, the rizo and seeds topaz, the 8 mm daggers crystal apricot and then I don't know the colour name of the 16 mm daggers.
This is actually the first thing I made, partially to show that the beads can be used for more than just bead weaving. It's a simple 2-in-1 chain maille bracelet with two rizos added to each jump ring. Maybe it'd look better with slightly smaller rings, but this is the only size I had. Still like it, though, and the topaz amber rizos have a ½ coat with a metallic finish that matches the rings and clasp beautifully.
Then I tried a few variations of the rizo chain, adding e. g. flower bead dangles, drops etc. However, the next design came about when I wanted to vary sizes rather than shapes. So why not add daggers? Well, it didn't turn out as planned at all as I forgot that even 11 mm daggers are too big to hang as freely and dangle as easily as e. g. rizos, drops or even long magatamas. Instead they form a much more stylized pattern. To keep that interesting new pattern still, the chain was turned into an earring rather than a bracelet.
I don't wear earrings so I'm not sure that the ideal length for this one would be. Any suggestions? Longer, shorter, as it is?
(I'm considering doing a new free tutorial for either the bracelet or the earring -- anyone want that? And if so, which of the two would you rather have instructions to? The earrings might need a little tweaking first, though...)
Last -- and least -- I made a tiny beaded bead. I'm thinking of making a handful and use them as space beads in a necklace or bracelet so it isn't a finished design, but I still wanted to show them now that I got photos of the other stuff I'm been making.
By the way: the colour used in the beaded bead and the earring is called emerald azuro and if you love jewel tones, you might want to check it out. Lovely emerald greens and metallic dark blues in that finish.
I'm going to play some more with my rizo beads today and hopefully I'll also get to work on few things with things I got in a blog partner programme (more on that later!). Then I hope to get some time to work on my first Bead Journal Project panel. So plenty of fun things to do. Don't feel like I'm on a creative roll at the moment, but I'm still being creative and that's a step in the right direction. The year seems to be beginning just fine. Not with a big, fabulous bang, but relaxed and filled with little progresses. And that's pretty decent, isn't it? Whether big or small, every step you take is a good thing. Even if it's slow, it propells you forward.
Etiketter:
bead-weaving,
beaded beads,
bezels,
bracelets,
czech,
ear cuffs/earrings,
Fru Pärla,
JEWELLERY,
rivoli
Saturday, 29 September 2012
Sequintastic September
Welcome to the Sequintastic September blog hop!
When Sarah of Saturday Sequins first presented her blog hop I was quick to enter. Rarely using sequins, but still buying a few now and then as they felt inspiring, I had managed to amass a small stash that wanted to be used. It's easy to be seduced by sequins once you find the right shapes and colours (like many I don't love all sequins), but not as easy to use them it turned out. Sequins are fun and lend themselves well to many techniques and having seen sequin jewellery from Sarah and Gail Crosman Moore as well as impressive french sequin embroidery, I wanted this as a challenge to actually start using more of my stash.
We did get a lot of time to prepare for this blog hop, but due to all that has happened with the kittens (Sötis, Vitfluff and Snuttis), I felt low on energy and creative flow so in the end I ended up with just the two simple creations below. But also with a feeling that participating have had positive effects, especially by giving me ideas for creating with sequins in the future and seeing the potential in these humble (and sometimes kitschy) plastic bits. It's not just about tangible results, is it? It's also about getting and sharing that spark of ideas and creativity this theme generated. And that's something I'll take with me from this blog hop.
I hope you enjoy my little contribution to this hop and that it might inspire you in your own creative persuit. (and I hope the photos aren't too bad -- forgot to put in new batteries...)
My first creation started as an idea of a floral satin ribbon bracelet. Once I started making it I realised two things: 1) the size of the sequins means they won't follow the curve of the bracelet when worn, making it scratchy and wonky-looking and 2) I didn't have enough flower sequins to cover the length of the satin ribbon. If I'd had enough sequins (and time) it'd probably morph into a necklace instead. Not having done much sequin embroidery before, I found I had a very small grasp of how much sequins were needed to cover a bracelet or necklace collar.
Did finish the embroidery, though, and now I'm thinking of ways to use this piece. One idea I've had has been to make a romantic hairband of it. An initial idea was to make it into a bookmark, but it was scrapped after seing how thick it became, especially with the tiny beads holding the sequins in place. But then again, what if the beaded piece is hung on the outside of the book and an unembellished piece of ribbon is placed between the pages?
What do you say? Do you have any other ideas or suggestions?
The second creation is a very simple pair of earrings I made to show of a couple of my large sequins. At first I wanted to make a linked necklace using these sequins, but in the end the earrings probably turned out better than any quickly made necklace. I'm considering adding drops to the bottom to prevent these very lightweight earring dangles from moving about too much (it only takes a gentle wind gust to move them -- which is also the reason for the blurry photo as I took the pics by the open window for the sunlight).
There were a couple of ideas I wanted to try, but didn't manage to make any samples of in time for the blog hop. If I do finish a few tonight (writing this on Friday evening) I'll add pics on Saturday, but most likely it'll be saved for future sequin posts -- because after this there's bound to be more sequins on this blog. E.g. I would've wanted to make something with my matte bronze sequins (the once that garned positive comments in an earlier post) and hope to be able to show something in the near future. If you were hoping to see some sequin waste creations, I'm afraid you'll be disappointed. That too will have to wait. Until then you'll have to make do with the two previous posts, Sequin waste patterns and Sequin waste inspiration links.
And so... That's all from me. Now be sure to check out the other Sequintastic September participants too!
Blog hop list
Host: Sarah... http://saturdaysequins.com
Dita... http://alankarshilpa.blogspot.com
Ambra... http://chicandfrog.wordpress.com
Audrey... http://hotpinkquilts.blogspot.com
Stacy... http://iridalsattic.blogspot.co.uk
Karen W... http://baublicious.blogspot.com
Lori... http://www.prettythingsblog.com
Lisa... http://lisabinkley.typepad.com
Carmi... http://resincrafts.blogspot.com
Dawn Marie... http://designsbydawnmarie.blogspot.com
Jeannie... http://site.jkdjewelry.com/blog
Shirlee... http://www.shirleestuff.blogspot.com
Linda... http://www.lilysofthevalleyjewerly.blogspot.com
Corrine... http://www.sparkledaysstudio.com
Gutukas... http://atradimutakeliais.blogspot.com
Shannon... http://uptwnsh-fallingintothesky.blogspot.com
Mallory... http://rosebud101-fortheloveofbeads.blogspot.com
Cyndi... http://www.beading-arts.com
Maneki... http://wildrosesandblackberries.blogspot.com (You're here!)
Maryanne... http://zingalasworkshop.blogspot.com
Ine... http://jewelsbyine.blogspot.com
Karen... http://www.overthemoon-design.com
Kepi... http://kepirasmussen.blogspot.com
Jennifer... http://jenniferstumpf.blogspot.com
Misty... http://thejollyfatelf.blogspot.com
Dot... http://speediebeadie.blogspot.com
Hope... http://craftyhope.blogspot.com
Cynthia... http://antiquitytravelers.blogspot.com
Micheladas... http://www.micheladasmusings.blogspot.com
Shirley... http://www.beadsandbread.blogspot.com
Karla... http://texaspepperjams.blogspot.com
Eleanor... http://eleanorpigman.blogspot.com
Therese... http://theresestreasures59.blogspot.com
Rita... http://www.toltecjewels.blogspot.com
Robyn... http://rcponders.wordpress.com
Stepha... http://skwds.blogspot.com
Sue... http://suebeads.blogspot.com
Cate... http://fulgorine.wordpress.com
Amy... http://Loraamyjames.com
Etiketter:
blog hops,
design woes,
ear cuffs/earrings,
JEWELLERY,
ribbon,
sequins
Monday, 21 November 2011
Bumble bee earrings
Double posts today. I found this photo of a pair of earrings I made a few months back. Made for a bee themed challenge and at the time I didn't have any bee related beads or other components -- and I wanted it to be a literal interpretation of the theme, not just using honey coloured beads or something as a symbol for bees. So what to do?
I gave in to my childish side and crafted these two fat bees (more bumble bees than honey bees). Using velveteen beads, dark yellow embroidery floss, butterflies cut from a ribbon, glue and some additional findings, I made this pair of children's earrings. A stash-busting last minute idea.
My ears aren't pierced so I've got different types of clip-ons, screwbacks and cuffs in my stash. These rings are a type of "clip-ons" for those occasions when you want something less clumsy. Super-easy to use and probably very easy to make yourself. Which is something I intend to try someday soon. (Read more about different clip-on earring findings here.)
Tuesday, 1 November 2011
Earring findings for non-pierced ears -- an overview
Last week I wrote about some of my clip-on earrings and mentioned how I don't see clip-on design ideas very often, save on japanese jewellery-making websites. It's like everyone assumes that people either have pierced ears or, if they don't, they aren't interested in wearing earrings. The late might be the case for some, but not for everyone as there can be many reasons for a person not to pierce her ears -- and I also believe some of those not wearing earrings would change their minds about clip-ons if they saw the different findings available today. Clip-ons don't have to be chunky, painful earlobe crushers. Some are very dainty and "earlobe-friendly". And if you don't like any types of clip-ons, why not give in to the ear cuff trend?
As promised, here is my introduction to some of the clip-on earring findings and ear cuffs available today. It is by no means an exhaustive listing, but rather showing some of the options you can use. For some findings, I don't have any photos of my own so I will be referring to a few bead shops that I know have a wide variety of the findings I'm writing about.
First out is of cause our old friend:
Clip-ons
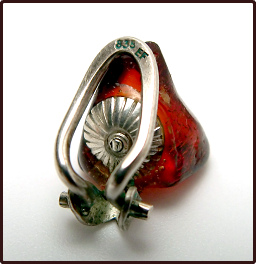
The classic clip-on earrings are probably the type most people think of when talking about earring findings for non-pierced ears. Wellknown for often being painful to wear as they press hard against the earlobe in order not to fall off. There are ways to alleviate the problem. First, some clip-ons are designs as the pair above with holes you can fit rubber cushions into. Second, there's a little tool called Comfee Key you can use to tighten or loosen the tension. You can find it e.g. at B'Sue Boutiques.
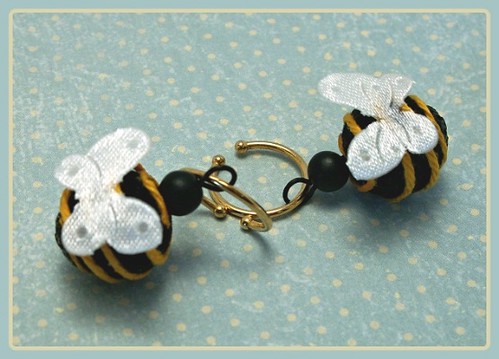
These clip-ons come in different versions. Some are big and chunky, others are more dainty. They can have a flat pad for you to glue on flatbacks and other components on, be fitted with settings for stones, have beadable perforated discs (aka mesh screens, sieves), have loops for bead dangles etc. Some are especially made for being soldered. For examples of different designs, see Jan's Jewels and Perles & Co. Below is an example of a slightly unusual old silver clip-on model.
Clip-ons are available in precious metals and plated basemetal.
Adjustable clip-ons
These are pretty much just a variation of the clip-ons above. Because they have a folded "tab" on the back, you can easily adjust the tension of the earrings by bending the pad back or forth. It is not recommended that you do this too much as it can weaken the metal. When worn, they can look similar to leverback earrings, making it less obvious it's clip-ons. I have seen them being referred to as "pierced look" because of this.
They can come with a loop, as in the picture, pad, cup-and-peg or cup. See examples at Fire Mountain Gems and Rings & Things.
Screw-back earrings
Screw-back earrings are my old favourites. I first saw them in some vintage costume jewellery as a kid and they were such a great option to the trendy 1980's clip-ons I had at the time. Best thing about screw-backs is that it is easy to adjust the tension -- no tools needed (great for jewellery buyers who don't have tools at hand) and you can do it over and over without weakening the structure.
Screw-backs come in two versions: with or without hinges. Hinges are useful if you have thick earlobes as you don't have to "push" the earring onto the ear. Unhinged versions are useful as they don't have a mechanism that can sheave or break down. Apart from this variation in design, there are several different models to choose between. Findings with loops, as the earrings on the left in the photo above, are the most common, but the screw-backs can also be fitted with pads (for glueing on flatbacks etc), cup and peg for half-drilled pearls and beads or stone settings. Some also have decorative fronts like the violet earrings in my photo. Just check out all the different versions at Jan's Jewels.
Earring converters
There's a special type of clip-ons and (though less common) screw-backs made for converting ear studs into earrings for non-pierced ears. You can read more about that in my post Örhängen -- från stift till clips. It's in swedish, but you'll find links to international websites for pictures of the various converters available for clip-on users.Hoops with spring closure
This type of clip-ons can often be seen in Japanese beading designs. They look very similar to hoop earrings, making them perfect for people who what a "pierced look". They come in different sizes and colours/platings (including pink!) and some have a loop at the bottom for adding dangles. I've used these as a base for wire-wrapping as well as for just dangling beads off. Only downside to this design is that the spring gives a rather loose tension, meaning the earring will fall off if you add beads or components that are too heavy. Stick with lightweight beads and simple designs is my advice.
More than once I've been asked were to find these elusive clip-on hoops. In the US these are sold by e.g. Fire Mountain Gems. In Sweden by Smyckestillbehor.se (Panduro used to have them too; some of their retailers might still have a few in stock if you're lucky).
Open hoops
Now, these are the simplified version of the hoop clip-ons above. As there is no mechanism these are much cheaper -- and it should'nt be too hard to make them yourself at home. They come in different sizes and colours (silver- or goldplate). Just as the hoops above they work best with simple, lightweight designs. You can't really adjust the gap much, though, so the fit might not be perfect depending on how thick your earlobes are. You can find these at Fire Mountain Gems (and Smyckestillbehor.se used to have them too).
DIY clip-ons
As clip-ons usually work using hinges and springs, it's not as easy to make your own clip-on earring findings as, say, earwires. I have seen two wirework clip-on designs, though. Check out Wrapture and WigJig. Some DIY ear cuffs (see below) could probably be used in a similar fashion.
Magnet earrings
I've never used these. The principle is simple: each earring consists of two magnets, placed on either side of the earlobe. The magnet in the front has a flatback, image or other component glued to it. These are often sold as "perfect for kids", more small children should never play with magnet as they can cause problems if swallowed. Use magnets that are suitable for earrings: some supermagnets are so strong they will be as painful as the good old clip-ons. Tips for how to make magnet earrings stick better can be found on eHow.
Ear cuffs
These are the classic old ear cuffs that you can use as is or combine with piercing earrings (many times connected with thin chains as in this tutorial). Cuffs are worn by people who have pierced ears as well as those without as they aren't necessarily a substitute for piercing earrings. Cuffs are clamped to the helix (= edge of the ear), not dangling from the earlobe.
You can buy them readymade (as in the photo) or make your own from wire or metal strips. There are many tutorials for making your own ear cuffs, from the most simple unadorned rings to richely embellished cuffs covering much of the helix. Embellished ear cuffs are sometimes called ear vines (also used for a kind of piercing earrings) or ear wraps. A few suggestions if you are looking for tuts: Jewelrylessons.com, The Beading Gem's Journal and BellaOnline.
The cuff in the photo has a small hole for adding dangles or connecting to an earring.
"Around the ear" cuffs/ear wraps
These have been trendy this season. Just like the cuffs above they are called either cuffs or wraps, though wraps and vines are also used for similar designs for pierced ears. "Behind-the-ear" cuffs can also be called bohemian wraps. Unlike the smaller cuffs that clamp on to the edge of the ear, these are positioned behind the ear and can -- depending on design -- look similar to piercing earrings. Sometimes they are especially designed for either the right or leaf ear (as with the cuff in the photo).
They can be bought readymade or you can make them yourself. Tutorial can be found at e.g. WigJig [I used that tutorial -- but without the aid of a jig -- for these ear cuffs], Semi and JewelryLessons.com. If forging your own earrings, this style of ear wraps can be used to make some seriously cool earrings. Just check out these dragons!
Apparently, this type of earrings were used even in Ancient times. In the big Hollywood movie Alexander, Angelina Jolie's character wore several different models like these bead earrings and these metal earrings. The jewellery used in the movie is supposed to be historically accurate, I've been told.
As the ear cuffs wrap around the ear, do they work if you wear glasses? Yes, I think it works as they sit tight against the ear (especially if they are costume made for your ears) unlike the glasses. Just don't use/make a cuff that is too thick.
*
That's the end of my little introduction to "non-piercing earrings". Do you think I missed something? Did you learn something new? Please feel free to comment, adding your own tips and ideas as well as general feedback. If you have any questions I'll do my best to answer them. I'm not anywhere near an expert in the field, but I like to try different clip-ons and cuffs so hopefully I can be of some help.
Wednesday, 26 October 2011
Flower earrings -- and a plea for "clip-on" design ideas
It's funny how memory works. I was sure I had published a pic of these earrings on the blog. I don't make many earrings (apart for a couple for my grandma these are about it) so I remember this pair well. And I was pretty sure they were somewhere on the blog. Just couldn't find them. So eventually, I just looked up another photo of them on a forum, where I knew I'd also shown them off. A so-so photo, but I wanted to blog about these. Still not sure I had mistaken myself, I started writing thise post. One thing lead to the other and I needed a photo of my other clip-on rings. What do you know... What I couldn't find just searching the blog headlines on the Blogger dashboard, I found in my blog photo album. It was right there, next to the rings I wanted to insert. I just didn't think they were in this blog post so I never even read through it when I came to it in the list of posts with the earring label!
Why all this hassle? There's nothing spectacular about the earrings really. Well, first off I just wanted to show them as I love the flower beads so if I didn't have an old post to refer to I had to write a new one. The reason I even began to think about the earrings was this post at Art Bead Scene Blog. If you don't want to follow the link: it's about a new blog focusing on daily earring inspiration.
My input was really just to lobby for "non-pierced" earring designs. With the exception of Japanese beading and jewellery-making websites, I rarely see any projects like that. It's like everyone assumes that people either have pierced ears or, if they don't, they aren't interested in wearing earrings. The late might be the case for some, but not for everyone -- and I also believe some of those not wearing earrings would change their minds about clip-ons if they saw the different findings available today.
But let's first get back to my flower earrings:
I like this type of clip-ons as they doesn't squeeze the earlobe as those horrible chunky clip-ons I had as a kid in the 80's. And they look like "real" earrings/creols. Unfortunately, you can't put anything heavy on them or they'll fall off, but for simple, light-weight earrings they are one of my favourite choices. I do have these too (se pic below), which are similar but without the spring and therefore much cheaper.
Because I don't have pierced ears, I'm not in the habit of wearing earrings -- pierced, clip-ons or cuffs -- but sometimes I feel like making a pair. Add to that the fact that I'm a collector so once I discovered there were different kinds of earring findings for us without pierced ears, I almost began to collect them. Below is an old photo I took for my other blog when writing about "non-piercing" earrings. It doesn't include cuffs, but shows some of the clip-ons I have. The big ones actually belong to my sis and are supposed to have beadable sieves (mesh, perforated discs) attached to the front.
I'm sometimes thinking of making a new, revised post presenting different type of clip-on findings and cuffs (the classic ones and the "round-the-ear" versions). For some, clip-ons still mean the painful chunky earlobe crushers they remember from 25 years ago, but now it's easy to find many different soloutions to ear hooks and studs. The more people are aware of the alternatives, the more I think they would be interested in clip-on and cuff earrings.
Would you like to see a post on these earring findings or on clip-on earrings in general written by someone without pierced ears? I'd be happy to write it, showing different options, DIY clip-on findings and suggestions for designers wanting to make earrings for us "non-pierced" jewellery buyers. I'm no expert, but I'll do my best to help if you have any questions.
Friday, 5 August 2011
Violet drops earrings
And for those of you not interested in kitties, here's a pair of earrings I made up a few years back. I had had the idea for some time before actually trying it out. It all began when I saw Lea Rose Nowicki's Looking Great Coming and Going earrings in BeadStyle. The thing that made her earrings stand out was that she'd added dangles not only to the stud itself, but also to the nut. I thought it looked fun.
Looking at it, I also remembered how people using earrings -- I don't myself, haven't pierced my ears -- often complained about losing the nuts and therefore didn't particularly like stud earrings. Well, I thought why not take Lea's idea but instead of using two seperate dangles, make just one than extended from the loop on the stud to the loop on the nut. That way it'd be impossible to lose the nut. Sure, it can still fall of the post, but if it does you still know where to find it.
I never have much chain laying around so I thought this one could make due for my experiment. Then I just added some drop beads to keep it simple. I'm sure the idea could be developed and evolve into nicer designs than this one.
Thursday, 24 June 2010
The things I buy...

Do you know what that is in the pic above? It's a dozen bolo slides -- a finding normally used when making bolo/bola ties (a country/western thing). I'm not planning on making anthing along those lines. This was a thing that just had to find it's way to my wishlist after reading the post Make your own big bracelet blanks by Dave over at the Rings & Things blog. The background for the post was that one of the R&T employees had a smart idea for how to make a bigger bracelet blank, as requested by a costumer. She found the bolo slides to be ideal for the purpose.
And of cause that sort of idea triggers my creativity. I began thinking about what other ways you could use this slightly unusual -- if you're not into the whole country & western thing -- finding. I got one idea just while reading the post and when I received the slides -- of cause I had to buy them in the end -- I had a new idea.
So, I know how to use the first two slides. That leaves ten more to come up with ideas for. I did hesitate to buy a package as I felt I didn't have enough ideas for a whole dozen, but I do think I'll get around to using them all. Good thing is they weren't too expensive either so can experiment freely without feeling like I'm wasting money.
I've been on a spending spree lately, I feel, and so the bolo slides weren't the only thing I bought just to try them out.

This is a new typ on "clip-on" earrings for me. I'm always trying different versions -- from screws to cuffs -- in search for less painful fake earrings than the horrible clip-ons I found as a kid. This version is very simple and with the right typ of wire (I'm thinking springy steel) you could probably do these yourself. Also they weren't too expensive, something that is often the problem with clip-ons as they have all sorts of springs and hinges to keep the earring on the earlobe.
I've already got a favourite type of clip-ons that are similar to these, but with a spring thingy, which makes them more expensive. Below is an example of what I've made with that type.
And, oh, I got some bezel lace too. Isn't it pretty?
Had only seen it in sterling before, which is beyond my budget, so I was thrilled to find it in my latest favourite metal, brass. Bezel lace is used for setting stones and the smart thing is that the loops make this type of gallery wire useful for wireworkers that doesn't solder as well. The top bezel is so pretty on its own I'll probably use it as a decorative trimming on a pendant or something too.
Etiketter:
bezels,
brass,
ear cuffs/earrings,
experiments,
JEWELLERY,
Rings n Things
Saturday, 6 March 2010
Long magatama bead earrings

While still trying to figure out how I want to use my "snowdrops", I took out some of my other long magatamas from Miyuki. Last time I used my long magatama beads was when making a crocheted bracelet. This time I wanted to use another, simpler technique and I soon began to think of shaggy loops. Originally a simple chain maille weave without beads, but it also looks great with beads (Beadsisters have a yummy example of that, using bronze wire and green lentil beads).
One thing is important to remember when using these beads: the two sides aren't symmetrical, meaning you will get different results depending on which way you string the beads. If stringing them all in the same directions you'll end up with something like FusionBeads' Birds of a Feather. By adding the beads in pairs, so that they instead "face" each other, you get more of a smooth look, almost like scales. That is what I did in my earrings above, adding the beads to larger antique copper-plate jump rings (screwbacks also in antiqued copper). If you turn the beads "facing away" from each other, you end up with a result like the one below.

This was more of an experiment so I just used what size jump rings I could find. Haven't tried any smaller one to compare results.
Etiketter:
copper,
ear cuffs/earrings,
experiments,
JEWELLERY,
Miyuki,
tips
Subscribe to:
Comments (Atom)


-filt.jpg)
_filtered.jpg)


