Showing posts with label paper. Show all posts

Thursday, 12 December 2013

Purple beads and tissue paper


I just had some fun with a photo of table cut flower beads, layering it with a photo of the purple tissue paper they came in. I love how tissue paper can be used to create interesting textures, both digitally as here and in painting/mixed media art. Have thought about using it in jewellery, but so far it hasn't got beyond a few random thoughts as other projects have been prioritized.

If you haven't seen the type of paintings and mixed media techniques mentioned you can find a few examples below (as seen on my pinboards):

That last one is of using tissue paper instead of a sponge to create patterns in watercolour paintings. The others are variations on gluing crumpled tissue paper on paper/cardboard and painting it.

Sunday, 2 June 2013

Endless Leather designs -- part 1


Remember when I showed this pic above as a little tease (or just as a way of saying I haven't totally dropped on the planet, just not blogging much)? Well, finally I'm going to do some show and tell! But first the background:

Some time ago, I was made aware of the shop Endless Leather. After having looked around the shop, I was hooked: I love leather and their range was really inspiring, covering everything from basic leather cords to all sorts of flat braids and unique leather cords such as salmon fish leather. Who can resist that?

The next week I got these gorgeous salmon leather cords and a cool stingray print leather cord plus so stainless steel findings to play with. Due to many things the reveal got delayed several times, but today I'm finally ready to show you the result.

Because I'm redoing a design and searching for the perfect components, I've split the reveal into two posts, the other one to be posted on a not yet defined future date. Perhaps in a few days, perhaps in a week or two depending on the workload next week.


First design is the cat wrap bracelet I made with violet salmon leather cord, stainless steel end caps and d:o clasp. To add a little fun detail while still keeping the design simple and sleek, I slid a cat button unto the clasp's loop before attaching it to the end cap. An easy way to make a quick and simple design a bit more personal.


There's actually a "secret" to this clasp: it was created as a necklace/bracelet. Originally I planned on making it a triple bracelet, which would be a good size for it to be able to be used as a necklace too, but it felt a tad too chunky on my dainty wrist so instead it's just a doubled bracelet. In order to be convertible it need a little something I haven't made yet as I don't have the right purple beads. Yes, it's one of my favourite colour in the leather cord and, yes, I don't have the purple beads to match it! So that'll have to wait until part 2.


The second piece is a necklace made from turquoise 6 mm stingray print leather, stainless steel end caps and d:o clasp with a beaded bezel focal. The focal is attached to the end cap loops using jump rings. It would be possible to stitch the end caps directly onto the bezel, but I chose not to as by using jump rings, it is easy to remove the focal e.g. for repairs or to substitute it with something else. Like a chunky, irregularly facetted focal bead as was my original idea before settling for this beaded component instead.


The focal is made of a crackled mosaic stone with the usual white ceramic back, which I covered with a coin in order to add weight (to counterbalance the clasp) and a more attractive finish to the flipside. Of all the coins in my small collection, only two had the right size and of those two, this one had the most suitable design. I put the change from a Copenhagen visit in the supply box just because of the designs on a couple of the coins. And now it came into use.


The last piece of the day doesn't have a clasp, hence the oddly cropped photo. This is more of a fun thing I whipped together last night. I love the brown salmon cord as it looks like bark (though much, much softer!), very earthy and so totally my thing. Of cause nothing works better with bark than flowers and leaves. In this case a small bouquet of paper roses on wire. I simply wrapped the wires onto the cord for a quick, whimsical piece of jewellery celebrating the summer season.


More to come: a metal free necklace, a necklace made from the cat button bracelet -- and who knows what else as I do have more leather cord left. So stay tuned for part 2!

Tuesday, 14 February 2012

Valentine card


Well, I'm still editing my photos, but in the meantime I wanted to take the opportunity to show the valentine's card I got for Michelle Mach's Valentine Challenge.

The challenge was to alter a plain embossed card any way we wanted. Like several of the participants I had no real experience in paper crafts, lacking both the skills and the materials and tool to make any kind of more professional looking card, but it was a challenge and I sometimes find it hard to say no to a challenge. Even if it is in a medium I'm no more than a newbie in.


This is what the card Michelle sent me looked like before I altered it. At first I just thought of it as being in landscape format and this is how I kept looking at it when planning and playing with different ideas. Then one day I turned it 90 degrees and realised it looked better in portrait format.


And this is what the card ended up looking like. I began by colouring the leaf pattern with watercolour pencils in spring green and light brown -- two colours I felt worked well with the cream white paper. I then wanted to add a quote and not having the time or resources to make a fancy stamping or image transfer I had to write it my hand. Lettering isn't my strong side, but what can you do?

The text means "Love [in order] to live. Live [in order] to love." I wanted something love related that was more philosophical than something addressed to a lover. More about love than about valentine.

As the card felt pretty bare, I thought of what material I had that could add to the design without overpowering the simplicity that I liked. My eyes fell on some pink tissue paper that I cut into flowers. Using the dull point of a brush shaft I pushed the flowers into a pin cushion to cup them. The remaing five flowers were shaped the same way, but using a pencil point so they became more ruffled, perfect for the centres.

So all in all not one of my best creations, but there are details I like (such as the flowers) and I probably shouldn't be too hard on myself considering that I'm a newbie in the art of card making after all.

If you want to see what the other participants made with their cards, please check out Michelle's valentine challenge blog post.

Wednesday, 29 June 2011

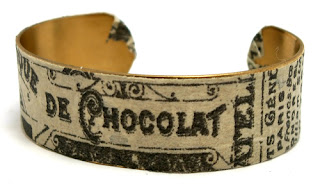
tissue tape cuff


Here's another pic I found. I'm not sure what to do with this one. What you see is nothing more that Tim Holtz tissue tape on a brass cuff, the kind of bracelet base you use for e.g. bead embroidered cuffs (which was what I bought it for). I kind of like it, but don't know how to seal it.

You see, tissue tape is not strong enough to stay bonded to the metal. And I have bad experiences trying to glue the sticky sides of stickers and tapes. Glue on glue just slides, it doesn't stick (until it dries if you're lucky). After I "made" this bracelet, I taped a bronze tag just to see if I could make it stick permanently by sealing it with decoupage glue/lacquer, but it didn't work. So I'll have to try actually glueing the tape to the metal and then apply a sealant/varnish on top, hoping it won't affect the tape.

So far I haven't tried it. The only thing I have done since I took the pic was to trim the excess tape visible on the back. Not sure if I should keep working with this project or actually save the cuff for the bead embroidered bracelet it was meant.

Sunday, 16 May 2010

My first resin rings

I found a pair of "old" resin rings I've made some time ago. Some of my first tests using epoxy resin and "resin powder", actually. Which would explain the sloppy work -- don't check for resin drops on the outside of the bezels...

Anyway, this first one is a simple ring where I cut out a rose from one of my favourite scrapbook papers. I had -- and have -- no special epoxy resin so I just used the common epoxy glue you can find in the hardware store. Non-yellowing according to the manufacturer. Looking carefully you can see some tiny air bubbles as I didn't know how to get rid of them.


I do prefer epoxy resins especially made for jewellery making, not least since those doesn't begin to cure as fast as epoxies intended as adhesives. But when you want to try something new you make due with what you have. Which was the thought behind the ring below as well.

This ring is made from japanese paper and UTEE (Ultra Thick Embossing Enamels). I wanted to try this as I'd just read about JudiKins' Amazing Glaze and thought it'd be fun to try. But I couldn't buy it at the time so what to do? Well, some time ago I'd bought some UTEE as I wanted to make some cool paper beads I'd found instructions for. That didn't happen as I don't own a heat gun, but I had read that you could melt UTEE in a melting pot -- so surely you could melt it in the oven too, as you would with Amazing Glaze?

Melting Amazing Glaze in the oven was fun, but I fear I'm not as steady on hand as I should in order to work with powders like this -- more than once I dropped my rings and bezels on the floor before I even got them into the oven. This ring I dropped directly when taking it from the oven and before the plastic powder had had time to harden...

As you can see in the close-up above the resin also "leaked" through the paper, but that is not as obvious when looking at the ring IRL.


Nowadays I've found another favourite that doesn't require mixing as epoxy does or handling powders and work with multiple "firings" as UTEE does: Gel du Soleil 1-part UV-curing epoxy resin. For some things I can't use it, but for resin bezels like the ones above I love it!

(There's also another brand of UV-curing resin: Lisa Pavelka's Magic Glos, which I haven't tried.)

Thursday, 11 February 2010

Vintaj and Karen-Marie Klip


What would I have done if I had not gotten all those Vintaj blanks? I'm having so much fun experimenting with them!

This time I wanted to use my sheet of laser-cut paper motifs from Danish Karen-Marie Klip. As I was mostly just experimenting I didn't bother too much with the designs, I just wanted to see what the mix of dark brass and thick off-white paper would look like. So I simply cut out the leaves and glued them to the metal using decoupage glue. Rather fiddly as I don't have any tweezers -- special fine tweezers can be found among the papers in my Panduro shop, but it wasn't until I started using the tiny paper motifs that I realised it would be sooo much easier had I not thought the tweezers where too expensive and not that important...

Any way, here are my first three pendants, waiting to be sprayed with a matte sealant. Photo is a bit blurred, but I hope it's not too bad. I really liked mixing the brass with the sweet little cut-outs and will probably keep experimenting with it.


Rose in filigree


I'm having a bit of a Vintaj theme this week, I feel. Here is another pendant I've made using my last natural brass filigree piece I have in my stash.

Here is yet another way for me to use my blanks from the giveaway. I selected a large round pendant and decoupaged a cutout from one of my favourite scrapbook papers, Paul (SCRB 256) from Calambour onto it. I pierced a hole in the paper so I could still use the hole in the blank.

When dry I put some 0,5 mm Vintage Bronze wire through the hole and pushed the wire ends through a hole in the filigree piece. I then wrapped the filigree "petals" around the blank. Because of the wire, the filigree is a tad off-centre, but not so much it's annoying. The filigree not just added a frame to the floral motif, but added interest to the back of the pendant.

Ideally I would have wanted to use a different style of filigree, but I had to use what was in my stash. I'm still pleased with the results though.

Saturday, 2 January 2010

The Dover Sampler -- free images every Friday

I subscribe to The Dover Sampler, a weekly newsletter from Dover Publications that give you free samples from their books to download. These samples include royalty-free clipart, copyright- or permission-free illustrations etc as well as excerpts from novels, CD-ROMs, non-fiction, stickers, paper dolls, children's colouring books and activity packs and much more.

Dover publish many different types of books, but for a jewellery-maker and crafter they are especially a great source of images, free to use for crafters and artisans. Some books even include a CD with images ready to be printed out on paper, transfer papers, decals, shrink plastic or what ever you are using in your crafts.

If you are interested in these subjects, perhaps using images in jewellery-making or other crafts, I'd love to recommend the sampler for you.
Related Posts Plugin for WordPress, Blogger...