Wednesday 30 June 2010

Rivet first, think later


Ok, I think I really like riveting. (After all, I really liked hammering nails as a kid so this was probably a logical development.) But I think I might like it a wee bit too much. This is my second riveted flower. As seen before in the Flowers and leaves post, but now without the centre bead.

So what's the problem? Well, I've riveted these layered flowers together before thinking about what I wanted to do with them. If I'd been smart, I would've waited long enough to determine if I should've added some sort of finding, bail, metal blank or other part to the layers of metal before riveting them together. E.g. adding a brooch pin to the back or a bail so I can use it as a pendant without having to add a bail or drill a hole afterwards. Well, while riveting the second flower that did hit me. And now I try to plan ahead a bit more before hammering down that rivet.

Ah, yes, unlike with my first riveted flower, I can actually show you a pic of the back. I use pre-made rivets so it's only this one side of the rivet I hammer down. Not the best pic, but -- well -- at least you can see what a hammered rivet looks like if you're unfamiliar with the technique.

Stamping on leather


I've never stamped on leather before, but now that I got a nice, tough piece of vegetable tanned leather I thought I had to give it a go. This is my first test where I wanted to see how much I had to soak the leather before stamping and to see how hard I must hit the stamps (as you can see, hitting them hard makes the stamp cut through the coloured surface, totally damaging it). The stamps I used are just some common letter and number stamps for metal. Not even mine, my sis bought these at Jula or Clas Ohlson or some such.

I'm a novice when it comes to this type of leatherwork so I really don't know what I'm doing, but that much I have picked up from info online that I have to soak or dampen the leather first (in cold water -- warm/hot water is used to harden leather) and that it shouldn't be chrome tanned. There are special leather stamps/punches, but as mentioned above I used metal stamps, also something I read online, that some stamps made for metal works well on leather too. The biggest problem with stamping leather is that the imprint can rise and thus fade away. You can also use a knitting needle or other "dull point" to trace a pattern on the leather. And, yes, I will be needing to colour those imprints so they show up better.

There are other ways of working with leather too, such as cutting and pauting, but I'm not looking to do anything more elaborate that I can make using just metal stamps. I have used another method of leatherworks in school as a kid: in woodshop class we got to try pyrography on wood as well as leather. It stinks, but it was a not-too-difficult way of decorating leather. I do have a Dremel Versatip that can be used for pyrography, but I haven't yet tried it on my leather.


PS! For another example of my "leatherwork", see my shaped leather flower. Also an amateur experiment.

*Edited to add: Since writing I read about and clicked my way to Tandy Leather Factory. Not only do they share info on leather working, but they have so many stamp that I just must have. And embossing rolls. I've never been that fond of metal stamping, but now I feel like leather stamping might be something for me!*

A barn swallow drama


Ok, as you can see, I'm no good at shooting flying swallows. And barely sitting swallows for that matter. So I hope you see these photos as more documentary in style. Think newspaper photographer on site of accident. And if you make it to the end of this short, but slightly dramatic, tale, you'll find a couple of nice pics of a sweet young swallow.


It's been a warm and sunny day today and I spent the afternoon outdoors. As usual, the swallows were circling in the air. Our beloved barn swallows. They build nests in our stable every year.


They circled low this afternoon, which is unusual on sunny days like these. Normally, the fly around catching insects and on warm days the insect fly high up in the air. And thus do the swallows. They did not behave as I was used to.


In fact, they even seemed to swoop down on me. As if trying to scar me away. I didn't pay much attention at first, but the closer I came to stand to the greenhouse, the lower they flew. Still, I was too focused on other things to "connect the dots" yet.


It wasn't until I fetched my camera, thinking I'd give it another shot, trying to photograph these elusive (to the camera at least) birds. When I began focusing on the birds I soon realised that there really was something wrong. I wasn't imagining it when I thought they were "aiming" at me. I got the final proof when one swallow actually swooped down on Mini, one of our cats that had just wandered into the yard and laid down on the gravel. He wasn't doing anything to aggrevate the birds so something had to be really, really wrong from the birds' point of view.


Still not knowing what was wrong, I stepped closer and this is what I found. Can you see what it is? A kid, a young swallow that probably wanted to try its wings, but failed. As you can see below, the vent hole on the top of the barn wall is right above our greenhouse. The swallow must have either fallen from the hole or perhaps bumped into it during one of its first flights.


Poor soul. There this little one sat, while the parents were soaring above, trying to defend it from the carnivores that called the farm theirs. Humans and cats. And also, by flying, trying to get their little one to get airborn. Poor birds, they can't pick their kids up in their arms or carry them from danger by holding them by the nape.


At one point, which I got a good look at and which was so touching to watch, one of the adult swallows sat down on the clothes line that run from the greenhouse to a nearby tree. As if trying to comfort the youngster and at the same time trying to coax it to get into the air to get to mummy/daddy. At this point I'm standing about two metres away from the birds.


Oh, look at the poor defenseless one as she or he is looking up into the sky, following the flights of mummy and daddy. At one point it tries to flap its wings, but alas, it remains stranded on the glass roof.


As the adult swallows didn't seem intent on attacking me, I got into the greenhouse to get closer to the poor baby. Some of the panes are missing since the autumn storms and snowy long winter and when dad got ill, no one got around to repairing them. Luckily for me, this meant I could get a couple of good shots, being within a meter of the bird. It was heartbreaking, seeing this lost little child looking up in the sky at mummy and daddy.


I wish I could end this story with a happy note, but the truth is I don't know what happened to the bird. I turned my back and the next time I got there, the swallow was gone. I didn't hear anything that resembled the sound of a cat catching a frightened bird. I don't know if it fell to the ground, but I didn't see it inside the greenhouse at least. If it did fall it would probably be the end for it. But the swallows disappeared so maybe, just maybe, they didn't abandon a falling child, but flew away with their little one. Maybe it did, in the end, flap its wings and soar into the sky. On should never give up, but try and try again. Baby birds know that better than most of us. Let us hope the story ended so.

Friday 25 June 2010

Happy Midsummer's Eve!


Summer solstice was this Monday (21st), which means that today is Midsummer's eve. Midsummer was originally celebrated on the day of the summer solstice, in a celebration of the longest day of the year (and there fore the midsummer as opposite the midwinter). Midsummer Eve in Sweden, however, is nowadays celebrated on a Friday between June 19 and 25.

While I won't dance around any Maypoles or get drunk -- nor pick flowers for that matter -- I will spend this day peacefully eating some yummy new potatoes with matjes (soused herring) and sourcream. I only eat it once a year and I've been longing so for it! No midsummer's eve is complete without it. And I hope the strawberries have ripened so they're plump and sweet despite the cold days this spring. Because one does need strawberries in cream on Midsummer.

Whether you celebrate this day or not, I wish you all a happy midsummer!


These pics are from May so not strictly midsummer flowers. But pretty notheless -- and they do still blossom. As kids, these were one of the flowers my sis and I would pic for the flower wrethes we would wear during the day and to decorate the maypole with.

Thursday 24 June 2010

The things I buy...


Do you know what that is in the pic above? It's a dozen bolo slides -- a finding normally used when making bolo/bola ties (a country/western thing). I'm not planning on making anthing along those lines. This was a thing that just had to find it's way to my wishlist after reading the post Make your own big bracelet blanks by Dave over at the Rings & Things blog. The background for the post was that one of the R&T employees had a smart idea for how to make a bigger bracelet blank, as requested by a costumer. She found the bolo slides to be ideal for the purpose.

And of cause that sort of idea triggers my creativity. I began thinking about what other ways you could use this slightly unusual -- if you're not into the whole country & western thing -- finding. I got one idea just while reading the post and when I received the slides -- of cause I had to buy them in the end -- I had a new idea.

So, I know how to use the first two slides. That leaves ten more to come up with ideas for. I did hesitate to buy a package as I felt I didn't have enough ideas for a whole dozen, but I do think I'll get around to using them all. Good thing is they weren't too expensive either so can experiment freely without feeling like I'm wasting money.


I've been on a spending spree lately, I feel, and so the bolo slides weren't the only thing I bought just to try them out.


This is a new typ on "clip-on" earrings for me. I'm always trying different versions -- from screws to cuffs -- in search for less painful fake earrings than the horrible clip-ons I found as a kid. This version is very simple and with the right typ of wire (I'm thinking springy steel) you could probably do these yourself. Also they weren't too expensive, something that is often the problem with clip-ons as they have all sorts of springs and hinges to keep the earring on the earlobe.

I've already got a favourite type of clip-ons that are similar to these, but with a spring thingy, which makes them more expensive. Below is an example of what I've made with that type.


And, oh, I got some bezel lace too. Isn't it pretty?


Had only seen it in sterling before, which is beyond my budget, so I was thrilled to find it in my latest favourite metal, brass. Bezel lace is used for setting stones and the smart thing is that the loops make this type of gallery wire useful for wireworkers that doesn't solder as well. The top bezel is so pretty on its own I'll probably use it as a decorative trimming on a pendant or something too.

Sunday 20 June 2010

2 x giveaways: skull beads and colourful beading wire


This week, Sara AKA SoftFlexGirl is giving away a Trios package of beading wire in the cool colour combo Egg Hunt: Purple Amethyst, Green Turquoise and Chrysoprase. It's a somewhat daring combination I probably would never make myself and perhaps that's why I'm so attracted to it. It looks like an interesting challenge. And I'm not the only one who likes this one.


From spring and a cool palette to a handful of "earthtone"skulls. It's Andrew Thornton who's giving away some skull beads and a pendant from his shop. Materials vary: from boxwood (carved ojime bead) and bone to ceramics and shibuichi.

While I personally am not a big fan of skulls -- though I kind of like some of the sugar skull/calavera inspired ones as a change -- my sis quite fancy them. So this week I think'll enter on her behalf. In my eyes -- owning more beads than anything else -- her bead stash is a bit meager. It could be a nice contribution to her skull bead collection.

Bead blog recap weeks 22-24


Time flies... So here's a recap from Manekis pärlblogg spanning over three weeks. Still on "summer time" so not that many posts.


Imitate enamelled metal flowers -- with pine cones
On the blog Jane avion you can find instructions for making faux enamelled flower pins, using "scales" from pine cones as petals.

The new map to Swedish bead shops
I've already written, in English, about our map to brick-and-mortar bead shops and other shops of interest for beaders on this blog -- check out this post.

Colourful new products
Acrylic angel wings, enamelled ball chain, floral bead caps, coloured rubber cord and lucite flowers are a few new and fun products in Swedish bead shops. Ideal for those sunny summer days.

Projects using long magatama beads

Miyuki's long magatamas are both pretty and unusual in shape. You can't always find many projects using them online, but here are a few examples. From beaded beads and spiral ropes to chain maille and stringing.

Summery striped magnesite beads
By pulverizing magnesite -- a white stone that accepts dyes well -- dying it and, using a binder, compress it in layers of different colours you get these colourful and fun stiped beads. Available in several different colour combos.

Design contests from Swedish bead shops
Two Swedish bead shops announce new design contests. Frost08 wants you to make an anklet and ÄnglaDesign wants -- true to their name -- to see a piece of jewellery with angel motif. Today is the last day to enter the challenge from Frost08.

June challenges: Art Bead Scene & Vintaj
Art Bead Scene Blog and Vintaj both have monthly challenges. ABS wants you to create something inspired by Toulouse-Lautrec's Marcelle Lender Dancing the Bolero in "Chilpéric". Read more about that challenge here. Vintaj's June challenge is already over, but you can already begin to plan your entry for the July challenge, on the theme Secret Garden. Read more about the Vintaj Design Challenges here.

More summer contests
Swedish bead shop Smyckestillbehör.se has a summer design contest for its costumers, focusing on colour. The name of the contest is Färgen av min sommar, "the colour of my summer".

Wednesday 16 June 2010

View from a stable window


As some of you know, I've had a famous "next-door" neighbour and not too long ago her home was turned into a museum dedicated to her life and person, the Birgit Nilsson Museum. Before the museum opened the closest neighbours and relatives were invited to a pre-opening party in mid-May. We took quite a few pics of the inside of the restored buildings. Not just for keeping as a memory (we do remember how it looked before the farm was turned into a museum), but also to show our dad who was too ill to attend.

These two pics are ones I took from inside the old stable, which has now been turned into a café. We sat at a table eating rhubarb cake and I looked out the window, thinking it might make a nice photo. Or, if nothing else, I'd get a pic of the stable windows. I love this type of arched old windows.

I used my sister's camera and it was only yesterday I happened to "re-discover" these pics. What almost looks like a pillar on the left side is the corner of a cabinet, standing bewteen our table and the window. Think it was a pot or round vase on top of it.

Doodling with beads


For a couple of reasons I haven't had much inspiration or energy to work with my beads for periods of time during this winter and spring. But then, some weeks back (or a couple of months, it's hard to keep track), I felt I had to do something. Try to kick myself in the butt and actually do something.

So I figured maybe this was the time to try freeform beadweaving. Something I've been attracted to for a long time, but never got around to try. One type of freeform technique in particular had caught my eye: NanC Meinhardt's freeform RAW. It looked just the thing for me and I find working in circles as one do with single-needle raw is easy and relaxing. And felt a technique that was like "doodling with beads", as described in her masterclass article in Beadwork magazine (February/March 2008), would be perfect now that I had no ideas or direction for what I wanted to make.

NanC used 11/0s only to make the base in her bracelets in the magazine article. I chose to work with a czech bead mix, featuring both large and small beads. It included some nice satin bugle beads too, but I put them aside. Save for one. Also she did extra embellishing with smaller beads which I haven't done (yet).

And how did I like it? Loved it. I was right in this being the thing for me. Both generally and as a way to fight my inactivity. I fully enjoyed just working without really thinking about what I did or planning ahead. Doodling is exactly the right word to describe this technique.

Others might just look at it and thing "eeh, is that some flattened seaweed?" or "that's not especially pretty and it's not even straight -- or even" or "is that a strip of perforated bacon the colour of bark?", but I like it. Not least for what actually picking up my beads again meant to me. Also I think it might make a nice background for further embellishing. I haven't finished this bracelet by adding a clasp yet and while it's just been laying around since I finished the base, I do think I'll do some more work on it. But for now it's just a first try that I'm very pleased about.

You know, while writing that last paragraph, I came up with another idea of what I could do with this bracelet. Not sure it'll work, but I'm writing the idea down. Will probably save it for my second freeform RAW creation -- because I will make more of these. Next time I'll probably try using 11/0 only or just sizes close to that instead of mixing such different sizes as I did here. My UFOs hang around for ages so I'm not making any promises to finish this one soon, but I will add a pic when I do finish it.


PS! If you don't have the issue of Beadwork I refer to above, you can see a pic of the Izzy and Lucy bracelet that was the project I learnt this technique from on NanC's website.

Tuesday 15 June 2010

Roses on the beach


I mentioned yesterday that I spent monday afternoon near the coastline. Haven't edited the pics from that trip yet, but just had to show you some rose pics I took.


These are typical Rosa rugosa. Also known as Japanes rose, saltspray rose, sea rose amongst other names in English. In Swedish it's best known as vresros, vresig meaning sulky/surly/crumpy. A name it probably got for its recilience. Roses may look sweet and innocent, but the rosebush can be really tough.


The rugosa rose was imported to Europe as an ornamental plant, but not least in around these parts (Southern Sweden and Denmark), it became a popular shrub to plant along the beaches to keep the sand dunes from eroding and spreading the sand inlands, damaging nearby fields. What no one predicted at the time was the ease of which this rose spread... Not only did it spread -- fast -- but in doing so it pushed out the local flora, totally taking over each area it settled in. As in so many other cases, introducing a foreign species to a new habitat caused many unexpected problems.


So while very pretty -- and with a divine scent -- it's now more or less actively "hunted down" by the local governments along the coast. At times the shrubs have been dug up and removed, but often it had only partial effect and I'm not sure it that strategy is even used nowadays due to the cost of labour involved. But other types of efforts are taken to curb the spreading. Though it takes time, money and patience to fight this rose. A project financed by the European Commission, DAISIE, lists the Rose rugosa as one of the 100 worst alien species in Europe.


It is still used as an ornamental plant, though I don't believe many plant new rosebushes in these days. It's just the old ones that are kept (ideally not too close to the coast). E.g. I remember it from both my first school (låg- & mellanstadiet, grades 1-6) and later my second school (högstadiet, grads 7-9), where it was used as a decorative and sturdy hedge. While the girls at most picked a few petals to make rose "perfume", some of the boys would collect the hips in the autumn as their seeds were known as an alternative to itching powder.


And then, finally, what other flowers did I spot? Many different kind of yellow flowers, from iris to buttercups. Not sure why there were so many yellow flowers and not so many in other colours right now. Might be interesting to find out. But I did find something else. Of cause, an other favourite of mine: violets. Heartsease or wild pansy (Viola tricolor) to be precise. Some of them grew in the sand beneath the roses.

Are you a beader planning on a trip to Sweden? Map to Swedish brick-and-mortar bead shops


UPDATE: The map has got a new home at Pärlbutiker i Sverige. Please visit the website to explore the map and read more about it.

A few days (nights) ago I updated a bead shop map I created together with another beader, Pugglis. While the map is in Swedish it might be of interest for other beaders that are planning to visit Sweden. Even if you aren't coming here just for the bead shopping -- we don't have any really big bead shops and some of the ones listed hear are rather tiny-- there's nothing wrong with just "happening" to walk past a bead shop when heading for some special sight or landmark, now is there?

There are lists of Swedish bead shops around. What makes our "list" different is that we've made it into a map of places to visit. No online businesses only or alphabetically ordered lists. This is especially made for those of us that like to do some bead shopping while travelling somewhere. The beading tourist's guide to Sweden perhaps?


Understanding the map
Literally understanding it? You can translate Swedish using e.g. Google Translate. While online translations aren't perfect, they can help you understand the basics of what a text is trying to say. [edited to add: or perhaps you can't... I don't seem to be able to use that service on the map. Sorry!]

On the map you'll find markers in different colours, symbolising different types of shops:
  • Blue: Brick and mortar bead shops.
  • Blue: Online webshops that accept visits from costumers if you call ahead. These have the words (bokn.) written after the name of the shop in the headline. Be sure you don't miss this detail as these aren't automatically open to the public.
  • Green: Craft, hobby or other shop with a large or small range of beads amongst other things. [green]
  • Orange: Other shops of interest, e.g. sellers of tools, storage solutions or bead magazines.
Click the marker to read more about each shop. There you'll find a short description of the shop's range, opening hours, address, phone numbers and (if applicable) website URL.

How to decipher the opening hours: even if you can translate the map using Google Translate, I'm afraid it might not understand the abbreviation of the days. Mån (mån) = Monday, Tis (ti) = Thuesday, Ons (on) Wednesday, Tor (to, tors) = Thursday, Fre (fr) = Friday, Lör (lö) = Saturday and Sön (sö) = Sunday.

There are also bead shops and beaders selling beads at fairs, mineral shows etc. These are not mentioned on this map and I'm afraid I don't know of any good source for finding fairs and shows with bead seller attending.


Before you plan your visit
This map is being manually updated and depends on the input from other beaders. Shops close and open, they move, they change opening hours and phone numbers. It's more or less impossible for someone to keep a hobby project like this map fully up to date all the time. So make sure you have the latest info by visiting the bead shop's website or make a call to them. It would be to bad if you go to a bead shop, eager to check out the local supply, only to find a "closed" sign (=stängt) or an empty facility.

And, again, please note that some of the shops listed are online shops (=webbutik) without any regular brick and mortar facilities. These are prefect if you're in the neighbourhood, don't want to spend money on postage or what to see the beads IRL, but they wont always give you the same type of free roaming shopping that you expect from "real" shops. Also, in most cases you have to call the owner and make an appointment.

Also make sure to double check the address: sometimes maps aren't as reliable as they should be, placing the markers in the wrong spot. We try to make sure this doesn't happen, but you can never be 100 % sure (bear in mind we haven't actually visited all the shops we list).


More information
Have I forgotten to mention something I should have? Or do you have any other questions about Swedish bead shops? Don't hesitate to ask -- I'm no expert, but I'll do my best to give you a good answer!

Monday 14 June 2010

Finally! A riveted flower


So... I've been meaning to try riveting as I've been interested in the technique for some time. After buying Susan Lenart Kazmer's book Making Connections, I actually did make a rivet headpin (i.e. a headpin with a head hammered the way you hammer a head on a wire rivet). But never any riveted connections as I didn't have a drill, nor the right gauge wire to rivet together pieces with existing holes. Also, I have a long list of things I want to try so other things got in the way.

But now, finally, I've actually made a riveted object. The "cheat" way -- used premade rivets. I recently bought both some thick copper rivets and some smaller Vintaj antiqued brass rivets. So I took a copper rivet, which was exactly the right size for the metal flower parts (except the sepals/leaves where I had to ream the hole a bit, using a metal file), cut it off and hammered it down.

I did damage the enamel (paint) in the middle, being a tad too careless when hammering, but other than that I'm pretty pleased with how the piece turned out. The rivet formed a nice and even head. Unfortunately I forgot to take a pic of the back -- the side I hammered on -- so you'll just have to take my word for it.

Now I just have to figure out how I want to use this piece. My thought have been to add a bail behind one ot the sepals/leaves, but that means using glue and I wanted to avoid that in this piece (or else, I'd just glue the floral parts together). And I'm not going to make a hole in the enamelled pieces. So what's left? Making a seedbeaded creation and attaching the flower by stitching? Or wirework? So far, I've no idea how I'll use it.

While the lilacs are wilting


The weather's been rather, uhm, un-summery lately. Windy, cold and rainy. And when the weather's been nice, I've been workning in the potatoe fields. Meaning I haven't had the opportunity to photograph much lately. And to top it all of, I've got a bunch of old pics that I've meant to post here, but with things being the way they are I haven't had the energy (and sometimes not the time). Not sure whether to post them later or just leave it be, seeing how they're "old" by now.

And I was going to do a post about it being "between bird cherry and lilac" right now. But, alas, the lilacs have begun to bloom -- and already even begun to wilt. Between bird cherry and lilac (mellan hägg och syren) is a short, intense period in deed...

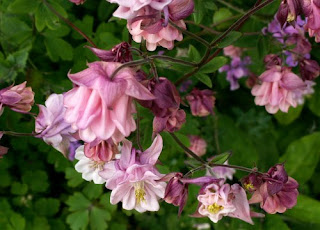
Today, I went to the beach with my sis as we happened to be nearby, cleaning a summer cabin before the tourists arrive. So hopefully I'll add some pics of the Bjäre shoreline tomorrow. Today I've just got a few pics of our pink columbines/aquilegias.


Many of the pics are taken from the above. Because I was lazy that day and in a hurry. But I hope you can see how pretty these flowers are even "von oben".

Sunday 6 June 2010

SoftFlex Giveaways


If you've read my earlier posts, you know I really find SoftFlex Trios inspiring. And I really like mixing colours. So of cause I want to mention that SoftFlexGirl is launching 8 weeks of beading wire giveaways. This first week you have the chance to win the red and pink Be My Valentine Trios (as seen above). The colours of love and romance or, inspired by the approaching summer, the colours of strawberry icecream, raspberry lemonade and red currants.

Be My Valentine consists of three reels of 49 strand .019" (ca 0,48 mm) beading wire in the colours Pink Rhodochrosite, Pink Tourmaline and Spinel. Each reel has 10 ft or approx. 3 m of wire.

Thursday 3 June 2010

More giveaways -- Green Girl Studios goodies


I've already mentioned some current challenges/contests on my other blog, among them Vintaj blog's monthly design challenge (this month: Vintage Wedding) and Art Bead Scene Blog's Monthly Challenge (this month inspired by Toulouse-Lautrec). To this I'm adding another one of Andrew Thornton's Thursday Giveaways.

This time he's giving us a chance to win five beads, buttons and charms from Green Girl Studios. Oh, I just love pewter! A metal with a long history, often used in arts and crafts. If I can choose between silver and (high quality) pewter, I more or less always choose the latter. No wonder I'm dreaming of attending a pewtersmith evening class? Anyway, who can resist Green Girl goodies? I already own a bat and a dragon bead. Would be nice to have a chance to add these pretty pieces to my "collection" -- especially the sweet roses.

For a chance to win, head over to Andrew's blog and comment on his giveaway post.


PS! Don't forget to read his blog for pics of a couple of super cute kitties!
Related Posts Plugin for WordPress, Blogger...