Monday 31 October 2011

If I had a birthday wishlist...


 ...I know one thing I'd put at the top (apart from money to buy beads): a Paperblanks journal. Unlined of cause: I always prefer to both write and sketch on unlined paper. They are so gorgeous. Expensive, but gorgeous. If you haven't seen or heard about them you really ought to check them out. Last time my sis and I went to a book shop that carries these, we spent ages just drooling over them and touching them. We didn't really have the money to buy any so after a while we had to pull ourselves away from the shelf before succumbing to the urge to purchase one or two or...

But here's the thing: I also know that when I buy an "eye candy" journal or notebook I desire, I don't dare using it because then it will be all "spent up". It's like with special beads, I want to save them for something special -- and end up never daring to use them. Just having them sit there waiting for the perfect idea, worthy of these special things, and never really believing that what I do at the moment is special enough. Using them for something mundane would be sacrilege! Still, I covet those journals so bad. And I do think I've learnt to accept that notebooks are meant to be used, no matter how special or trivial the notes are. It's not desecration to write on a pristine, white page of an expensive notebook -- even if it almost feels that way sometimes. I'm using them, which is what they were made for. It's silly to buy a notebook and then buy some more cheap ones as I can't write in the expensive one...

(And, no, I don't write a personal journal. I want the book as a sketch book and to jot down ideas and texts for stories etc.)

So I do hope I get at least a little money from my parents and grandma so I can buy one without feeling guilty for not saving the money for more important things. I know a lot of stuff that I probably should prioritize over a luxury journal, but sometimes you need something beautiful to brighten up your day.

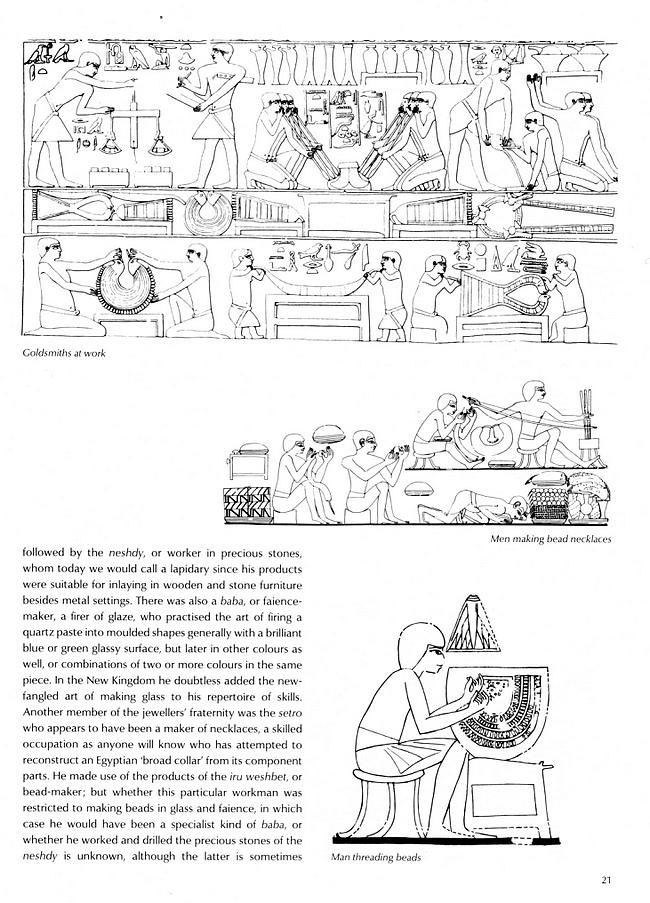
But something I also really hope to be able to buy soon is books. I love reading books, both fiction and non-fiction (history, science, cultural geography, beading, jewellery making, embroidery etc). If you're curious, part of my vast wish list can be found here. It's pretty much focusing on how-to books rather than fiction (so very little fantasy) and because it's a british shop, there are no Swedish titles. My unabridged book wishlist is many times longer. In fact, it's not even one complete list, but comprised of book reviews I cut out of mags and papers, bookmarks on my browser and the Book Depository wishlist -- so not even I know how many books there's really on it! (The one below is: not a cheap embroidery technique to learn, but I really like some of the modern goldwork. Feels luxurious to work with threads like that too.)


I'm not expecting to get a lot of presents or money for my birthday, but I'm hoping it'll be enough to buy a book or two -- and hopefully a journal too. Knowing myself, though, I think it's much more likely I buy books and supplies than a journal, no matter how many years I've wanted one, as beads and books feel more useful than a blank journal. But if I ever get a real job and real income one day, I know a Paperblanks journal will be one of the first things I'll buy.


PS! Yes, I stole those photos of the Paperblanks website. Hope they don't mind it too much... That's actually not the journal/notebook I've been oogling the most, but I love the colours of the books in the Romantic Sensibility collection.

Sunday 30 October 2011

Crackle paint cabochons


I've had some crackle medium standing on a shelf for ages. Or at least it feels like that. I bought it just a week or so before reading about a cheaper crackling technique that uses ordinary white glue instead of crackle medium, which can be pretty pricey sometimes. Typical. Anyway, this weekend I finally got around to trying it and these are my very first pieces: two 30 mm wooden discs and two glass pebbles (of the kind used in flower vases etc).


This one is a bit so-so. I tried not to paint over the medium more than once, as recommended, but I think I was too worried about doing it and therefore got a very uneven layer of paint. To the right you can see an unsuccessful attempt to add some colour without blocking out the crackles in the semi-dry paint. Not a smart idea. Better to just paint, allow it to overlap if you have to (and don't do it too much) and then not worry about uneven painting or a few small bare spots. After all, that just add to the old and rustic look.

For both cabs/discs I used a blue base coat, pretty much the only darker colour I have apart from some purple paint. It was really a matter of using what I had at hand. Have to buy some dark brow paint soon as I think it'll make a better base coat, more realistic if nothing else.


I also tried to paint some glass pebbles. Here, I didn't use any base coat. Instead I painted the medium directly on the glass and then painted it over with acrylic paints. Beige on the amber yellow cab and the same blue as above on the clear cab.


I tried to add another layer of paint in a contrasting colour to darken the cracks on a third, green cab (not pictured). Didn't work very well. Perhaps I should've let the first layers of paint dry longer, making sure there's not even a drop of moisture left. Well, you live and you learn...

Have no idea what to do with these cabs. They were test pieces, but it would still be nice to use them in my jewellery.

I'm also planning on doing a few pieces that are only partially crackled, e.g. adding the crackling as a frame around an image or painting. Not exactly sure what I want to do, but playing with crackle medium is fun so I will experiment some more with it.

Wednesday 26 October 2011

Flower earrings -- and a plea for "clip-on" design ideas


It's funny how memory works. I was sure I had published a pic of these earrings on the blog. I don't make many earrings (apart for a couple for my grandma these are about it) so I remember this pair well. And I was pretty sure they were somewhere on the blog. Just couldn't find them. So eventually, I just looked up another photo of them on a forum, where I knew I'd also shown them off. A so-so photo, but I wanted to blog about these. Still not sure I had mistaken myself, I started writing thise post. One thing lead to the other and I needed a photo of my other clip-on rings. What do you know... What I couldn't find just searching the blog headlines on the Blogger dashboard, I found in my blog photo album. It was right there, next to the rings I wanted to insert. I just didn't think they were in this blog post so I never even read through it when I came to it in the list of posts with the earring label!

Why all this hassle? There's nothing spectacular about the earrings really. Well, first off I just wanted to show them as I love the flower beads so if I didn't have an old post to refer to I had to write a new one. The reason I even began to think about the earrings was this post at Art Bead Scene Blog. If you don't want to follow the link: it's about a new blog focusing on daily earring inspiration.

My input was really just to lobby for "non-pierced" earring designs. With the exception of Japanese beading and jewellery-making websites, I rarely see any projects like that. It's like everyone assumes that people either have pierced ears or, if they don't, they aren't interested in wearing earrings. The late might be the case for some, but not for everyone -- and I also believe some of those not wearing earrings would change their minds about clip-ons if they saw the different findings available today.

But let's first get back to my flower earrings:

I like this type of clip-ons as they doesn't squeeze the earlobe as those horrible chunky clip-ons I had as a kid in the 80's. And they look like "real" earrings/creols. Unfortunately, you can't put anything heavy on them or they'll fall off, but for simple, light-weight earrings they are one of my favourite choices. I do have these too (se pic below), which are similar but without the spring and therefore much cheaper.


Because I don't have pierced ears, I'm not in the habit of wearing earrings -- pierced, clip-ons or cuffs -- but sometimes I feel like making a pair. Add to that the fact that I'm a collector so once I discovered there were different kinds of earring findings for us without pierced ears, I almost began to collect them. Below is an old photo I took for my other blog when writing about "non-piercing" earrings. It doesn't include cuffs, but shows some of the clip-ons I have. The big ones actually belong to my sis and are supposed to have beadable sieves (mesh, perforated discs) attached to the front.


I'm sometimes thinking of making a new, revised post presenting different type of clip-on findings and cuffs (the classic ones and the "round-the-ear" versions). For some, clip-ons still mean the painful chunky earlobe crushers they remember from 25 years ago, but now it's easy to find many different soloutions to ear hooks and studs. The more people are aware of the alternatives, the more I think they would be interested in clip-on and cuff earrings.

Would you like to see a post on these earring findings or on clip-on earrings in general written by someone without pierced ears? I'd be happy to write it, showing different options, DIY clip-on findings and suggestions for designers wanting to make earrings for us "non-pierced" jewellery buyers. I'm no expert, but I'll do my best to help if you have any questions.

Monday 24 October 2011

Poetic fog and quotes

september fog002


I keep saving a lot of photos on the computer, thinking I want to show them off on the blog, but often I don't get around to edit them and after a while it just feels misplaced. For example showing summer photos in September. I have said I'm going to do three "remember summer" posts this autumn because there are a few things I really wish I had time to write about at the time.

Right now it's a batch of photos I took in the last days of September that bugs me. It was one of those foggy days you get when a cold and chilly weather suddenly changes and you know that tomorrow it will all be so different, sunny and warm. Fog adds such a mysterious veil to the landscape and softens everything. I know some of the photos I took look good on the camera display, but not in full size. Still, I really hope there are some photos good enough to publish here. So far I've only edited a couple of them, as you can see here. Not the best, but not the worst either.


september fog001


That photo inspired me to do this (as I'd already softened the focus on that one, cheating a little, but not so much it altered the original mood of the photo):


september fog quote


The quote is from Hamlet (there is a small, almost invisible credit to Shakespeare in the pic). I found it on this lampwork bead, which I more or less fell in love with (the front, not the back, sorry).

It was kind of along the same way as another quote I've been contemplating for some time now:


Without going in too much on my personal life and why I've spent the last two years dreading my 30th birthday (which is just a little more than a week away by now), I can say this quote -- which I stumbled upon my chance in a magazine -- really struck a cord with me. Must admit to not knowing who Joseph Campbell is, but at least he has said some good things it seems.

See, since I began studying and choosing what I wanted to learn more about, I've not had a big plan about how I wanted my future to turn out, but I knew I wanted to work with the issues I felt so passionate about: environment and planning (samhällsplanering). Since the day I stepped out of the university world into the real world, the adult world, I haven't gotten a chance to do so. That hurts me, makes me feel so sad. One of the reasons I don't sell my jewellery is actually related to this in a weird way. I have this idealist in me that want to dedicate my life to the big things, to create a sustainable development, and I don't want to be side tracked by less important things. I think I feared that by focusing on my beading and putting my energy into making that my business (that's one of the things I've studied, by the way, business administration) I would turn my back to the one thing I really want to work with. Since I don't seem to be able to get a job in the field, I have to rethink my whole purpose in life. Or at least that's how it feels. I'm at a turning point. 30 years old without a job, lover, own home or money (but a nice big loan after six years at uni). That sucks. And I have to do something because it can't go on like this. It's just that I feel like I have to give up a dream, an education -- a part of me. I know there will be other dreams if I just let them in, but there are so many things I hate to let go of. I don't want that to be my only way of getting out of the deep, black hole I'm in. But I have to do something. I've slowly begun to -- if not accept it so at least realise it might be what I have to do. Because my life can't continue as it's done these last years. I wish you could just pause life, make everything just stand still and stop time. To give me a moment to really think about what I want and must do without being stressed by the clocking ticking and minutes, days, years of my life just floating by and be gone, never coming back again but lost forever. And it was at that point I saw that quote.

Sunday 23 October 2011

Bead blog recap weeks 41-42

TWIN


Time for another recap of what I've been writing these last two weeks over at my other blog, Manekis Pärlblogg. This time the subjects include Plasti Dip (as jewellery material), new products from the US and Czech Republic, contests and bunting necklace projects. The post that excites me the most? Of cause it's the new Twin beads from Preciosa Ornela (see photo above and check out these pics).


Wednesday 19 October 2011

Went shopping again


Yes, I know I'm on a tight budget and shouldn't shop, but you just can't pass up an opportunity to get to buy a handmade gräddbulle (as I mentioned here). Gräddbullerian and Accessorize are by far my two favourite shops among all the new ones at Väla (sorry, Bites & Bottles). Apart from gräddbullar, the only thing I was thinking of buying was a bottle of gesso and some stickers so I can make more MOP etchings. But then of cause I had to go by Pressbyrån and check out all the mags. They don't seem to carry any of the beading or jewellery making mags anymore, but I can find other craft magazines and creative reading. This time I picked up an issue of Hemslöjd.

I discovered Hemslöjden, the magazine that has now become Hemslöjd, more or less by accident. I was given a whole bunch of back issues by a woman that was moving to a new home. Keep or donate to charity she said. I read them and kept them all. Even if I hesitated at first. Could this really be for me?

To understand why I felt like that, you have to understand both what hemslöjd means and the age in which I grew up.


Monday 17 October 2011

Iron-on transfer on leather


Those of you that have read my blog for some time know that I don't just publish photos of things that turned out well. This is one example of something that didn't turn out as well as I'd liked. But something that did give me valuable experience for the next time I want to try it.

I wanted to try the image tranfer technique for leather, which Sherri Haab describes in her book Designer Style Jewelry. She uses iron-on transfer paper for dark fabric. I didn't have that and wanted to have the leather show through in the background so I tried it with "regular" t-shirt transfer papers (e.g. for white/lightly coloured fabric). Tip: Black text doesn't show up well on dark purple backgrounds...

Note: If using transfer paper for white fabric, you will get a shiny film between the coloured areas. See photo above and how the film ends next to the first and last letter, creating a visible seam or edge. Solution is to trim as much as you can around the image or cover all the leather with the transfer paper so it gets evenly shiny. Or just not see it as a problem. This is not an issue with papers for dark fabric as all white areas are transferred to the leather, giving it an even, opaque finish. While cheaper, I don't recommend papers for white fabric to begin with -- unless you are ok with the edges.


First thing I learned was that my choice of leather was bad. I used this thick painted lace as it was intended for a contest where I had to use this product. Not good: the iron almost melted the paint in places. Normally leather is dyed or stained, but this wasn't which probably made it a bad choice. Not sure if it was the painted surface or the leather itself that also made the transfer slide when I rubbed it with the hot iron. Lesson to myself: apply iron from above, pressing and lifting to heat section by section. Do not "rub" back and forth as when ironing clothes. Not even a little.

Second problem can be blamed on the instructions. The book said to refer to the paper manufacturer's instructions, but these didn't mention what heat setting to choose (only to choose a setting appropirate for the t-shirt -- which of cause comes with care symbols unlike the leather). I don't know what heat is ok for leather and still hot enough to transfer the image. So I just set it somewhere in the middle or just below the middle. At one point I heated the leather so much it hardened and curled. D'oh!


I did probably over half a dozen transfers and the one you see in the first photo (top of post) is the only one that's anywhere near neat and clean. Most annoying part: when making a bracelet with two transfers, the first one being turning out very nice, the second totally messed up. Grrr!

But I'm not giving up. I still believe in this technique and to show that it can indeed be successful, I took a photo of some leather "tiles" my sis have made.


(Cats on the photos are: Figge, Mimi and Rostan, followed by Randi and Isse below.)

Much better than most of my flops. The slightly grainy appearance says more about her (and my) camera and print out than the transfer method. She also  had the same problem with the image distorting when ironing it less than meticulously.


Looks pretty ok -- until you focus on Randa's head!

I'm not trying to deter anyone from trying this. In fact, it's a great method if you are careful and know what you are doing. I don't know that many transfer methods for leather so I can't compare this with other techniques, though. Just be prepared that the first transfer might not be as good as you hoped. But when it works, when you lean what the pitfalls are, it looks good!


What will happen with the "dreaming of dragon" transfer I showed initially? When I get good scissors for cutting heavy leather, I'll trim the edges, punch a hole in each and use as focal/connector in a bracelet. At least that's my plan at the moment.

Saturday 15 October 2011

When you challenge yourself

Double posts today. If you're looking for sari ribbon you'll find it by scrolling down a bit, just after the mauled french wired ribbon. Or by clicking here.


So... Do you see what's in the picture above? It's black pipe cleaners, AKA chenille stems. A common craft supply, not least used by kids. So what am I doing with them? I have no idea. No idea at all. But I know it will be jewellery.

It began as it often does by me challenging myself to use some unusual or unorthodox material for my jewellery. In this case, using a very common craft supply for adult jewellery seemed like a challenge that would push me outside my comfort zone. The plan is to do real jewellery, that is: something that can be worn without looking like a masquerade piece or something your kid made you wear. I'm not talking about making crown jewels with it, but it should be wearable and tasteful.

The first hurdle was buying the supplies when on a fixed, very tight budget. They don't cost much each, but you can only buy them in bundles of at least 25 but up to 100 stems. And if you want mixed colours to avoid having to buy several packages of each colour, you get an assortment. Read: not one of the packages in the craft store had a colour mix I was pleased with. Too many of colours I don't want and too little or none of the colours I'd planned on buying. I had an idea, inspired by something I saw online, but in the end I couldn't get the right colour for it. So I went with black, figuring it's a classic, elegant colour. Surely that would make my challenge that much easier?

Well, I don't know about that. So far I haven't had even one good or even somewhat good idea since I had to scrap my inital necklace idea. (Thought I kind of like these.) I've seen pipe cleaners wrapped in ribbon or cloth and than of cause makes them look classier and more useful, but according to my challenge rules, they have to be visible. Even it it would just be an accent like e.g. in these butterflies.

Maybe I have gone in over my head here. It feels that way. But I won't give up -- and that's partially why I'm blogging about this: now that someone else know about the challenge, I can't chicken out. Right? Maybe I'm worrying too much that I'll look tacky or childish. Maybe I should just do something and then decide if it was a good idea or not. Well, when I come up with a good enough idea and create jewellery I'm not too embarrassed to show, I'll be sure to blog about it.

Speaking of ribbon...


This is my tiny stash of lovely, shimmering french wired ribbon in different ombré colours. It's woven with one colour in the weft and then the warp consists of threads toning from one hue to another, giving it not just that colour shifting you know from e.g. dupioni silk, but also a colourchange from one edge to the other. It's that shifting that makes the ribbon look stiped in a photo when you scale it down as I've done above (click on it to see it in original size).

Granted, it's a bit too shiny for my taste perhaps, but the colours are lovely. And used the right way, of cause I like shimmer too.

Like with so many of my supplies I just never use these. Why? Partially because they're special and I therefore want to save them for a special project, but also because I keep thinking that if I use them I will have nothing left. I know it's not the last ombré french wired ribbon on earth, but there are so many other things I want to buy and save up money for that it might as well be. I know it's irrational, but keep in mind that I don't sell what I though and thus never get an income to finance restocking. As it really is a tiny stash I cannot make more than one flower of each colour, adding to my indecisivenes. When I do decide and cut the ribbon, there's no going back. Then I can't change my mind anymore. So in the end I never "dare" use it, I keep my little bundle of ribbons like a treasure in a treasure chest.


Execpt for one of the ribbons... Somehow it had fallen out of the bag I store them in -- and I didn't notice at all! Probably months after than happened my sis found it under some newspapers. Of cause the cats had found it. Of cause they had decided it was their new best toy. Oh, just look at it! All mangled and perforated by naughty kitten claws (yes, I blame the kittens rather than the adult cats). I think there is a short stip that's relatively unharmed in the middle of the roll, but not really long enough to make anything from. At least not a flower.

Oh well, it's my fault. Can't deny that. I'm the only one that has opened that bag so it can only have been me who dropped it on the floor. And once there, how is a cat to know it's not a toy? Can't really blame them for not knowing the difference between what's ok to play with and what's not. That's how I feel now, not how I felt when my sis showed me the ribbon. I can assure you of that!

Friday 14 October 2011

Sari Ribbon Party Blog Hop

 Due to computer issues (the headache inducing kind) I'm writing this in the middle of the night. I hope the fact it's past my bedtime won't make this post too difficult to read.


I like cords and ribbon, but I've never used the sari ribbon I've seen so many other do beautiful jewellery with. So when I read about the Sari ribbon blog party, hosted by Brenda Sue Lansdowne (of B'Sue Boutiques) I thought it was a good incentive to try it myself. I also challenged myself further by choosing to work with a colour I don't normally use. A colour far from the earthtones I'm so fond of.

This is my third hop in less than a month, which meant I didn't have much time to work with the ribbon. I mostly do bead weaving and embroidery at the moment, but that was out of the question this time. As so often when I'm working with something new I tried to keep it simple, getting to know the material rather than go for some grand design I didn't know if it'd work out in the end. Working with what I had at home also added som limitations.


And these three added another obstacle to the whole thing. Especially Julle and Jisse quickly learned that sari ribbon is just so much fun to chew, run off with, catching in the air and just generally play with. At one point, Jisse (the boy in the middle) was hanging from my skirt trying to catch the ribbon I was holding (I was standing up at the moment). Cute, I guess, but awfully irritating when I was racing against the clock yesterday. Well, I guess I should just be glad not all of our eleven cats took the same interest in my new ribbon stash....


I planned several different things, but in the end it boiled down to two finished pieces. For my first necklace, I found the perfect dark heather freshwater pearls to go with the ribbon. When I check colours to see if they match, I often twist the ribbon, cord or bead strands around each other. In this case that became the inspiration for the finished design. I simply stitched a strand of pearls to the ribbon and twisted it, leaving some ribbon on each side for tying in the neck (preferrably with a prettier bow than mine).

I might redo this one as I think the ribbon it too tightly twisted and it looks like the pearls are wrapped around the ribbon rather than the two -- ribbon and pearl strand -- being twisted together as it looks when I first tested the technique.


Pretty soon I knew I'd probably want to make a ribbon flower (check out the blog label ribbon flowers and you'll see why). This was not my original plan. I wanted to do a "loop" flower, but in the end I settled for a smaller flower in a technique known as continuous u-gather. The flower was stitched to a filigree in russian goldplate and then a flower in the same plate was added to the centre, held in place by a fire-polished bead.

The chain is just temporary: I didn't have any in the right colour to match the filigree and because it's so delicate I didn't have any cord or ribbon that seemed to fit.


The flower is a bit uneven, which I probably can blame the kitties for, but I hope it doesn't look too uneven. I can't say that hot pink and gold is a favourite colour combo, but it is eyecatching and very different from what I usually do so it was a fun combo to work with. A happy and warm combo.


All in all, I made two designs that I never would've thought I'd make, had you asked me the day I signed up for the blog hop. Ideas got scrapped, components had to be returned to the stash as they didn't work out, ribbon got mauled by the cats. And in the end I came up with something created by the work process itself in a way. Something I hope you like or might even be inspired by, even if they are simple designs hastily made in the last minute.

Will I be working more with sari ribbon in the future? Most likely, though from now on I'll probably wait for the really good ideas as I don't have a deadline hovering over me. I'm an "ideas first" kind of person, finding it hard to work with kits or choosing materials before choosing my project idea. But I know that sooner or later I do get an idea for the materials I've accumulated. Until then I'll just work with something else (right now embroidery, I think). Sari ribbon sure has potential to inspire me.

*

Before you go, I just wanted to add that you might want to stick around: I'm planning to do a giveaway in the beginning of November, which you perhaps would be interested in. Ok, now go and check out all the other talanted party people in this hop:

Vickie Wills 
http://www.jewelrybyvee.blogspot.com/

Susan Kennedy
http://www.suebeads.blogspot.com

Michelle Mach
http://www.michellemach.com/blog/


Michelle Lee Hardy
http://fireflyvisions.blogspot.com/

Ruth Crawford
http://www.home-with-ruth.blogspot.com


Hilary Frye, FryeStyle
http://fryestyle.blogspot.com/


Diana P.
http://www.suburbangirlstudio.com

Brenda Sue Lansdowne, B'sue Boutiques
http://www.bsueboutiques.typepad.com/

Elizabeth Owens-Dwy
http://www.clarityofpurplesage.blogspot.com

Connie Rios-Relyea
http://www.JewelsDesignsCreativeCorner.wordpress.com/

Jennifer Justman
http://soulsfiredesigns.blogspot.com/   

Deb Davis
http://www.naturaltreasuresbydeb.blogspot.com

Beanzie
http://www.thevintageheartcharmbracelets.com/the-vintage-heart-charm-b/
             
Cathie Carroll
http://www.cathiecarroll.com/

Rosemary Cowit
http://www.gemrosedesigns.blogspot.com/

Georgene Lockwood
http://sylvanavintagedesigns.wordpress.com/

Cathy Buckley
http://cathybuckleycatsmeow.blogspot.com

Harry Wood
http://www.oscarcrow.blogspot.com

Sonya Stille
http://dreaminofbeads.blogspot.com

Mary Deis
http://mdeis.blogspot.com/

Heather Goldsmith
http://asibeadit.blogspot.com/

Susan Rouleau
http://mountainshadowstudio.blogspot.com

Terry Matusyk
http://pinkchapeau.wordpress.com

Pam Chesbro
http://afortunatesoul.blogspot.com/

Mary Shannon Hicks
http://uptwnsh-fallingintothesky.blogspot.com/

Janice Everett
http://JLynnJewels.blogspot.com

Davinia
http://www.daviniadesign.com

Kristina Johansson, Maneki  [You are here]
http://wildrosesandblackberries.blogspot.com

Kris Binsfeld
http://www.cherishdesigns.wordpress.com


Mandy
http://www.beadsforbrains.blogspot.com

Charlene
http://thebeaddreamer.com/blog/

Catherine Jeltes
http://www.galleryzooart.com

Jackie
http://kydojewellery.blogspot.com/

Sharon Palac
http://www.sharonsjewelrygarden.blogspot.com

Deb Beechy
http://beetique56.blogspot.com/

Jean Yates
http://prettykittydogmoonjewelry.blogspot.com/

Patrice Pfeiffer
http://treeseatreasures.blogspot.com/

Dorcas Midkiff
http://wondrousstrangedesigns.blogspot.com/

Lynn Perry Bennett
http://designsbylynnea.blogspot.com

Linzi Alford
http://www.magpieintheskyspoilheaptales.blogspot.com

Deb
http://greenshoot.blogspot.com/

Cynthia Wainscott
http://www.exoticperujewelry.blogspot.com
Marie-Noel Voyer-Cramp
http://skyejewels.blogspot.com
Alice Craddick
http://alicesbeadsandbaubles.blogspot.com/
B'sue Boutiques Creative Group
http://www.flickr.com/groups/bsueboutiques/


Have fun!

October rose


Yay, I finally managed to over come the computer issues and write by blog hop post, which will publish in the morning. Over here it's 02:25 so I really should get into bed. I look forward to the sari ribbon party tomorrow, though I don't look forward to the fact that I have to work some more with the ol' computer. Hopefully it'll be in a good mood. Fingers crossed.

Until the post will appear on the blog (at 6 my time), you can enjoy this rose image I made the other day, using a blurry and noisy photo of a rose blooming in October. Took the photo on one of the first days of the month so I haven't checked if it's survived the cold nights we're having now. Don't know if you can read the text due to my font choice. I just jotted down a short text about it to add a bit of interest in the image. It's in English as it's really annoying trying to write something in Swedish when you can't add three important vowels because the font isn't adapted to the Swedish language. Well, as long as I keep it simple, it less noticable how much more eloquent I am in Swedish than in English.

Now I better turn the computer off so I can get at least a few hours sleep tonight. I believe I've got four hours until sunrise at least.

Good night!

Tuesday 11 October 2011

Digital collage II


I actually made another similar collage before the Harry Martinson one. This one has a text that's very familiar to Swedes: the first verse of Fjäriln vingad syns på Haga by Carl Michael Bellman. This is the 64th song in Fredmans sånger, published in 1791. It has been recorded in English under such titles as On a summer's day in Haga, Haga Butterfly and Haga. The setting is the Haga Park, founded by king Gustav III. Here you find famous buildings such as the Haga Palace, the Chinese Pavilion, Gustav III's Pavilion, the Echo Temple and the Copper Tents.

But let us return to the collage. I had a hard time with the layout here and I'm not that fond of the results. This isn't what I wanted and the density of the font paired with the spacing made it impossible to cover the whole page with the text as originally planned. In the end, I even made a second version by cropping the original image. And now I just realised I forgot to change the Äs and Ås, hence the question marks in the text. Stupid... As with the Harry Martinson image, I didn't intend to make the text clearly visible. I was after the mood of the lovely handwriting, rather than framing a quote for someone to read. The reason I used a quote rather than just write random words was that I wanted a mood to create the image around -- and from a practical point of view, a real text would look more realistic than a nonsense text.


I think I like this one better even if it does look very much like an image cropped from a larger picture. Much tighter composition, putting the text in centre (though that wasn't the plan). Again, not perfect. Far from it. But better, I think. And, oh, if you didn't notice it yourself already: I'm really fond of that tree "sticker" in Picnik.

Digital collage


I mentioned I wanted to learn more about digital art and collages not too long ago. This is one of my first digital collages since my laptop died a few years ago. Made in Pixlr-o-matic (textured background) and Picnik.com (the rest) -- something that took a bit of time since I'm used to working with layers in PSE, which I can't with this software. It's not great and I can't even call it my first try (though my first try using Picnik for this type of images), but I think it's nice enough to blog about. Showing at I at least try to learn something new. 

I've got a few more with quotes, but right now the big issue is that I find it hard to pick out quotes to work with. I've got to find my old compilation of poems and texts I like...


The text in the collage is by Harry Martinson (1904-1978), a poet and writer I really like. He won the Nobel prize in literature in 1974. He grew up in poverty without his parents -- his father died and his mother emigrated to America, leaving him behind. Became a seaman at age 16. Then he became a famous and loved writer, making his debute as poet in 1929. The years after he won the prize, the critizism against him grew harder and harder -- and in the end he comitted suicide by stabbing himself with scissors in a way similar to harakiri. A sad and brutal end to a man whose words I love to read. After his death, the Harry Martison Society (Harry Martinson-Sällskapet) was founded. Amongst other things they reprint his works and have founded two prizes in his memory.


This short essay is titled Försonande rymd ("Redemptive space" ) from the book De tusende dikternas bok (1986). It's been reprinted in Naturessäer by the Harry Martinson Society. I don't know if it has been translated, I'm afraid. As it's almost impossible to read the font -- and it didn't have å, ä or ö, three crucial letters in the swedish alphabet -- I'll publish the text below. First in original, then in my slightly clumsy translation.


Försonande rymd

I en by där jag levde fanns en bonde som jag hatade. Jag hade
beslutat att innan jag lämnade byn kasta en sten i hans ansikte.
En kväll såg jag honom köra hem från arbetet. Jag stod inne
mellan några träd och han såg mig inte. Men plötsligt höll han
in hästen och stanna den kracklande arbetsvagnen.
    Han satt länge alldeles stilla. Och efterhand gick det upp
för mig att han lyssnade på själva aftonens tystnad omkring sig;
till den frid som kan höras bara av den ensamma mänskan. Då
smög jag mig bort.

Redemptive space

In a village where I lived, there was a farmer I hated. I had decided
to, before I left the village, throw a stone in his face.
One night, I saw him drive home from work. I was standing behind
some trees and he didn't see me. But suddenly he held his horse
and stopped the cracking work wagon. 
     He sat still for a long time. And gradually it dawned on me that
he listened to the very silence of the evening around him; to the 
peace that can be heard only by the lonely man. Then I slipped away.


The scene captivated me the first time I read it. Standing like that, alone in a silent evening, is one of the most divine experience you can get. The beauty and harmony in nature at moments like that are hard to put in words. Pair my personal experience of moments like that with the man in the text. Her was this hard man, who probably had treated the young boy badly (I've read Martinson's depiction of his childhood and how he was treated by his foster parents and other adults so I'm not just basing it on this text) -- and suddenly we see his secret, soft side. A glimpse that tells us there is much more to this man than he has shown the child. Even our enemies can have benign sides we can sympathize with, though we might never see them. But if we do, we might change our opinion about them. As we get to know other sides, get a fuller picture of the personality, we might no longer in the same way hate the person we have made our enemy.


I hope you like it. Both the collage (though far from perfect) and Martinson's text.


PS! It's just as good the font is hard to read. I misspelled Martinson!!

Saturday 8 October 2011

Book finds -- jewellery inspiration


Yesterday, my sis and I went down to the village as we both had mail to collect. As we had time and the weather wasn't too bad we also went by the pharmacy and, as it's just around the corner from that shop, the library. Of cause they we selling old books and redundant copies so we got stuck there for a while. Not that many great finds, but I did walk away with a few books. One of them was Jewels of the Pharaohs: Egyptian Jewelry of the Dynastic Period by Cyril Aldred.

I can't say Ancient Egypt is one of my main source of inspiration, but I have found inspiration from there before (even done an egyptian revival-inspired jewellery set once) and a book on jewellery is always a book on jewellery. Even if it is old and have those typical 70's colour photos.

Haven't read it yet, but have flipped through it and found some inspirational -- and impressive -- jewellery. It's not just eye candy: the book covers bead making, jewellery techniques, history, symbolism etc on around 40 pages. You can e.g. learn that a bead maker was called iru weshbet and that it isn't known whether the Egyptians knew how to draw wire.

Flipping through the colour plates, I kept thinking I wanted to see more close-ups of the clasps and bead and that there was a slightly annoying lack of measurements. Because nowadays I don't just want eye candy for inspiration, I want to know how something is made. Techniques, materials, what the back looks like, what details and mechanisms (e.g. clasps, hinges, fasteners). Everything.


This page show one of the pieces that caught my eye, a floral circlet belonging to princess Khnumet who was buried in Dahshur (the crown above it was also hers). It's not something I'd immediately class as egyptian if I hadn't seen it in this book. Seeing it, I keep thinking it might be an inspiration for a piece made in wire crochet, either a circlet or a necklace. You can click on the image for a close-up so you can see more of the details.


Here's another page I quite liked. The top image is of goldsmiths, known as nuby, at work. Below that is two images of male jewellery makers making bead necklaces and collars. The guy below almost seem to have a modern day bead board. Apart from the nuby (goldsmith) and iru weshbet (bead maker), there was also the baba (faience maker) and neshdy (lapidary) involved in the jewellery making. [Googling it, I also found that the skilled collar stringers were known as seti nub.]

So now I have "new" book that includes two of my favourite subjects -- cultural history and jewellery/beads -- to read. Or rather look at as it's mostly pictures. Hopefully, I'll both learn something new and find jewellery inspiration in it.

Bead blog recap weeks 39-40


A summary of what I've written the last two weeks over at my other blog, Manekis Pärlblogg. From blue slag stone and needlepoint beads to earring contests and beaded candle holders.


Tuesday 4 October 2011

Very Vintage Challenge


Today is the day. Time to reveal what we've made for the Very Vintage Challenge, hosted by Michelle Mach. This is a kit challenge where each participant has bought an autumn-themed kit to create with. What makes this kit challenge a bit special was the fact that Michelle not only sold full kits, but also a few "mini kits" with fewer items, but in the same style and on the same theme as the big kits.

I choose the small kit, as you can see above, because I thought it was very cute. My plan was to do something simple with just a few pieces (not really adding to the kit) so that each and every piece could shine. Just look at the pic: it doesn't need much more to make a lovely necklace, right? I also decided early on that I wanted to do something asymmetrical as I'm no good at it. But of cause nothing really went as planned.

First I added a few beads, thinking I'd like them on each side of the branch. Very nice and elegant, no bead dangles except the acrylic leaves (was going to drill a hole at the tip of the brass leaf). And a well balanced asymmetry. It was also important that the branch would be used in a different way from last time I used that component. But for some reason I gave up that idea. Perhaps I couldn't make the pieces fit the way I wanted; I'm not sure exactly why it began to move in a completly different direction.

I gave up the round pendant, which I wanted to use as a clasp, for another idea I got. Then I wanted to add a few more flowers on top of the red ones I'd selected for my original idea. Before I know it, I'd added several pieces and come up with a design I wouldn't normally work with as I don't like "cha-cha style" jewellery (rassel as we say in Sweden). And whether or not I'd added too many pieces considering the rules of the challenge, well, I totally forgot about it being a kit challenge once I'd begun! (Hope I didn't bend the rules -- and the whole idea of a kit challenge -- too much...)

Ok, enough talk and trying to build up suspense. You want to see it, right?


Can you spot the clasp before I point it out?

I kind of cheated myself out of the asymmetry "ultimatum", didn't I? Adding beads like this, it's almost always asymmetric to some degree, but you don't see it as well do to the number of beads. As you can see I've added quite a lot to the kit -- would you believe me if I say I just realised that last night? D'oh. There's several czech glass beads in different colours as well as a few tiny fire-polished drops and two rough-cut czech rounds. I also added a chain and a Vintaj leaf charm by the branch component. I did not use the round charm from the kit.

The leaf charm wasn't added as mere embellishment. If you haven't already figured it out, it's the clasp. I bent it and made a hook clasp in the same way I did with my barn swallow focal.


One detail I forgot to get a good pic of is how the beaded chain on the right is attached to the branch. Just like with the leaf and flower pendant, I made a loop on the middle of a piece of wire, trimmed the ends and crimped it onto the dapped branch. Sort of like a staple or claw.

Adding the two round-ish beads to the end of ech beaded section was really just something I did because the chain was soldered and I had to shorten it. That's why I prefer open links (if they're sturdy enough). Also had some idea about making a more defined transition from beaded to unbeaded chain.


This is a short necklace. I don't have a photo of worn, I'm afraid, but I did take a photo of it hanging. This one shows what the necklace would look like worn -- if it had been long. I kind of like it -- even if you can see that that loop on the left isn't properly closed... But it has nothing to do with how the necklace actually lies around your neck.


So... Am I happy with the results? Well, kind of. I finished on time despite knowing I can find it hard to work with kits (still I can't say no to a kit challenge!). And I like the colours. This style of jewellery isn't really my cup of tea, though, so perhaps I'd preferred to string the beads. Perhaps even add a few tiny beads in between the dangles to make it more like the "in progress" pic below. Or add the beads to twisted wire for a more "airy" design and interesting texture. And as for the final result, I'm still wondering if I did the right thing by adding a chain and not beads as initially intended. What do you think? Keep the chain or go with my small dark brown square wooden beads instead? Or both?


Another "in progress" pic below: at this point (measuring the length of the beaded sections) it looks like a neat lariat necklace:


 Well, I might sound negative, but those who know we knows that's my style. Never really satisified, finding faults and always looking for ways to improve things. So in the end I'm probably more pleased than it sounds like. And I'm really glad I signed up for this challenge. So a big thank you, Michelle, for creating an inspiring and beautiful kit to work with!

*

Before you go, I just wanted to mention that you might want to come back again soon. I've decided to host a birthday giveaway next month (Nov 3rd) and already next week (Oct 14th) I'm participating in another hop, the Sari Ribbon Blog Party, hosted by Brenda Sue Landsdowne (B'Sue). That said, now, don't miss all the other participants in this fun Very Vintage challenge today:

Andrew: The Writing and Art of Andrew Thornton

Cat: Boo Beads

Chris: beadjewelry.net

Cilla: Tell Your Girlfriends

Cyndi: Beading Arts

Cynthia: Cynth's Blog

Dawn: Morning Glory Beading

Donetta: Simply Gorgeous

Heather: As I Bead It

Holly: SilverRose Designs

Kate: We Can Make That at Home

Kristina: Wild Roses and Blackberries (You are here!)

Lauren: Laurel Moon Jewelry & Beads

Linda: Lutka & Co

Lisa: Lucid Mood Studio

Lola: Bead Lola Bead

Mary: MLH Jewelry

Melinda: Melinda Orr Metal & Clay Jewelry Designs

Michelle H.: Firefly Visions

Michelle M. (hostess): Beads & Books

Salla: Blog by Salla

Shannon: Falling into the Sky

Shay: Shaiha's Ramblings

Shel: MiShel Designs

Shirley: Beads and Bread

Stephanie: Pixybug Designs

Tari: Pearl and Pebbles

Terry: Pink Chapeau Vintage Jewelry

Tracy: The Bead Junkie

Have fun hopping -- and thanks for visiting!

Monday 3 October 2011

The cornflower picture


 Some of you might have noticed that I've made a few small changes to the blog. I've added new pages for my free tutorials, recipes and jigsaw puzzles, making them much easier to find. I've also tried to add a personalized favicon. For some reason it worked on my other blog, but as far as I can see not on this one. (If you can see a favicon other than the Blogger B, I'd love to know about it.)

I've used the same image for the favicon as for my Blogger profile. I don't think I've said anything about the background of that image, though, despite mentioning that I would when I made the change. So here it is, the story behind the cornflower photo -- and the "original" photo I created the image from:

It all began a summer afternoon when I wanted to take some photos of my sister's multi-coloured cornflowers. It was a lovely light outside so it felt like the right moment to get some pics. I'd just recently taken a few photos indoors and it wasn't until after the first photo I realised I hadn't changed the white balance settings. That's why the colours are a bit strange. It's not edited afterwards. It's the result of me forgetting to reset the camera. I love the effect!


So that explains the colours, but not the cropping. Because I did of cause not miss half the flower when I took the pics. The inspiration for the artsy cropping came from the editing software I was using at the time, Picasa. When you want to crop an image in Picasa, the software gives you several suggested cuts if you don't want to choose yourself. One way the software wanted to crop my photo intrigued me so I used it. That's the photo you see just above this paragraph.

I had struggled with a picture of a flower and background in colours I loved, but with a composition that was just so plain. This way I could focus on the things I liked about the photo. I just had to learn that you don't have to fit the whole object in the image. It can look nice this way too. But I'm not sure I would've seen this solution without the suggestions created by the software. That's the one feature I miss about not using Picasa anymore.

Later, I wanted to add a new image to my Blogger profile. No matter how much I loved my dragon, I felt another image might say more about me and my style than the black and blue sweetie. For my profile image, I needed a square pic so I just cropped the top half of the original image and changed the resolution. As a bad last move, I also added a texture. So reduntant with a photo like this one, but it's the way it is now.

Someday I'll make that pic into a pendant (if the resolution isn't too bad for printing). I think it'd make a nice focal in a necklace.


By the way... 
Speaking of blog changes, I'm thinking about making a new banner for my other blog. Mainly because I want something more bead or jewellery related. I'm not a fan of fairies and choose the image I'm using now more because of the colours. And I want something more personal, by mer for my work, than some free clipart I found online years ago. If you have any suggestions -- or want to save my fairy -- I'd love to hear it.
Related Posts Plugin for WordPress, Blogger...