Showing posts with label silk. Show all posts

Sunday, 2 March 2014

Challenge of Music 2014


A belated welcome to my stop on the Challenge of Music blog hop! After what seemed like an eternity of knotting (126 knots to be precise), I finally have a challenge piece to show. It's green, but not so much in anticipation of spring. The colour is in many ways the central component of this story and challenge creation and it all begins in the year 2000.


My studentmössa, "student cap", from the graduation in June 2000.


The year 2000 started, in a way, rather anticlimactic for many after the much ado about nothing 1999 new year's eve. No world ending, no civilization crushing Y2K computer bug, no epic end-of-a-millenium party. But for me and everyone else my age in this country it was the beginning of a very important time. It was our last semester at gymnasiet, the three years following the mandatory nine years of schools, and it was time to choose our path in life. As the year transcended into the Year of the Dragon, many of us were really to send in our university applications. I was one of them, the first one (and so far the only one) in the family to aim for higher education.

This is the first meaning of the green colour as I, during the last year studying at the social science - business administration programme (samhälle ekonomisk), had gotten fed up with what I thought was my path in life, marketing. The more we studied, the less it felt creative and challenging and the more it felt like just learning about how to manipulate people. Business administration felt hollow, without real meaning and importance even though I still sort of loved the dynamic world of business. And having become more and more interested in environmental issues as well as human rights, contrasting marketing with the important issues in the world, money making felt soulless. The solution came one day when our class teacher handed us a list of business admin and economics programmes at the universities and högskolor in Sweden. After looking through the list, one line stood out. It said the Ecological Economics Programme. Not knowing much about all the existing disciplines, this felt like striking gold: I could combine my interest in economics/business admin with my passion for environmental issues! I knew straight away what I wanted to study after the summer. Now it was just a matter of finishing the last courses, get my grades and my student cap and then pursue my new passion in life.

In the summer I got the papers saying I got in and in late August I moved to a student flat in Västerås, a place I couldn't even pinpoint on a map of Sweden I'm embarrassed to say...

This is where the music part of this challenge comes in. Choosing a year was easy, the year 2000 was so extremely important in my life, but choosing a song wasn't much harder. We only had the basic channels on telly (plus the danish as we're on the verge of the area where you can get their broadcasts), but in my flat I got cable, which meant getting two (then) music channnels, MTV and ZTV. I still remember two songs from that year, one mainly from the telly (Overload with the Sugabages) and one from the telly and the clubs I visited with my new class mates that autumn. This is the second song I remember from that year:


The one thing I remember from the actual music video I saw on my telly was -- yes, you guessed it, the colour green.

But there's even more green associated with the year 2000 for me. Not just the green from the song I remember so well from the dance floors and videos on telly, not just the symbolic green of my choice of studies (apart from Ecological Economics, it included all sorts of green disciplines, from environmental sciences and green technology to eco sociology and environmental history). The one thing I remember best from my first -- and so far, only -- flat was not the inside, but what was outside. A country girl moving to the big city, I still felt close to nature: on the back of the student apartment building there was a lawn and a small exposed cliff with bushes and trees. You could at times see many rabbits and on occasions even a roe or two. At the centre of it all was a big linden tree. Every time I looked out my windows, I saw that beautiful tree, it filled up the window frame.

So that my challenge piece was to be green was the one thing I knew right from the start when signing up. Now it was "just" a matter of design and finding the right components. In the end, I settled for a simple (but somewhat time consuming design) that focused mainly on colour. The colour of the music video and the colour of my memories of the year of the dragon 2000.


In a way it's also a reference to home: the paired dagger beads reminds me of bamboo leaves, like from the bamboo bushes dad planted in the gardens. I spotted that while making the necklaces so it wasn't a symbol I intended originally.

As for more references to the music, it's a song that make you want to move -- dance or just jump up and down -- and I can just imagine the necklace and the beads bouncing and moving with the person wearing it.


The necklaces is made using medium braided silk thread and small dagger beads in a very simple pattern, knotting them two and two with spaces in between. Thought about varying it a bit, knotting some daggers in groups of three or one, but in the end I kept it like this --probably because of them reminding me of our beloved bamboo. At first it was intended as a lariat without clasp, but as it tangles easily I felt it was probably better to add a clasp -- none can be seen in the pics as I want a green one to match the beads -- wear it like a multi-strand rather than wrapping it around the neck.

It's very simple, but I like it. It'd be easy add a removable pendant or little beads on headpins if I ever felt like varying it a bit.


And that's it, my challenge creation and my story of an important year in my life. It's my life -- a fragment of it captured in glass beads and silk cord. For many more stories and creations, please visit our challenge creator and blog hop host Erin's challenge reveal post for her creations and for links to the rest of the participants. Enjoy!


Monday, 30 December 2013

Boxing day


While I haven't been blogging about anything I've done lately, that doesn't mean I haven't done anything. On boxing day, I took out the o beads I got for christmas (technically, I got christmas money to buy beads from so I got the beads before christmas eve) and played around with them. Really like how thin they are and how well they can be sandwiched between beads like the superduos in the pic above.

You can see some thread in some places so they aren't all perfect, those first three samples. Will play around some more with these designs and see what I can come up with. And of cause I'll embroider with them too, stitching them "face up" so to speak.

(By the way, if you need some inspiration for your new O Beads, check out this pinboard. The pinner also have a lot of other inspirational pinboards with various themes such as specific bead shapes or techniques.)


And as for this thing I also made on boxing day, can you guess what it is? If I give you another view?


No?


It's actually a cover for my embroidery scissors. After putting all my threads and needles in an organza bag along with the scissors, I realised how much I needed some sort of protection for the sharp blades -- both to protect the scissors from being damaged and to protect the organza bag from being pierced.

The cover is made from something I just grabbed in my stash: the most ugly looking of my silk rods (aka silk carrier rods). It was already softer than most of the other rods, but was soften even more by being rubbed. I then folded it in half and stitched the edges with uneven, but luckily close to invisible stitches. Not the prettiest thing ever made and ideally the shape should follow the shape of the scissors and be tapered, but with some embroidery -- with beads or floss -- it could look pretty nice I think. Should have embroidered first, but forgot to plan ahead...


The hard edge on the end is used as a sort of clasp or clamp to hold the scissors in the cover: once it gives in it'll be replaced by a button and loop closure.

At least it's serving its purpose and that's pretty much why I made it the way I made it. It's not about looks, it was about finding a quick fix and crossing it of the to-do list. But I do kind of like the look of it as well. Very earthy/forest feel about it with the texture and colours in it. Might even keep it like this and not embroider it...

Tuesday, 6 August 2013

Silk ribbon bracelet tutorial


It feels like summer is soon over so maybe I should translate my silk ribbon bracelet tutorial while there's still warm and sunny days left? This is a very simple little summer project, perfect for vacations and summer breaks as it suits all ages and skills -- and you don't (depending on the choice of button) need any tools at all to make it.

For these bracelet I've used silk ribbons with overlocked edges (= doesn't fray easily), which are sold i somewhat varying lengths. These two ribbons were about 91-94 cm. Some ribbons are shorter, maybe around 80 cm, which can be too short for a wrap bracelet. If you only find really short ribbons, you can make a normal bracelet instead.

For choice of button, se the tips at the end of the tutorial.

 *

Supplies:

1 silk ribbon with sewn edges (at least 90 cm long)
1 two-hole or shank button
optional: buttonhole thread, embroidery floss or similar

Tool (optional): sharp embroidery needle


1. For a shank button bracelet, start by pushing the ribbon end through the shank of the button. Slide it carefully to the middle of the ribbon.


2. Fold the ribbon double and tie an overhand knot. Push the knot towards the button shank while tightening it. It is important to push the knot where you want it before starting to tighten it.


3. Mark where on the ribbon you will place the next knot, which will create a loop for the button. I did this my simply wrapping the ribbon around the wrist and drawing a dot with a pencil at the edge of the button. If you find it hard to do it this way, you can instead use a tape measure wrapped around the wrist -- not too tight -- to note the desired length and then use it to mark the ribbon. 


4. Knot the ribbon, making sure it ends up more or less at the place of the mark. Make this knot as pretty as you can -- prettier than in my photo -- as this knot will be visible.


5. Measure how big a loop you need to be able to thread the button through it and mark the length on the ribbon end. Make a knot.


6. Finish by trimming any loose thread end on the ribbon edges.

*


Variation 1: 2-hole button bracelet
Many jewellery projects using buttons demand shank buttons, but for this bracelet, a two-hole button works just as well.


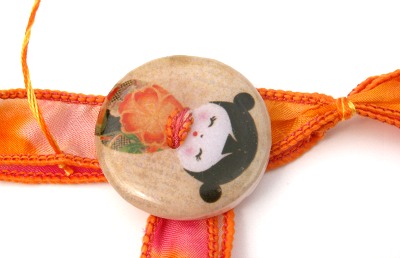
1. The easiest way to use two-hole buttons is to choose a button with big holes so you can just thread the ribbon ends through it like in the photo above.


2. Pull the ribbon tight and keep it from twisting while you do it as a twisted ribbon will look heavy and clumsy.

Are the holes too small? The easiest solution is to simple stitch the button to the ribbon. Knot the thread and start by sewing from the front of the ribbon so the knot will be hidden between the ribbon and button. Finish the same way to avoid visible knots. Tip: For the last stitch, add beads to the thread if it fits the button motif (here, it would give the kokeshi doll a bead necklace).


Variation 2: Instead of knots

If the ribbon is just barely too short for knotting or you don't want to knot the ribbon, one option is to stitch and wrap the ribbon together instead. 


1. Mark where you want to place the wrap. Choose a heavy, strong thread in a colour matching the ribbon. Thread your needle and knot the thread. Start by stitching from the edge -- from the wrong side in order to sandwich the knot between the ribbons.


2. Make small running stitches through both ribbon ends from one side to the other.


3. Gather the ribbon by pulling the thread while holding onto the ribbon.


4. Wrap the thread around the ribbon three times. Keep the wraps as tight as you can. Push the needle through the wrapped section and pull very tight.


5. Finish by fastening the thread between the ribbons by making a knot as close to the wrap as possible...


6. ...and make a couple of invisible tacking stitches in an inconspicious location and cut the thread.


7. Measure where to place the next wrap and repeat the above steps.


*

Tips
  • The choice of button is important: a heavy button will make a loose-fitting bracelet turn so the button sits on the inside of the wrist. A light-weight button and/or a tight-fitting bracelet will keep the button on the top of the bracelet where it will be more visible.
  • A large button demands a larger ribbon loop, which will give the bracelet a loose fit. Remember that when choosing buttons.
  • If you just wrap the bracelet around your wrist like in step 3 above, you will only see one half of the ribbon. If you want a somewhat wider bracelet or want to show you the whole ribbon , you can instead wrap the ribbon as in the photo below: when you've completed one wrap, split the ribbons so the will sit on either side of the button for the second wrap.This will also place the button in the middle of the bracelet.


  • If the ribbon is somewhat too long for your desired length it's easier to just let the ribbon ends be instead of trimming them down as they will fray. Let them hang free or tuck them under the ribbon when you've clasped it around your wrist (compare top photo with the one below). Works best with tight bracelets.


Monday, 29 July 2013

July bead soup palette


Well, just got a lot of cats before the weekend so this monday I'm doing things a bit differently and will just be showing this colour palette -- if you want another cat, check out the last version I made of the Julle digital doodles on my Flickr page.

You might recognize the silk cord from this post, but I think the colours look better in this photo. The beads are also a new addition -- one that made my sis wonder what was happening: something must be wrong or at least weird when I buy blue stuff. I opened the envelope and showed the beads I'd bought, most in more or less my usual colour palette (gilt lavender, black diamond, brown-lined montana, mauve, paprika etc) which perhaps made this colour stand out even more in her eyes. It was the first thing she saw and the first thing she commented. To my defence, it's a slightly violet purple so it's not such a big leap as it might seem to those who know of my disinterest -- yeah, let's call it that -- in blue.

Anyway, this month's palette turned out to be an analogue colour scheme. Just two items, but they are both variegated which add some depth and life to the mix. The silk is mainly blue with periwinkle, blue-violet and violet. The beads are in a similar blue with mauve accents. It's a simple palette, but one with a lot of colour to draw the eye towards it while at the same time being calm and serene.

For this palette I chose to use colour-lined seed beads. I really like this type for two reasons. First of all because of the interaction between the colour in the glass itself and the colour of the lining, I love seeing what happens when combining colours this way. Secondly, this bead finish combines the qualities of both transparent and opaque beads. It has the depth, shine and lightness of a transparent bead paired with the solid colour of opaque beads. If you haven't tried colour-lined beads, but want something with more opacity and impact than transparent beads, but without the "flat" appearance of opaque beads, you should give this bead type a go.


Friday, 12 July 2013

Silk ribbon bracelet tutorial


Due to circumstances (which include being bitten by a tick, which have made me slightly hypochondriac, and having had a jaw ache that's made me cranky), I haven't been able to blog much lately. However, I did get around to publishing my first summer project on my other blog: Manekis sidenarmband.

It's just a very simple bracelet project for all ages and skills. Planning on making an english version to publish on this blog too, but for the moment I'll be referring you to my other blog for instructions. There are many pics and the project is so simple that it shouldn't be hard to just follow the pictures. And then use Google Translate to try and make out the tips. Key tip, which I didn't even write: pick out the loveliest ribbon and button you cand find as it'll make all the difference!

I'm hoping my second blogiversary project will be more about bead-weaving. Or perhaps I'll do something embroidered... Well, we'll just have to see what happens.

Hope you enjoy it!

Wednesday, 10 July 2013

Space-dyed fibre addict


So I'm a bead junkie since way back by now, especially when it comes to seed bead colours -- Gotta Catch 'Em All! -- and soon I became a copper junkie (though it's more base metals in general now). Then I got back into embroidery and drooled over every conceivable embroidery thread shade and type. I'm as addicted to embroidery threads as to beads now! And more specifically, I've recently become crazy about space-dyed or variegated fibres of all sorts. Preferably hand dyed.

Don't ask me why because I often end up not using them very often or, when I do, not using them in a way that specifically shows off the space-dyed effect particularly well. But I still can't help to drool over it. Guess it's the lovely colour combos all in one thread that does it. It's an instant colour palette inspiration. Maybe it's also because these threads are less common, more unique (especially the hand-dyed ones), or because they have more depth, the blending hues making them more attractive than the usual uniformly coloured embroidery threads. And maybe can add another thing to it as well: the fun effect you can get when beading with ombré or variegated/space-dyed stringing materials, something I've written about here.

It's not a totally new addiction -- I've shown tendencies in post like Embroidery threads for Christmas and More yarn. Not to mention One offs sorted -- and why mixed skeins are a fab challenge. And it's evident in this pinboard too. Space-dyed fibres also make me talk to myself as you can see here and here. But this time I've almost outdone myself: not being able to resist a 10 % off offer, I bought more. Heavy linen thread, matte 6-ply fine cotton, 12-strand silk, viscose gimp, braided silk and even a new mixed skein (If you don't know what that is, see photo above and the One offs sorted post linked to above). Couldn't stop drooling and just have to get my fix.


(Please don't look at that pic trying to figure out how much I spent on this one order... I'm a tad embarrassed, but at the same time I'm treating myself to some yummy supplies after 10-11 months of living as frugally as possible.)
Don't know how well it shows in the photos, but I just love how matte the 6-ply cotton is. Normally I'd say linen is matte (see fifth skein from the top in the above photo), but this thin thread is even more matte, making the colours feel like chalk or powder. Love it! Only mishap was that I thought the pastel skein was going to be a bit more like silk rods and not as pastel-y as they turned out to be, but the matte finish still makes it a nice buy. And you always need a few different accent colours when embroidering, not all colourways are for big areas. It can still be very useful.

The violet and blue silk cord (third from top) was also a choice I'm very pleased with, especially now that I'm trying to work a little more with blues. It'd be better for jewellery if it was thicker (seller doesn't have any thicker silk cord of this sort), but it still works in both embroidery and jewellery making.

12-ply silk is super soft and fluffy. I've bought a skein before (as seen here) or I'd be over the moon right now, telling you how lovely and beautiful it is. It really invites you to just sit and stroke it. And being silk, it has a nice lustre and makes the colours shine -- though it's of cause not a shiny as, say, filament silk.

Should I say something about the last two threads too? There's the viscose gimp, which turned out to a little too similar to a skein I already have, but with darker maroon and red hues so it'll probably find its use too. And I had to get yet another mixed skein just because it looked so nice in the photos. To be honest, I do prefer the mix of threads in Oliver Twists (top photo) than in Stef Francis' Texture Selection, they're the better choice for the jewellery maker in my opinion, but the colours seduced me. Can you blame me?


But it does mean one thing: now I really have to get a grip and at least start working more with them, not just treat them like eye candy as usual! If nothing else I have to invent a good reason for spending so much money on this...

Anyone else likes variegated/space-dyed threads? Do you have any good tips or suggestions when it comes to working with multi-coloured fibre to share? Or are you maybe in the same stage as me, just beginning to use it?

Sunday, 30 June 2013

The seaside pendant -- an acrylic doodle


It's ages ago since I participated in a monthly challenge it feels like. This month I really wanted to get started on something and gathered info on challenges. One challenge that I instantly felt a connection to was the Art Bead Scene Blog challenge, featuring a painting by Franklin Carmichael called Jackknife Village. Living on a peninsula, always close to the sea, I really liked the landscape he conjured up on his canvas. While it doesn't really look like that around here, the image reminded me of the childhood vacations I spent in Bohuslän (google it and you'll get photos illustrating my point). It's pretty similar to the Bohus coastline. In other words, it was an image that wouldn't leave me.

Some weeks ago I felt compelled to paint a pendant with these images -- of the artwork and the childhood vacations -- in mind. I got out a 34 mm arte metal (i.e. blackened steel) pendant and started painting using white gesso that I tinted with acrylic paint. Now, the only small brushes I have are watercolour brushes as that's always been my favourite media when it comes to painting (ironically, Carmichaels painting is watercolour and I still didn't choose that myself for this project). No way I was going to ruin them with acrylic paint -- and besides, the brushes are made for heavy paints like oil and acrylics anyway. So I had to make due with some bigger craft quality brushes instead, which partially determined what style to paint in: it wasn't possible to paint any fine details so instead I opted for an impressionist style. The kind that just look like smudges of paint close up, but forms a dreamy landscape when you take a step or more back and admire it from some distance. I always did like impressionism as a teen.

It's really just a doodle, but a doodle I had a lot of fun working with. It might not be perfect, but I'm still pleased with it. While it might be hard to understand from seeing these photos, I must say it looks quite pretty in real life -- though of cause I see it through my own rose-tinted glasses right now.


So the challenge really inspired me, but unfortunately I also wanted to participate in it for real (and get a chance to win as they always have such lovely art bead prizes) and the pendant just didn't want to turn into a piece of finished jewellery (a bead strung on cord or chain doesn't qualify). So frustrating! The days went passed and I couldn't find anything useful in my stash. No blues or if I found any they were the wrong blues (pendant have a slightly lavender blue, most my blues are turquoise). Or the wrong finish: the pendant is so matte that any shiny bead detracts from the focal. The last day today and anything I did try failed. Everything conspired against me!

Wanting to at least do something with the pendant, I made this necklace which I doubt will be approved by the ABS team. But at least I did finish a project so I should feel good about myself anyway, even if I can't officially be part of the challenge this month.


The cord, by the way, is one that I've tea dyed myself. Tea dyeing might not be the best method of dyeing textiles as the tannins can weaken the fibres over the years, but it's easy and fun -- and you can experiment to get just the right hue. Like in this case: I let some cords steep longer than others which gave me range of hues to choose from when wanting to find a good match for the pendant. It looks a bit dark in the first two pics, but it really does match the cliffs in the pendant.

The necklace cord is simply made by doubling the cord, knotting a loop in one end and tying the loose ends to a metal button. Nice and simple. You just need a cord long enough, which was really just barely the case here.

Saturday, 27 April 2013

Bead Soup Blog Party 3rd Reveal


And so it's finally here, the third BSBP reveal. I signed up for BSBP again, not having joined for for a couple of rounds. Of cause that had made me very keen to participate again and I signed up -- completely forgetting that the dates could be in the middle of spring farming season. Oops! Of cause I couldn't know that the spring farming would start unusually late this year, but as luck would have it (for me), the reveal was postponed a couple of weeks so here I am, free from the potatoes and ready to show what I made with the lovely soup I got from my BSBP partner Noemi.

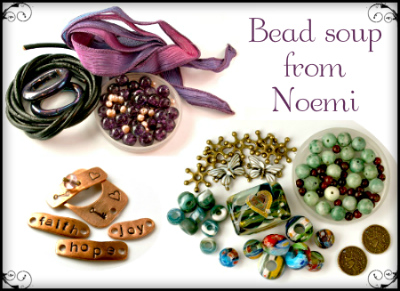
First, let's take a look on that spanish soup Noemi cooked up for me to work with.


You can read more about all the different ingredients here. It was a fab soup, but due to work, a workroom I couldn't work in (= no metalwork or techniques requiring a torch this time) and everything else that came in between, I still had my struggles with it. Mostly with getting ready in time with something I wouldn't be embarrassed to show anyone and that would make Noemi's soup justice. In the end, I ended up with four piece to show you today. Haven't yet used all the beads from the soup so there might be some "leftover posts" later.


First a quick (and hopefully enticing) sampler of what's to come below.


First up is the necklace made for the lampwork focal. I had matching fire-polished rondelles, but they were pretty tiny (as are most my beads, being used to working with dainty jewellery and seed beads) and there were only 30 of them. After going back and forth many times, I finally decided on just stringing them with dark green silk cord (in lieu of anything matching the chain) on a gunmetal chain.


Looking back at it, I should've added something to the last portion of the chain. Ran out of rondelles, but adding, say, some gunmetal beads would've looked better than just leaving it bare in the neck. Well, something to remember for next time, then.
 
And look at that wire wrapping -- you can tell I've almost only been seedbeading and embroidering these last couple or years!


For the next piece, I wanted to do something with the sweet little copper connectors and clasp, which are made by Noemi herself. Wanted to keep it simple in order not to overpower the connectors and this is what was finally settled on. Not the best chain to use -- if you want to try something similar, I'd suggest a small rolo/belcher or cable chain -- but the only one I had that matched the copper. As it was slightly boring with just the chain, I wrapped some dusky dark purple anchor embroidery floss around the links. Don't know if it made it better or worse! *lol* I do enjoy embroidery so threads and floss is something I like to add to my jewellery nowadays.

The chain was so uncooperative I almost gave up, thinking of turning the connectors into little charms with a bead dangle in one end (it would've included a maneki neko charm, sorry all catlovers who didn't get any cat jewellery here). But I persevered.


Third piece is a silk wrap bracelet. First I thought of altering the ribbon in some way, either embroidering it, smocking it or adding a beaded edge, but in the end it all came down to my wanting to try an idea. Now, I'll say right away that it's an idea that maybe looks nice, but wasn't as practical as intended.


The idea was to lose the clasp and use the rubber o-rings to tighten the ribbon ends, then tucking them under the ribbon as with other wrap bracelets. But the wrap part made it more cumbersome than practical -- next time I'll try it with a simple bracelet that doesn't wrap around the wrist several times. (Also, the focal was supposed to be black to match the o-rings, but I hadn't time to blacken it. Some of you might prefer the antique bronze colour it has now, though.)


And so, the fourth and last piece. I wanted to use those vibrantly coloured crackle beads, but couldn't think of anything fun to do with them last minute (made it yesterday). Ideally I wanted to keep them mixed with the fw pearls in the colour combo Noemi created, but some of my teal supplies kept trying to get my attention, wanting to play with the purple beads. Finally, I caved and created this simple leather necklace with beads dangling from waxed linen cord attached to the leather using lark's head knots.


That's all, folks! My creations for this year's edition of BSBP. Now be sure to visit my BSBP partner Noemi, who had this eclectic (and somewhat boringly coloured) soup to work with:


And of cause a huge thank you to Lori for hosting this great (in fabulousness and size) event once again! You're fab!

*

For a complete list of all participants in the 3rd reveal of the Bead Soup Blog Party, please visit Lori's blog here. As Lori makes her way through the blogs, she will replace the links with direct links to the reveal posts, making it easier for us who will take a long time going through all 200+ blogs in this reveal. 

You will also be able to find many of the creations from all three of the reveal on the official 7th BSBP pinboard at Pinterest.


Related Posts Plugin for WordPress, Blogger...