Monday, 12 August 2013

Instead of cat photos -- a frog


We've had some real downpours today and yesterday with recurring thunder so I've only been able to sit on the computer on and off, several times rushing to close everything down and pull out the cords as the thunder rolls in. And it's been rolling in fast these days.

Anyway, no Meowy Monday, but instead I'm showing you a pic of a little frog my sis found. Well, actually she rescued it from Uggi, who was happy to have found a new playmate/toy/prey. Cute, isn't he? The frog, I mean.

Friday, 9 August 2013

What will the cats say?


cat shadow


Apparently it was World Cat Day or International Cat Day yesterday, which I didn't know. Luckily the kitties didn't know either or they might've demanded extra treats yesterday -- though, to cats all days are World Cat Days, of cause. They are to be celebrated 365 days of the year if they get to choose.

While being real cat nuts, my sis and I don't celebrate the cats' birthdays (some aren't born at home, other we forgot the date for). When we were kids we did have a collective birthday for them on Lillen's birthday for a couple of years. Then we kind of forgot about it. It wasn't something we cared much for. But the cats always get extra treats, fancy food and (if we have kittens or playful young cats at the time) toys for christmas. They have to get something special too.


UPDATE: I completely forgot, when writing this, that we do sometimes celebrate one cat day, the national cat day called Kattens dag, which is celebrated on the first sunday of Advent (which perhaps makes it sound religious, but it doesn't really have anything to do with christianity -- if anything it's probably chosen as it's easy to remember, often being a "skyltsöndag"/julskyltning, a sunday when the shops in a town/city put up the winter decorations and are all open). Despite the name, it can be a weekend-long event (especially in pet shops as people don't shop on sundays that often).

*

I made this digital doodle today. Not related to the Cat Day or anything, I just wanted to use one of Temari09's new textures. If you want to see it full size and read more about the images I made it with, just click the pic. And yes, it's another one with the silhouette photos I took of Julle.

Wednesday, 7 August 2013

Sleeping butterflies


The other day my sis and I went up the hill to take some photos of the sunset, accompanied by Julle and with Knatti meeting up in the coppice. When we got up, we kept stumbling into a lot of sleeping butterflies. Much easier to get photos of them there than trying to chase them daytime when they flutter incessantly over the garden, never sitting down long enough for you to get any photos.


It's pretty much just white butterflies. We have a lot of them this year as they were attracted by the rapeseed blossoms on the other side of the road.


Tuesday, 6 August 2013

Silk ribbon bracelet tutorial


It feels like summer is soon over so maybe I should translate my silk ribbon bracelet tutorial while there's still warm and sunny days left? This is a very simple little summer project, perfect for vacations and summer breaks as it suits all ages and skills -- and you don't (depending on the choice of button) need any tools at all to make it.

For these bracelet I've used silk ribbons with overlocked edges (= doesn't fray easily), which are sold i somewhat varying lengths. These two ribbons were about 91-94 cm. Some ribbons are shorter, maybe around 80 cm, which can be too short for a wrap bracelet. If you only find really short ribbons, you can make a normal bracelet instead.

For choice of button, se the tips at the end of the tutorial.

 *

Supplies:

1 silk ribbon with sewn edges (at least 90 cm long)
1 two-hole or shank button
optional: buttonhole thread, embroidery floss or similar

Tool (optional): sharp embroidery needle


1. For a shank button bracelet, start by pushing the ribbon end through the shank of the button. Slide it carefully to the middle of the ribbon.


2. Fold the ribbon double and tie an overhand knot. Push the knot towards the button shank while tightening it. It is important to push the knot where you want it before starting to tighten it.


3. Mark where on the ribbon you will place the next knot, which will create a loop for the button. I did this my simply wrapping the ribbon around the wrist and drawing a dot with a pencil at the edge of the button. If you find it hard to do it this way, you can instead use a tape measure wrapped around the wrist -- not too tight -- to note the desired length and then use it to mark the ribbon. 


4. Knot the ribbon, making sure it ends up more or less at the place of the mark. Make this knot as pretty as you can -- prettier than in my photo -- as this knot will be visible.


5. Measure how big a loop you need to be able to thread the button through it and mark the length on the ribbon end. Make a knot.


6. Finish by trimming any loose thread end on the ribbon edges.

*


Variation 1: 2-hole button bracelet
Many jewellery projects using buttons demand shank buttons, but for this bracelet, a two-hole button works just as well.


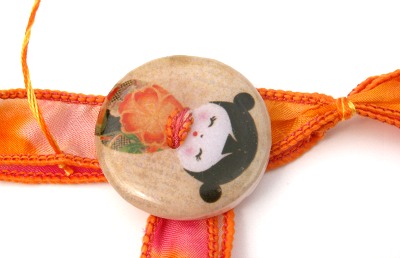
1. The easiest way to use two-hole buttons is to choose a button with big holes so you can just thread the ribbon ends through it like in the photo above.


2. Pull the ribbon tight and keep it from twisting while you do it as a twisted ribbon will look heavy and clumsy.

Are the holes too small? The easiest solution is to simple stitch the button to the ribbon. Knot the thread and start by sewing from the front of the ribbon so the knot will be hidden between the ribbon and button. Finish the same way to avoid visible knots. Tip: For the last stitch, add beads to the thread if it fits the button motif (here, it would give the kokeshi doll a bead necklace).


Variation 2: Instead of knots

If the ribbon is just barely too short for knotting or you don't want to knot the ribbon, one option is to stitch and wrap the ribbon together instead. 


1. Mark where you want to place the wrap. Choose a heavy, strong thread in a colour matching the ribbon. Thread your needle and knot the thread. Start by stitching from the edge -- from the wrong side in order to sandwich the knot between the ribbons.


2. Make small running stitches through both ribbon ends from one side to the other.


3. Gather the ribbon by pulling the thread while holding onto the ribbon.


4. Wrap the thread around the ribbon three times. Keep the wraps as tight as you can. Push the needle through the wrapped section and pull very tight.


5. Finish by fastening the thread between the ribbons by making a knot as close to the wrap as possible...


6. ...and make a couple of invisible tacking stitches in an inconspicious location and cut the thread.


7. Measure where to place the next wrap and repeat the above steps.


*

Tips
  • The choice of button is important: a heavy button will make a loose-fitting bracelet turn so the button sits on the inside of the wrist. A light-weight button and/or a tight-fitting bracelet will keep the button on the top of the bracelet where it will be more visible.
  • A large button demands a larger ribbon loop, which will give the bracelet a loose fit. Remember that when choosing buttons.
  • If you just wrap the bracelet around your wrist like in step 3 above, you will only see one half of the ribbon. If you want a somewhat wider bracelet or want to show you the whole ribbon , you can instead wrap the ribbon as in the photo below: when you've completed one wrap, split the ribbons so the will sit on either side of the button for the second wrap.This will also place the button in the middle of the bracelet.


  • If the ribbon is somewhat too long for your desired length it's easier to just let the ribbon ends be instead of trimming them down as they will fray. Let them hang free or tuck them under the ribbon when you've clasped it around your wrist (compare top photo with the one below). Works best with tight bracelets.



Monday, 5 August 2013

Meowy Monday: Cat photo of the week


It's so warm here, I really don't feel like sitting in front of the computer (or, well, not sitting in front of the computer doing anything that require brain acticity, such as editing cat photos), but I do have one cat photo for you today. One that I wanted to make something with as the background was boring, but the result is pretty so-so. It's still a photo I like as it's not often I get "Jinna" and "Ninna", daughter and mother, in the same pic.

Saturday, 3 August 2013

Challenges accepted -- and troubling me...


Ok, so sometimes I sign up for things without thinking. It sounds fun, I want in. I rarely keep in mind that these challenges often equal blog hops, which means that not only am I to produce something on a theme in time for a deadline and blog about it (hard enough when I've felt drained of creativity and energy), but I also have to make time to visit other participants and comment on their creations. And this time I've managed to sign up for three challenges with reveal dates 31 aug, 18 sept and 28 sept. (1 sept is, by the way, the date I'll resume blogging daily on my other blog again.)

First up is the 2nd Annual Challenge of Travel, hosted by Erin of Treasures Found, which has You Are Here as the theme this time. You can still sign up for this challenge here.


The second challenge, which I signed up for first, is the Creating with Cabochons Challenge by Sally of The Studio Sublime. Sign ups are closed so if you really, really wanted to participate you'll have to cross your fingers and ask the hostess if you can sign up late.


And last but not least I had to sign up for another Sequintastic September blog hop, hosted by Sarah of Saturday Sequins. You still have ample of time to sign up for this one, aug 24 being the last day I think.


Now, I have some ideas for the cabochon challenge and with the travel challenge, which will be revealed in three weeks, I've thought about some things I want to incorporate, but have no real ideas for the jewellery or accessory I want to reveal. As for the sequin hop, it was such a recent and spontaneous sign up that I haven't even begun to think about it at all. If nothing else it's better to focus on the earliest reveal first.

Right now looking at the three commitments, I just feel like my mind is blank, really. I hope to have something fun and inspiring to show on the reveal dates, but most of all I hope, hope I won't feel all overwhelmed by all the blog hopping (which is sadly the reason I'm hesitating to sign up for e.g. BSBPs in the future, even though I love the great gettogether that it is, the international swapping/gifting and the huge amoung of inspirational creations you get to see).

Thursday, 1 August 2013

Piggies in a circle


As I mentioned in my previous blog post, I was going to bead a sample with the "herringbone-ish" stitch in a circle. Well, I did have enough beads after ripping up the piggy bead samples to do it and this is the result. Above is a close-up and below is something a bit closer to the natural scale (it's about 31 mm wide).


The seeds used are 8/0 and then the rest is just piggy beads, stitch the same way as in the straight sample (see below) and then joined up. Did learn one thing though: if you want to stabilize the inner ring by going through the centre holes a round or two, you have to do that with a separate thread before joining the circle together or it'll be too tight for the needle. Because it needs stabilizing. Perhaps using double thread or a heavier thread (I don't want to say Fireline...) and/or tighten the thread tension even more, but I think just running the thread through all the inner beads once or twice will do a lot.


Guess the next step from here will be to try a few variations with other bead shapes either in the outer or the inner circle. But that'll have to wait as I'm reluctant to rip up this sample. In fact, this one's no longer a sample but a component I just have to figure out what I want to do with. A pendant? A brooch? An objet d'art? Perhaps it's even a big-hole beaded bead?

Related Posts Plugin for WordPress, Blogger...