

It feels like summer is soon over so maybe I should translate my silk ribbon bracelet tutorial while there's still warm and sunny days left? This is a very simple little summer project, perfect for vacations and summer breaks as it suits all ages and skills -- and you don't (depending on the choice of button) need any tools at all to make it.
For these bracelet I've used silk ribbons with overlocked edges (= doesn't fray easily), which are sold i somewhat varying lengths. These two ribbons were about 91-94 cm. Some ribbons are shorter, maybe around 80 cm, which can be too short for a wrap bracelet. If you only find really short ribbons, you can make a normal bracelet instead.
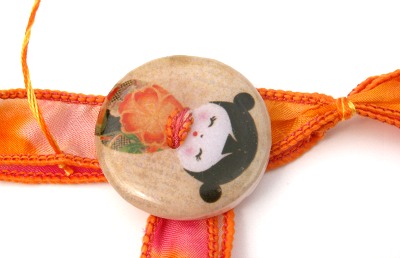
For choice of button, se the tips at the end of the tutorial.
*
Supplies:
1 silk ribbon with sewn edges (at least 90 cm long)
1 two-hole or shank button
optional: buttonhole thread, embroidery floss or similar
Tool (optional): sharp embroidery needle

1. For a shank button bracelet, start by pushing the ribbon end through the shank of the button. Slide it carefully to the middle of the ribbon.

2. Fold the ribbon double and tie an overhand knot. Push the knot towards the button shank while tightening it. It is important to push the knot where you want it before starting to tighten it.

3. Mark where on the ribbon you will place the next knot, which will create a loop for the button. I did this my simply wrapping the ribbon around the wrist and drawing a dot with a pencil at the edge of the button. If you find it hard to do it this way, you can instead use a tape measure wrapped around the wrist -- not too tight -- to note the desired length and then use it to mark the ribbon.

4. Knot the ribbon, making sure it ends up more or less at the place of the mark. Make this knot as pretty as you can -- prettier than in my photo -- as this knot will be visible.

5. Measure how big a loop you need to be able to thread the button through it and mark the length on the ribbon end. Make a knot.

6. Finish by trimming any loose thread end on the ribbon edges.
*
Variation 1: 2-hole button bracelet
Many jewellery projects using buttons demand shank buttons, but for this bracelet, a two-hole button works just as well.

1. The easiest way to use two-hole buttons is to choose a button with big holes so you can just thread the ribbon ends through it like in the photo above.

2. Pull the ribbon tight and keep it from twisting while you do it as a twisted ribbon will look heavy and clumsy.
Are the holes too small? The easiest solution is to simple stitch the button to the ribbon. Knot the thread and start by sewing from the front of the ribbon so the knot will be hidden between the ribbon and button. Finish the same way to avoid visible knots. Tip: For the last stitch, add beads to the thread if it fits the button motif (here, it would give the kokeshi doll a bead necklace).
Variation 2: Instead of knots
If the ribbon is just barely too short for knotting or you don't want to knot the ribbon, one option is to stitch and wrap the ribbon together instead.

1. Mark where you want to place the wrap. Choose a heavy, strong thread in a colour matching the ribbon. Thread your needle and knot the thread. Start by stitching from the edge -- from the wrong side in order to sandwich the knot between the ribbons.

2. Make small running stitches through both ribbon ends from one side to the other.

3. Gather the ribbon by pulling the thread while holding onto the ribbon.

4. Wrap the thread around the ribbon three times. Keep the wraps as tight as you can. Push the needle through the wrapped section and pull very tight.

5. Finish by fastening the thread between the ribbons by making a knot as close to the wrap as possible...

6. ...and make a couple of invisible tacking stitches in an inconspicious location and cut the thread.
7. Measure where to place the next wrap and repeat the above steps.
*
Tips
- The choice of button is important: a heavy button will make a loose-fitting bracelet turn so the button sits on the inside of the wrist. A light-weight button and/or a tight-fitting bracelet will keep the button on the top of the bracelet where it will be more visible.
- A large button demands a larger ribbon loop, which will give the bracelet a loose fit. Remember that when choosing buttons.
- If you just wrap the bracelet around your wrist like in step 3 above, you will only see one half of the ribbon. If you want a somewhat wider bracelet or want to show you the whole ribbon , you can instead wrap the ribbon as in the photo below: when you've completed one wrap, split the ribbons so the will sit on either side of the button for the second wrap.This will also place the button in the middle of the bracelet.

- If the ribbon is somewhat too long for your desired length it's easier to just let the ribbon ends be instead of trimming them down as they will fray. Let them hang free or tuck them under the ribbon when you've clasped it around your wrist (compare top photo with the one below). Works best with tight bracelets.

Nice tutorial with clear instructions. A pretty way to showcase those special buttons. Anna
ReplyDeleteThis really is a lovely tutorial thank you for sharing, can you give some ideas of where to buy this type of ribbon in the UK so far I only seam to be getting Etsy results in USA.
ReplyDeleteThanks again they really are beautiful :o)
Thank you, I'm glad you like it! The ribbon in the tutorial is handmade by an american silk painter, Quintessence Silk Art, who only sells through her Etsy store. But there are other similar ribbons if you don't want to shop from the US, though most of the silk ribbons you find are a thinner crepe (this is habotai silk). Beads Direct have both multi-coloured crepe ribbons and smoother ribbons, but the latter are pretty plain (brown, beige and taupe). Afraid ribbon is something I very, very rarely buy from the UK so I don't know any shops just on the top of my head. Have seen sari silk ribbon in a few places, but that's a rather different type of ribbon, same thing with Liberty cotton bias tape/ribbon. Easier to find silk ribbon for ribbon embroidery, but those are usually too delicate for jewellery. So I'm afraid I can't be of that much help to you.
DeleteIf you feel like doing things from scratch, there are some different tutes on how to make and paint your own silk ribbons online. Like this one. ;-)
Awesome tutorial. Easy clear instructions.
ReplyDeleteThat ribbon is gorgeous! I've only used sari ribbon so far in my designs but this type of ribbon looks amazing. I think it produces a much smoother, "elegant" result.
Thank you so much! I'm glad to hear you enjoyed it.
DeleteAbout the ribbons (from Quintessence on Etsy), the "speckled" ones, like the blue one here, are probably my favourite silk ribbons in my stash. For some designs sari ribbons are great, for other designs more "clean cut" ribbons look best. As a comparison, you can find a similar bracelet made from ripped silk (like sari silk) in this post: http://wildrosesandblackberries.blogspot.se/2012/03/reveal.html