

Not all patinas turn out the way you like it. Some will turn out different, but good, or perhaps even different and great. Others will turn out different and disappointing.
The heart above is a plated stamping, silver ox or something like that. Those stampings are usually lacquered to protect the antiquing and keep the plating from tarnishing. I don't always bother with such details as seeing if there is lacquer and if so remove it before trying to patinate a piece. That was the case with this iris heart. I just chucked it into the baker's ammonia and spirit vinegar (ättika 24 %) sawdust and checked in on the progress from day to day.
This piece have been removed from the sawdust and rinsed in water several times, which is one of the reasons it doesn't have a crusty or cobalt patina. Today when I took it out and let it dry, I also brushed it vigourously with an old tooth brush, removing some of the blue dust of the patina. The result almost looks like an old/antique, not very wellmade, paintjob.
Not sure what I'll do with it. Keep it like this or try to enhance the motif a bit in one way or another (adding LOS? polish the relief? gesso in recesses?). I'll have to think about it for a while longer.
.JPG)
This is a Vintaj brass tag I put in the vinegar-and-tea leaves jar. Originally I had attached an image transfer to the surface (Nunn Design image transfer sheets), but forgot to check that the lacquer was compatible with the plastic film. It wasn't -- I watched in horror as the beautiful butterfly image dissolved in front of me! So it's just been laying around, looking like a ruined mess. Adding some verdigris couldn't make it worse so that's what I did.
Above is a pic of the back (also lacquered) and below is the front with the ruined image transfer.
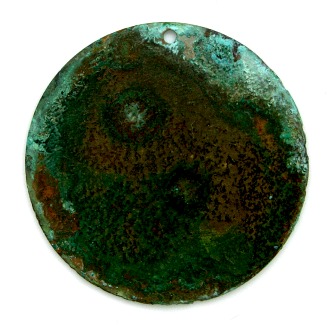
Finally, another piece I put in the ammonia jar:

Not exactly sure what the material is. It looks very much like pewter, probably lacquered but it doesn't really look plated as it was darker than most silver and white plates. At first it looked like the patina hadn't had the slightest effect on the charm, but once I took it out, I saw that the patina solution had darkened the metal significantly. (The reason one edge is lighter is that it protuded out of the sawdust so it wasn't fully buried as the rest of it.)
This is the back of the charm. The front is so fugly it doesn't feel work showing. In fact it was the "fugliness" of it that made me sacrifice it for the patina experiment in the first place.
~*~
Do all these patinas last? No, unfortunately not. Even if lacquered, some of my samples in this blog have altered in appearance already after a few weeks. Maybe they needed heavier layers of the sealant, maybe I needed a better sealant, maybe the pieces should've been rinsed and/or neutralised better before sealing. The patina tutorials and recipes don't always discuss such details.
You need to make sure you stop the process you started as best you can or at least slow it down as much as possible. But it just isn't always enough to completely stop it -- and sealants often alter the patinas one way or another (a common problem is that matte sealants dull heat patina colours or alter the hue). I've also had problems with some lacquers that have seemed to "boost" the patinas before drying. It's all about experimentation at this stage.
I always enjoy seeing results from other artists. Thanks for sharing.
ReplyDelete